
I have already approached the Position of the light (here) so this would be another great feature to use on you next photos.
I read the Strobist article on Position|Distance 4 or 5 times before attempting this one and even then I could not figure out how come the background would change if I would move the light forward and backward from the subject position.
I decided that was time to make some setup shots of the process and explain it step by step. This way I will do the exercise and make it register for future reference. For sure there are a lot of you out there with the same issues.
I used, as reference, on this project:
- ISO 100
- Tv 200 (as sync speed for my flash)
- Gadget Infinity Remote triggers
- 580Ex as flash gun
- 24-70 L USM
- 1D MarkIIn
- Subject on a table and distance to background ~2m
I started first by putting the flash at middle position between the subject and the camera (more or less 3m and turn it in at 1/8 (just to evaluate what kind of aperture I can use).
After 2 or 3 quick shots I get the subject well exposed at Av 13.

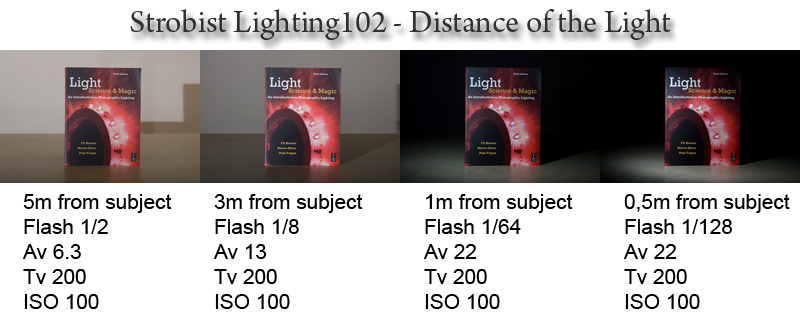
Here is the setup shop with the flash at the ~3m distance from the subject.
And the result:

You can see that the background has some light, you can notice the shadow on the wall and table at the right side produced by the flash (this is not something that any client would love to see but this is for illustration purpose only ;) do not mind about the imperfections but take a look at the results).
Next I decided that, since the subject is well exposed at Av 13 at middle of the field, then what would happened if I moved the light way back to the corner in my living room?
So I moved the 580Ex back at ~5m and made this setup shot.

As you can see almost all the room was illuminated by the small light and look at the book, it also cached a broader area of light as you can see, a soft light hitting him as well as a harsh shadow on the wall.
After moving the light this far then my monkey scratch come into my head...
If I move the flash light far then I will have to get more power from it in order to reach it's destination (the book) as well as that I needed to open my aperture in order to maintain the subject properly exposed.
Here is the result:

What I did was move the 580Ex to ~5m, gave it more power dialing it up to 1/2 and opened up the Aperture to 6.3.
You can notice a big change on the background, just by opening the aperture on the camera I now have more light on the background and my subject stays well exposed.
You should try this because you'll never know when will you need (on your assignments) to change your background into a lighter or darker one.
Next comes the best part.
I moved the light a little closer to the subject at about ~1m from the it.
Here is the setup shot:

I changed the flash power to 1/64 and closed the Aperture to 22 (since the flash was too close to the subject) in order to get a well exposed photo.
Look at the result...

But this is not all.
I decided to move, again, the light REALLY CLOSE to the subject at ~0,50 m to see what could change dramatically in the picture. The setup photo of the close up.

And the final image is this one. It was made at 1/128 power flash and the Aperture 22 maintained. Since the flash was too close to subject it did not need to change the aperture but yes you need to turn down the power of the flash.

On these last two pictures even with the same aperture and just by moving the flash towards the subject you can see the difference on the background. The halo produced on the table is also much more pleasing.
I compiled on Photoshop the all sequence with the distances and Apertures in case you need some guides for your tries, but please do not use them as a fixed thing since you never have the exact measures of the light position unless you would like to carry with you, all the time, a ruller.
I realize by doing this simple and easy test shoot that if you keep your subject well exposed all the time the background will change by simply opening or closing the aperture on your camera.

If you need a bigger image click here.
The setup shots may not be well exposed since they were only to show you what was the position of the light and how it will affect the subject (I think I accomplish that).
Hope that you enjoyed this simple, but very useful, test and apply it to your situations and assignments.
As my friend David says:
"Here is what you need to know about the inverse square law:
The closer you are to the light source, the more powerful the light.
Get real close and it gets really powerful. Get far away, and it gets weaker.
And here's the other thing:
The closer you get to the light source, the quicker the lighting values change as you move in.
When you get farther away, small differences in distance (from the light) become meaningless."
So... Keep in mind:
1) Light Placed Closer = more powerful + control of the depth of the correct exposure.
2) Light Placed Further = less powerful + a broader zone of even light exposure.
Until then... keep shooting great images.
2 comments:
Thanks this helps it all click. One point you might mention to other views is to have a far distance between your background and subject or the results won't be the same.
i have a vivitar 285hv.it doesn't have 1/64 power,how can i achieve this kind of effect? markmaguz
Post a Comment