Showing posts with label Filters. Show all posts

LRB Graduated Filter Presets for Lightroom 2.0 by Sean McCormack


Today let's talk about some cool plugins for Adobe Lightroom 2.

My mate Sean McCormack is a wonderful guy and fellow photographer. In case you haven't notice Sean has been creating awesome galleries and slideshows modules for Lightroom since 2006 at Lightroom-blog.

With the introduction of Adobe Lightroom version 2 adobe has made available some tools that cause some great impressions over photographers and their workflow one of them was the Graduated Filter tool.

So Sean decided to create a very affordable set of presets with over 70 Graduated Filter (just €5.00, about $7.75) and simply called them LRB Graduated Filter Presets for Lightroom :)

Sean sent me the presets a couple of weeks but I can confess you that time and availability was against me for testing them and write this article... but now that I have test them I just want to say one thing AWESOME!!!!!

I could not leave you guys wondering where to get your Graduated Filter elsewhere except buying the Sean McCormack one's or take time to create your own, but after you buy them you can always change them to your taste and then create your own based on Sean initials.

With no more delays let's look at what he have to say about them and what you will find in the sent package.

"While I provide a lot of free tips, tutorials, and even galleries to users, sometimes I do a little that requires some return on my time.
To aid users in selecting the right look for their landscape images, I've created a set of over 70 Graduated Filter presets to get you started with making creative choices for your images. Covering both landscape and portrait orienations, as well as hard and soft line filters, these filters come in 3 standard colours: ND (Grey), Blue and Tobacco. As is also standard, they come in strengths of 1 stop (0.3), 2 stops (0.6) and 3 stops (0.9). It was a bit of work to create this, but I'm not charging a whole lot for them, just €5.00 (about $7.75). Obviously you can tweak the settings once applied. In fact I positively encourage it!

Why should you pay for these, when you could create them yourself? Well the fact that it takes a bunch of time to put them together is the best reason. Probably more than €5 of your time. Also by running down through the Presets panel on the left of Develop, you can preview them quickly to see how they look with your image. Much quicker than mucking around with sliders.

You can see some of the presets in sample form here: Download Sample Grads

To install these presets, drop the Sample Grads folder into:

User/Library/Application Support/Adobe/Lightroom/Develop Presets
on OS X,
C:\Documents and Settings\User\Application Data\Adobe\Lightroom\Develop Presets on XP-Note that Application Data is a hidden folder,
C:\Users\User\AppData\Roaming\Adobe\Lightroom\Develop Presets on Vista,
where User is your login name.
Or you can click on Preferences>Presets>Show Lightroom Presets Folders to open this folder in Finder/Explorer. Then open the Develop Presets folder from there.

The full version folder contains 4 Sub folders, place these folders in the Develop Preset location mentioned above.
You can also Right click on a preset or folder and import them from within Develop, which is fine for a small amount of presets, but for folders, manually placing them and restarting Lightroom is quicker.

The 4 folders are:
Grads: Hard-Landscape
Grads: Hard-Portrait
Grads: Soft-Landscape
Grads: Soft-Portrait

Hard Grads have a tight transition, which Soft Grads user a wider transition. Landscape and Portrait Grads need to be separate as they don't rotate. The 3 colors (ND, Blue and Tobacco) come in 1, 2, and 3 stops varieties, equivalent to 0.3, 0.6 and 0.9 in standard filter terminology. Also as most Landscape photographers use the Rule of Thirds to compose, each type is set on the bottom and top third, allowing you to choose the nearest one quickly. To change the filter, click on the pin to select it (Press M to activate Grad Filter in Develop, if it's not open). Drag the pin to move the center of the grad, and the outside lines to make it softer or harder. Finally click the color chip to change the tint. The Blue and Tobacco colors I've chosen are simply ones I like. You may prefer a redder Tobacco, or different blue. Actually then ones I have look similar to the Cokin set I own, so I was trying to get close to them.


To Download, add them to the cart. Payment is Paypal via E-junkie, but can also take Credit Card. Once Paypal sends notification, an email will be sent with a download code.
Windows user that experience security issues related to downloaded Zip files should try an alternate decompressor such as 7-Zip.

Update: On the advice of Richard Earney, I've rezipped with BetterZip to remove Mac related components. Please let me know it you're still experiencing trouble after redownloading. Also rather than clicking on the link in the email, copy and paste it into your web browser. This works fine for me using XP under boot camp.

Update #2: I've found one of the presets had an incorrect value which has been fixed and the packages reloaded. Please download again. Apologies. I did check them before I posted, but somehow missed one.

Update #3: A few people commented the Portrait grads were upside down. Well, they're not.. They just shoot upside down! Seriously though you should turn the camera so you shoot with the shutter button up. It makes the camera more stable. Anyway for those that shoot upside-down, I added another 36 presets, duplicating the normal ones, but upside down. In fact they probably got more love!

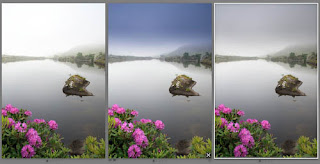
A look at the sets (Click for Bigger version):

Here's roughly how they look, first the hard set, then the soft."


Please note that VAT is charged in the EU.

THANK YOU Sean for taking the time to create this beautiful presets and have them available so cheap.

You can also follow Him and his fabulous Lightroom work at Lightroom-blog or visit his home page for photography business here.

DIY: Lee Filters Flash Adapter

Last night I was inspired and decided to put together an idea that been bugging me since the day I received my 4 Lee Filter sample packs from Musikhaus Thomann.

I had already made a filter adapter for the Canon flashes but then when I received the Lee filters sample package I wonder how could I use the package on the field without having to put some Tape or Velcro on them prior to the assignment.

Since I always carry the all package containing the 287 small sample colored filters with me and sometimes only on the field I decide which one's to choose, or none, it started to be very difficult to have them all with tape and Velcro (like the CTO and Green one's I already have made).

In general I think this is one of the accessories, if you use the filters too much, that you cannot live without it in you bag or pocket or wallet.

Soon I realize that I needed something that I could call adapter and could be all time (or not) attached to the flash, it must be weightless and above all portable since I carry already too much weight and gear to some assignments.

This is a simple thing you can do since all the material used costs almost nothing, as you will see, and it's a very small portable thing you can even put it together with the filter package.

If you follow the last example of the Black Straws Snoot then you are half way there ;)

As always, I start with the Setup shot so you can see how the all pictures in these series were made.

Lee Filters Flash Adapter_001

I use for this ISO 100, Tv 200, Av 8.0 and a silver umbrella to the left of the camera as you will notice on some of the shots.

Here is a picture of the stuff we are going to need to accomplish this project.

Lee Filters Flash Adapter_002

- Cereal or other card box package
- Scissors
- Ruler (this time I covered the ads on the ruler)
- Glue
- Lee filter sample pack
- Kitchen knife or snap-off blade knife
- Carving board (so you won't cut the table out)

After you gather all the things you are ready to start.

I unfolded the cereal card box and draw on one of it borders (the more straightened side) the measures of my Canon 580Ex.

For Canon 580Ex 1cm, 4cm, 7cm, 4cm, 7cm and 2cm tall is enough.
For Nikon SB26 1cm, 4,5cm, 7cm, 4,5cm, 7cm and 2cm tall.

Lee Filters Flash Adapter_003

Lets use the scissors to cut it out from the card box, this is a simple process and do not require master degree on engineering :)

Lee Filters Flash Adapter_004

Picture after cutting it out from the card box. But this is not all...

Lee Filters Flash Adapter_005

Next we use the ruler to help bend the parts we need. We really do not need the ruler since the card box is not so thick but I used it anyway since it will help get them straight.

Lee Filters Flash Adapter_006

After you have to choose the distance you want the filter to be from the edge of the box to the inside part. As you can see I'm pointing with my index finger to where you should make the draw. I made it 0,5cm from the edge and draw a line from one side to the other on the 4cm sizes. (I've done this since if you put it too much on the edge it will not be strong enough and resistant to hold the small gel).

Lee Filters Flash Adapter_007

You use the sharp knife to make a hole in there, be careful to not cut yourself and do not make a very large hole so the filter won't be loosen. Just cut it straight from one side to the other on the 4 cm parts.

Afterwards test it with one of the Lee filters to see if it passes through the hole on both sides without too much afford and before you glue the adapter together.

Lee Filters Flash Adapter_008

Now apply some glue on the 1cm part to glue the adapter box together.

Lee Filters Flash Adapter_009

After the glue dries (2 or 3 minutes depending on the glue) put one of the filters in. First you pass it through one hole and then enter on the next one... this is a simple procedure.

Lee Filters Flash Adapter_010

Here is the final shot after putting the gel through the both holes. NICE!!!

Lee Filters Flash Adapter_011

This is what it looks like when you mount it on the flash.

Remember that this is not intend to be a snoot... you need the filter to stay out of the box the maximum you can drill the hole (for me was the 0,5 cm)in the card box end because what we want is a filter adapter and not a snoot. Hey, this came into my mind right now!!! maybe you can use this, later on, to make a snoot with color ;)

Lee Filters Flash Adapter_012

I changed it to red so you can see the effect it produces. Here it is... Isn't this a COOL and NICE idea ?!!!

Lee Filters Flash Adapter_013

Follow me on this: "I do not believe pigs can fly unless I can see one", so that's why I put here a photo of the result.

Don't mind about the small hole on the small filter since, as you can see on this shot, it has no effect whatsoever on the final filter color. When you put the filter on try to minimize the hole by pushing it to the other side.

Lee Filters Flash Adapter_014

Now, another thing, I wanted the adapter to be was small and portable... Just look at this!!! you can fold it and put it in your pocket or near the rest of the gels. You can even drill a small hole in it and attach it to the rest of the pack.

Lee Filters Flash Adapter_015

Another shot to show you how small this adapter really is.

This is a good portable adapter since it takes only 5 minutes to assemble and if you loose one or smash it then you can make another one from another box in no time.

I did not make any tape finishing since it would make difficult for the filters to enter on the holes because of the tape's glue but you can always put some tape on the top and bottom or leave it like this... who will bug you by having this adapter on your flash??

Lee Filters Flash Adapter_016

I hope you enjoy another useful DIY for your daily work.

I also think this adapter could come up very handy since, as I said before, you can carry it around and change filters on the fly... you can even have two or 3 of them, with a hole drilled near the flash size attach, and carry them with your gels pack.

Imagine in 2 seconds you could change the flash color just by putting another adapter or changing the filter color on location.

Before I did this I use, like so many of you out there, the gels with Velcro on each of the tips. I have also a collection of them hanging on my bag and with different sizes because of flash size with this I only need to have 1 adapter for the 580EX and another for my 2 SB26.

I can carry now the complete Lee gels pack without loosing too much space on my bag and when, for some reason, I need the purple or exotic color I can easily get it without having to glue anything to it or turning the idea down just because I do not have it set.

Make one of these yourself and enjoy flash colors ;)

Until next time keep on making good photos.

DIY: 580EX and 580EXII Color Gels Printing Diagram

580Ex DIY:Color Gels Printing Diagram

Starting out today I will make a full post of the diagram and conception for the gels and how to attach them to your Canon 580EX and now for the 580EXII flash.


There are several ways you can do this and here is another.

You can get this printing pdf diagram for the 580Ex here and for the 580ExII (New) here.

With this print you then can cut your color gels as illustrated on the next DIY color gels next shots.

580Ex & 580ExII DIY:Color Gels_01


After you print the diagram onto some paper then it's time to match it with the color gel as you can see in the picture.


580Ex & 580ExII DIY:Color Gels_02


Cut it with a nice scissors :)


580Ex & 580ExII DIY:Color Gels_03


With the help of the ruler fold the upper part of the diagram with the gel underneath it. You can use a ruler behind to force it a little.


580Ex & 580ExII DIY:Color Gels_04


There you go. Now you got the gel shaped and ready to put into the 580EX or 580EXII.


580Ex & 580ExII DIY:Color Gels_05


Final product shot.
You can use different colors if you like ;)


---

P.S. - I also have another version that I have attached them, to the flash, with some Velcro... I leave it up to you on what will suit you best and more be more practical.

If you have any assembly shots for the Nikon let me know so I can link to them.

Stay tuned for more stuff.

P.S. - A BIG Thank you to Thomas Reufer that mention it first at dforum.net