Showing posts with label Nikon. Show all posts

Camera Raw 5.4 RC Available on Adobe Labs


Adobe has recently released a Release Candidate for their new Camera Raw.

As always this brings a lot of new cameras to the set and if you are using the Hasselblad series or the new Nikon D5000 this is a major for you.

Although this is only a Release Candidate but is very functional and the Hasselblad possibilities just rocks.

Check the ful article for the full list of new supported cameras.

The Camera Raw 5.4 Release Candidate is now available on Adobe Labs. The release includes new camera support for the following models:

* Canon EOS 500D (EOS Rebel T1i)
* Epson R-D1x
* Hasselblad CF-22
* Hasselblad CF-22MS
* Hasselblad CF-39
* Hasselblad CF-39MS
* Hasselblad CFH-22
* Hasselblad CFH-39
* Hasselblad CFV503
* Hasselblad CWD
* Hasselblad H2D-22
* Hasselblad H2D-39
* Hasselblad H3D-22
* Hasselblad H3D-31
* Hasselblad H3D-39
* Hasselblad H3DII-22
* Hasselblad H3DII-31
* Hasselblad H3DII-39
* Hasselblad H3DII-39MS
* Hasselblad H3DII-50
* Kodak EasyShare Z980
* Nikon D5000
* Olympus E-450
* Olympus E-620
* Panasonic Lumix DMC-GH1
* Sigma DP2

This release also includes new DNG Compatibility conversion options. These choices are explained on the Adobe Labs web site and help address the additional options available with an upcoming revision of the DNG Specification.

If you have feedback on this release please post a descriptive topic on the Adobe User to User forums.
Comparing Video Cameras

I found this Incredible video where Scott Lynch, Steve Weiss,Jens Bogehegn and Joseph Stunzi exchange some impressions and test out some of the video cameras on the market and make a great video review about them.

You can see the resulting videos from cameras like the Canon 5D MarkII, Nikon D90, Red One, Film camera, HPX3000 and others.

This is a 10 minute video you shouldn't miss if you are a video fan or a photographer looking for the best field video device.


Zacuto's Great Camera Shootout '08 from Steve Weiss, Zacuto USA on Vimeo.

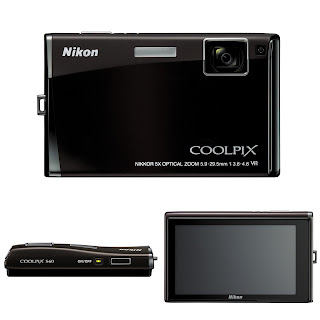
Touch Screen on Cameras


Well, I hate to tell you that buttons are things from the past. It seems that Nikon is taking a step forward in this direction.

With their new Nikon Coolpix S60 everything comes with a finger screen touch.

Now let's hope this would be implemented on the new DSLR so they can come up with a coffee maker model ;)

Take a look at the video after the jump...


Nikon with Pocket Wizards Inside

Today while driving through the Pocket Wizard web page I stumble with this excellent news for Pocket Wizard and Nikon users.

It seems that they can mount an Internal Radio Transceiver just like the ones we are using today on the hot shoe mount.

Take a look at the full Press Release after the jump...

Press Release from Pocket Wizard (you can find the original post here at their page):

"Taking the ultimate step forward, PocketWizard is now offering the first built-in digital radio Transceiver in a digital SLR camera. The newest generation PocketWizard takes the shape of a wafer-thin electronic computer circuit board, that interfaces with existing technology found in the Nikon® D-Series Digital SLR cameras. This built-in PocketWizard Transceiver offers the same advantages as the external units without the need for pre-triggered motor drive cables, batteries or PC cords and it leaves the camera's hot shoe available for other accessories such as an on-camera flash.

Installation of the PocketWizard inside the Nikon D-Series cameras is available from Mamiya America Corporation in the U.S. as an after market modification to current owners of Nikon's D1, D1H and D1X series of digital SLR cameras.

The PocketWizard technology inside modification is fully compatible with all current and previously released PocketWizard Digital Radio Triggering Systems. Offering 32 channels plus "Multi-Zone Triggering", this modification also features auto-channel detection. Setting the radio channel on the Nikon® D-Series camera is as easy as holding the camera's flash key down and turning the jog wheel, until the flash or camera fires.

Since the PocketWizard chip inside is a Transceiver, it can send or receive digital radio signals independently or simultaneously. That means you can trigger your camera remotely and your camera will trigger your flash units remotely, all at the same time, wirelessly up to 1000 feet away.

The PocketWizard inside also offers features such as Pre-Triggering release circuitry that keeps the camera from going into sleep mode, SpeedCycler mode enabling rapid switching from one flash unit (or Zone) to another.

Relay Trigger sequencing, offering the photographer the ability to trigger a camera wirelessly and the camera, in turn, triggers electronic flash units wirelessly. The PocketWizard inside accepts the trigger signals from other PocketWizard radios, (such as the PocketWizard Classic, Plus, MAX, MultiMAX or also a Sekonic radio- ready exposure meter).

An external antenna that screws into the Nikon's PC socket is the only indication that PocketWizard technology is inside. Once the antenna is removed the PC socket automatically switches back to a standard PC terminal. With a triggering range estimated at 1000 feet or more and total compatibility with all PocketWizard Inside or PocketWizard Ready professional photographic equipment, the Nikon's D-Series cameras with PocketWizard technology inside is the perfect addition to the "Digital Wireless Freedom" system.

Future photographers won't know the limits of a wired world, why should you?

Features include:

* Wireless auto-detection - Channel ID setting
* Transceiver Technology - Transmit, Receive or do both at the same time, all in one radio
* 32 selectable channels - Allows multiple users to work together without interference
* Multi-Zone Triggering - Selectively control which camera(s) or flash(es) triggers remotely
* Pre-Triggering release - Prevents a remote camera from going into sleep or standby mode
* SpeedCycler mode - Allow sequential triggering of cameras or flash units
* Relay mode - Offers simultaneous triggering of a camera and flash units remotely
* Removable external antenna - Retains standard PC socket function
* 1000 foot operating range - Offers reliable remote operation at great distances.

PocketWizard inside Nikon D-Series Specifications:


Range: 1000 feet +
Frequency: 344mhz (Standard Triggering channels 1 thru 16)
346.5 - 354 MHz (Quad-Triggering 17 thru 32)
Code: Complex 16/24-bit digitally coded signals
Channels: 32 digitally coded Channels
16 original PocketWizard classic Channels
16 PocketWizard Quad-Triggering Channels
Synch Speed: Up to 1/400 (focal plane)
Power: Uses the Nikon camera body's power source
Weight: Internal wafer board adds only 0.16 oz. to the camera

Note: PocketWizard Digital Radio Triggering systems may be used only in countries where a permit for the control frequency has been issued by the government office in charge.
Specifications are subject to change without notice.


PocketWizard Inside Nikon D-Series [Instructions & Warranty]

MODIFICATION PROCEDURE: When requesting a Nikon D1, D1X or D1H digital SLR to be modified with a PocketWizard inside, the PocketWizard Inside Modification order form (link to Order Form) must accompany the camera. The camera must be in good working order before MAC can perform the modification. If the camera is not received in good working order it will be returned. Once the modification is completed, the camera will be shipped back to the sender.

MODIFICATION TURN-AROUND TIME: MAC's service department receives the camera, providing that all components are available, the standard turn-around time is 48 hours. If you require a faster turn-around, special arrangements can be made (additional charges apply) including overnight shipping and drop-ship procedures.

WARRANTY COVERAGE: MAC will warranty the PocketWizard inside modification
and Nikon will continue to warranty the Nikon camera. This means that if a require service with for your Nikon radio-ready camera, you must first send the camera to MAC's service department. MAC will remove the radio board and send the camera to Nikon USA for servicing. If the problem is with the camera, Nikon will honor the warranty. If the problem is with the PocketWizard, then MAC will honor the warranty."

I Just hope this feature soon will be available for Canon 1D series soon :)

DIY: Snoots with Color (Part 1)

Snoots with Colors (Part 1)_01Welcome back to another DIY.

I know that you already missing some DIY here so here goes a great one.

I grabbed David Hobby last year's idea for building a cereal card box snoot at his Strobist blog and decided to take it a step forward towards coloring them.

This will be a two part set with me covering on the first part how to build your snoots, with no effort , from any cereal card box, as if you do not know this already, but this time I'll take you to coloring the lights with them using the Lee filters small pack gels.

They will continue to be the good old carry on, even if you loose one you can get home and make another one, but these one's will be colored.

For those of you who do not know what I'll be talking about take a moment...

STOP!!

... and read some of these example articles that David Hobby wrote before you continue, this way you'll get an idea what is a snoot and what you can accomplish if you build one.

- On Assignment: Spring Arts Guide

- Developing an Idea, Part One

- Developing an Idea, Part 2: Compact Fluorescent Bulb

- DIY Macro Strip Lights

- On Assignment: Blind Snoot Portrait

- On Assignment: Pool Portrait

- On Assignment: Flavored Vodkas

- On Assignment: Simple Wall/Snoot Portrait

AMAZING isn't it ?!!!

Well at least that's what I thought when I read it for the first time... so stop being lazy and gather your stuff to build one here's how:

First I will start with the setup light I used to take all these shots.

Snoots with Colors (Part 1)_02
On camera left, a white umbrella with a Nikon SB26 through it at 1/6 to get a nice bright light.
Camera settings for this was Tv200, Av8.0 and ISO100.

What you will be needing:
- 3 Cereal card boxes ( I got 2 from the same size and another a little bigger).
- Scissors
- Glue
- Ruler
- Pen
- The Flash you will be using for measures and try out later
- Lee filters or any other sample package you have and try out later
- Some patience...

Snoots with Colors (Part 1)_03Snoots with Colors (Part 1)_07

First things first. Draw the measures on the card.

For the 580Ex (L to R) 1cm, 7,3cm, 4,3cm, 7,3cm, 4,3cm
For Nikon SB26 will be 1cm, 7,3cm, 4,5cm, 7,3cm, 4,5cm

And since this will be the small of the three I have chosen the 16cm of height.

Why 16cm and not 13,5cm or 11,656cm? - You may ask

First because it will be easier to carry, second you have to count with at least 2cm for the flash head to enter and be steady (so it will be 14cm) and last but not less important the size of the box since the one I had available was from that size... :)

Well you can make them at any size based on what your needs are. I will come to this on part 2 of this DIY.

Snoots with Colors (Part 1)_05

See, on the above picture, that my index fingers are pointing at the card well this is the already made bending part of the box.

When I made the measures I took the available space on the cereal card box to make it fit into the drawings of the snoot, pay attention to this when you build yours or at least choose a box that fits on your drawing measures since this will save at least bending 2 more parts ;)

Snoots with Colors (Part 1)_06

This is the picture of the drawing for the snoot 22cm with sizes as above only the height is 22cm.

Snoots with Colors (Part 1)_08

And here for the third and last one of the series the MEGA snoot 28cm with sizes as above only the height is 28cm. I always wanted to make and try one of these...

Snoots with Colors (Part 1)_04

Now get the scissors and start cutting them out of the cereal card box, nice and easy.

Snoots with Colors (Part 1)_09

With the help of the ruler start folding them inside so it will help shaping the box.

Snoots with Colors (Part 1)_10

A little glue, on the 1cm part, to hold the box together.

Snoots with Colors (Part 1)_11

And "voilá" we got the first cereal snoot assembled, cool, fast and simple. ;)

Snoots with Colors (Part 1)_12

On top the 16cm and on bottom the 22cm... now let's work on the BIGGER one and I will post next a side by side of the three so you can get a visual idea.

Snoots with Colors (Part 1)_13

Quickly I finished it and here it is a picture of the "CORNFLA" colored cereal box ;)

Snoots with Colors (Part 1)_14

Enjoy the three of them align together. See when I meant BIG?

Until here nothing was new (for the people who were building this cereal card box Snoot for some time now).

Next comes the interesting part...

I've been scratching my head for quite a while now and wondering a way to make the cereal card box Snoot hold a gel filter.

- Tried to put some Velcro at the end of the Snoot like I did on the flashes, this way I could attach the same gels I was using on them. Attempted FAIL!!
Simply because this would led me to Velcro all the gel filter colors I would need to use... but then again what if I needed a Ultimate Violet ref.707 color on one snoot and a Velvet Green ref.735 and all this while on location with no way to attach or get some Velcro?

Damn S"#$&, why this had to happen now that I have carried all the stuff I was going to need for the assignment, how could I missed this...!!!

- Tried to make a hole at the end part of the flash like I did on DIY: Lee Filters Flash Adapter, this could make a point, but then again FAILED!!.
This was a good idea except that when you make the hole, on the end part of the Snoot, for the gel to get in it will not stay aligned with the inside flash because the flash diameter would make the Snoot wider than the 4cm gel and the white light will spread mixing it with the colored gel.

- I also tried to make a box wider on one side, where the flash will get in, and on the other side cut it the size of the gel. FAILED!!
The box would not be very stable since it was not holding the light for a steady position and will cause the box not to be completely square, it was having a strange shape and the glue, after some use, would start to come out.

After trashing a couple of boxes trying to figure it out a way of making this to work and spending almost a week testing out...

YUUUPPPIII, I DID IT!!!!!!

Let me show you how simple it is:

Snoots with Colors (Part 1)_15

On one side of the box you measure 2cm (this for the 580Ex or you can feel the flash end with the tips of your fingers and measure there) from the end side of the box you will want to use the gel (see image above) then you mark that with a pen.

Snoots with Colors (Part 1)_16

Pay attention to the above picture because you will want to make the cut on the clean part of the box, do not make it on the 1cm glued part since this will be more complicated to slide the filter gel afterwards.

Snoots with Colors (Part 1)_17

Next, remove the flash from the snoot and make a clean cut from top to bottom.
DO NOT cut any inside parts of the box except the one mentioned!!

Snoots with Colors (Part 1)_18

See how it will look like after you inserted my old Lee filter gel that I generally use for testing purposes.

Snoots with Colors (Part 1)_19

View from another side.
Here you can actually see how the hole of the gel filter tip will keeps out after inserting the all filter gel. This option is very good in case you need to change it quickly with another one or none.

And you may ask at this point... Will it work? - YES IT WILL WORK!!!

Pay attention to the next image.

Snoots with Colors (Part 1)_20

Here you can see it working and with this technique you can even adjust the filter to cover the all flash head since the filter gel will be very near the flash and you can push it inside for better adjustment.

Snoots with Colors (Part 1)_21

Here is a quick simple example with a blue Lee filter gel put in giving you a complete blue color.

After we've finished cutting and gluing everything is time to give a cover to our boxes.
We do not want our fellow photographers to think we are not professionals or people on the street looking at us with a weirdo look ;)

Snoots with Colors (Part 1)_22

So 30cm (more or less) of Gaffer tape will be enough for a complete turn around the snoot so it will look very professional.
Start on the part of the Snoot that does not have the hole and leave that for last... this will be explained why a couple of steps further.

Snoots with Colors (Part 1)_23

Do it like this smoothly so it would not turn in with any wrinkles...
The wrinkles you see on the image are the joined pieces of tape.

Snoots with Colors (Part 1)_24

This should be the last part to add tape since you CANNOT cover the hole with tape.

I repeat you CANNOT cover the hole with tape!!

Because if you do you will damage the filters since the Gaffer tape's glue will be passed onto the filter as soon as you put in through the hole... so once again DO NOT cover the hole with tape!!

Cut a little piece of tape and cover around the hole like you see on the image.

Snoots with Colors (Part 1)_25

Here are the final trio with some tape on them. Doesn't they look like a professional tool, or whatever that means.

Now that you make it this far also take a look at my best "selling" DIY: Black Straws Snoot Grid (Part 1) and DIY: Black Straws Snoot Grid (Part 2).

You can also apply this color example filter insertion to the Black Straws Snoot Grid. The only thing you need to add to it's construction is the small hole on the side so that the gels could get in and color the straws.

On the Black Straws Snoot Grid you can make them with different color straws but, from my point of view, the only issue is that you will have to stick with that color and again carry a lot of this things on your bag when you decided that Loving Amber ref.176 was the right color... get it?!!!

Hope this could help you guys out as much as it is helping me on the field.

Stay tuned for the DIY: Snoots with Color (Part 2) in a couple of days where you can see an example on how you could use this to make your photos shine as well as the effect of each one of them.

Greetings to all,

Rui

Snoots with Colors (Part2)

Nikon & Canon flashes, know all about them

Today I decided to write you about flashes, Nikon and Canon were the target.

I do not want to bother you with that old song that model A is better that Model B or that the C now is better because it looks like a coffee machine but unfortunately does not make it.

So instead of that BLA, BLA, BLA stuff I decided to get on to something you can look around for your self and decide what would be the best flash for you to use and abuse while you are doing your Strobist lighting or your assignments.

Just keep in mind that sometimes you buy a flash for 500,00 euros, or more, and you really do not need all the features in it but I know... to impress friends and neighbors at least you got the state of the art. You never even read the manual or know how all the functions work, oh well at least you got the latest model !!

So what I have done today was compile a couple of few good links for you to explore and read about all Nikon and Canon series that I grab here and there.

Hope you enjoy them and choose what's best for you.

Remember that sometimes on Ebay you can get some good prices for those old models and they can do more that you could think of when it comes to lighting a subject or object.

Tom Hogan's website is a great place to start when it comes to Nikon products.

You can view his review chart for the recent flash models models from the SB-28DX to the new one SB-800, check it out.

And some other good links to review each of the old classics (some of them have the link to the instructions manual) are the one's I mention above:

SB-24, SB-25, SB-26, SB-28, SB-80DX, SB-600 and SB-800.

Find at the bottom of each flash page some more useful information about Nikon products and other flash models.

Photographer Ken Rockwell made a detail review for some of the Nikon flash series as well.

PhotoZonde.de made also a side by side chart with Nikon flashes, in English.

And to not become a link supplier for the Nikon flash here is the last one.

NikonLinks with this one you can find almost anything for your Nikon Flashes.


On the Canon side you can see a lot of detail information on the Canon website.


I also found a comparative chart, here, between all of them.

That's it for today.

Hope you enjoy all the links and review which one of them will fit better to you.

Almost all Nikon series have a PC-Sync socket so you can use Pocket Wizard as Canon only the new 580EXII have the socket. On the Canon side you must have a hot-shoe adapter with a PC- sync socket on it, some come with a cable already attached like above.


What you will decide will be the best choice... analyze what you are going to do with the flashes and what will they be good for and above all if you really need that fancy XPTO model if you are only doing on flash photography.

Stay tuned for more good stuff.

DIY: Lee Filters Flash Adapter

Last night I was inspired and decided to put together an idea that been bugging me since the day I received my 4 Lee Filter sample packs from Musikhaus Thomann.

I had already made a filter adapter for the Canon flashes but then when I received the Lee filters sample package I wonder how could I use the package on the field without having to put some Tape or Velcro on them prior to the assignment.

Since I always carry the all package containing the 287 small sample colored filters with me and sometimes only on the field I decide which one's to choose, or none, it started to be very difficult to have them all with tape and Velcro (like the CTO and Green one's I already have made).

In general I think this is one of the accessories, if you use the filters too much, that you cannot live without it in you bag or pocket or wallet.

Soon I realize that I needed something that I could call adapter and could be all time (or not) attached to the flash, it must be weightless and above all portable since I carry already too much weight and gear to some assignments.

This is a simple thing you can do since all the material used costs almost nothing, as you will see, and it's a very small portable thing you can even put it together with the filter package.

If you follow the last example of the Black Straws Snoot then you are half way there ;)

As always, I start with the Setup shot so you can see how the all pictures in these series were made.

Lee Filters Flash Adapter_001

I use for this ISO 100, Tv 200, Av 8.0 and a silver umbrella to the left of the camera as you will notice on some of the shots.

Here is a picture of the stuff we are going to need to accomplish this project.

Lee Filters Flash Adapter_002

- Cereal or other card box package
- Scissors
- Ruler (this time I covered the ads on the ruler)
- Glue
- Lee filter sample pack
- Kitchen knife or snap-off blade knife
- Carving board (so you won't cut the table out)

After you gather all the things you are ready to start.

I unfolded the cereal card box and draw on one of it borders (the more straightened side) the measures of my Canon 580Ex.

For Canon 580Ex 1cm, 4cm, 7cm, 4cm, 7cm and 2cm tall is enough.
For Nikon SB26 1cm, 4,5cm, 7cm, 4,5cm, 7cm and 2cm tall.

Lee Filters Flash Adapter_003

Lets use the scissors to cut it out from the card box, this is a simple process and do not require master degree on engineering :)

Lee Filters Flash Adapter_004

Picture after cutting it out from the card box. But this is not all...

Lee Filters Flash Adapter_005

Next we use the ruler to help bend the parts we need. We really do not need the ruler since the card box is not so thick but I used it anyway since it will help get them straight.

Lee Filters Flash Adapter_006

After you have to choose the distance you want the filter to be from the edge of the box to the inside part. As you can see I'm pointing with my index finger to where you should make the draw. I made it 0,5cm from the edge and draw a line from one side to the other on the 4cm sizes. (I've done this since if you put it too much on the edge it will not be strong enough and resistant to hold the small gel).

Lee Filters Flash Adapter_007

You use the sharp knife to make a hole in there, be careful to not cut yourself and do not make a very large hole so the filter won't be loosen. Just cut it straight from one side to the other on the 4 cm parts.

Afterwards test it with one of the Lee filters to see if it passes through the hole on both sides without too much afford and before you glue the adapter together.

Lee Filters Flash Adapter_008

Now apply some glue on the 1cm part to glue the adapter box together.

Lee Filters Flash Adapter_009

After the glue dries (2 or 3 minutes depending on the glue) put one of the filters in. First you pass it through one hole and then enter on the next one... this is a simple procedure.

Lee Filters Flash Adapter_010

Here is the final shot after putting the gel through the both holes. NICE!!!

Lee Filters Flash Adapter_011

This is what it looks like when you mount it on the flash.

Remember that this is not intend to be a snoot... you need the filter to stay out of the box the maximum you can drill the hole (for me was the 0,5 cm)in the card box end because what we want is a filter adapter and not a snoot. Hey, this came into my mind right now!!! maybe you can use this, later on, to make a snoot with color ;)

Lee Filters Flash Adapter_012

I changed it to red so you can see the effect it produces. Here it is... Isn't this a COOL and NICE idea ?!!!

Lee Filters Flash Adapter_013

Follow me on this: "I do not believe pigs can fly unless I can see one", so that's why I put here a photo of the result.

Don't mind about the small hole on the small filter since, as you can see on this shot, it has no effect whatsoever on the final filter color. When you put the filter on try to minimize the hole by pushing it to the other side.

Lee Filters Flash Adapter_014

Now, another thing, I wanted the adapter to be was small and portable... Just look at this!!! you can fold it and put it in your pocket or near the rest of the gels. You can even drill a small hole in it and attach it to the rest of the pack.

Lee Filters Flash Adapter_015

Another shot to show you how small this adapter really is.

This is a good portable adapter since it takes only 5 minutes to assemble and if you loose one or smash it then you can make another one from another box in no time.

I did not make any tape finishing since it would make difficult for the filters to enter on the holes because of the tape's glue but you can always put some tape on the top and bottom or leave it like this... who will bug you by having this adapter on your flash??

Lee Filters Flash Adapter_016

I hope you enjoy another useful DIY for your daily work.

I also think this adapter could come up very handy since, as I said before, you can carry it around and change filters on the fly... you can even have two or 3 of them, with a hole drilled near the flash size attach, and carry them with your gels pack.

Imagine in 2 seconds you could change the flash color just by putting another adapter or changing the filter color on location.

Before I did this I use, like so many of you out there, the gels with Velcro on each of the tips. I have also a collection of them hanging on my bag and with different sizes because of flash size with this I only need to have 1 adapter for the 580EX and another for my 2 SB26.

I can carry now the complete Lee gels pack without loosing too much space on my bag and when, for some reason, I need the purple or exotic color I can easily get it without having to glue anything to it or turning the idea down just because I do not have it set.

Make one of these yourself and enjoy flash colors ;)

Until next time keep on making good photos.