Showing posts with label Presets. Show all posts

Adobe Configurator 3.1RC must have tool

Recently I discovered this wonderful tool for my Photoshop/InDesign tools and panels.

The Adobe® Configurator is a utility that enables the easy creation of panels (palettes) for use in Adobe Photoshop® CS5.x/CS6 and Adobe InDesign® CS5.x/CS6.

It makes it easy to drag and drop tools, menu items, scripts, actions, and other objects into a panel design, then export the results for use in Photoshop or InDesign.

Distribute and share panels with other Creative Suite 6 users via the Adobe Exchange, also available on Adobe Labs.

This is the kind of tool that can help you when you just need a couple of buttons/panels on your setup and do not want the all panel. If you normally just use a couple of tools then you can configure it to your best purpose and the most important of all... makes you work faster.

You can download Adobe Configurator 3.1 here on Adobe Labs for CS 5.x or CS6 users.

Color Accuracy Test


How is your color accuracy today?

With this fun game you can check if you are color blinded or if you can measure correctly the colors.

Click HERE to play the game,

Have fun and a great photographic week.

Xume Quick Release Filter Adapters

What if suddenly you could take of filter off your lens without having to unscrew them? Wouldn't that big a great help when you're out on the field having that great camera moment or even when you want to quick change that Polarize Filter from one lens to the other in a snap?

Fear no more... Xume got this great idea when they created the Quick Release Filter Adapters.

They are nothing more than a couple of magnetic adapters that you could screw in to your filters and your lens and BAM!! You got an instant filter exchange for your setup.

The adapters are a little pricey and they are available, for the moment, only on 77mm threads, let's hope they will make them on some other threats soon. You also need to pay attention if they will not produce some vignetting on your lens corners because of the extra height but they look pretty thin to me.

Filter Holder
And the Lens Adapter


Just take a look at their video for more info and their web page for online orders.

New Book: Photoshop Compositing Secrets

The well known Photographer and Photoshop guru Matt Kloskowski for the National Association of Photoshop Professionals (NAPP) got another Excellent book. This time he decided to show us what we can create with Photoshop Compositing of our photos.

About Matt

Matt Kloskowski lives in Tampa, FL and is a full-time Photoshop Guy for the National Association of Photoshop Professionals (NAPP). He’s a best selling author of books and DVDs, a professional photographer, and Photoshop instructor at seminars and conferences around the world. Matt co-hosts two top-rated video podcasts, Photoshop User TV and Dtown TV. He also hosts the Lightroom Killer Tips blog and podcast.


Unlocking the Key to Perfect Selections and Amazing Photoshop Effects for Totally Realistic Composites

Compositing is one of the hottest trends in Photoshop and photography today for portrait photographers, designers of all walks of life, and even retouchers. Everywhere you look, from group photos, to school graduation portraits or sports portraits, to magazines, movie posters, and DVD covers, chances are, you’ve seen compositing.

In Photoshop Composting Secrets, Matt Kloskowski takes you through the entire process behind creating convincing, well-executed, and captivating composites. You’ll see how to create images that run the gamut from real-world portraits for corporate, graduation, or group photos to sports portraits, templates and collages, and even the surreal dramatic composites that clients clamor for.

You’ll learn:

- One of the most important secrets to compositing: how to master selections in Photoshop (yes, even wispy hair)
- What background color, and camera lighting setups work best for compositing
- How to move a subject from one background to another, and the Photoshop lighting and shadowing techniques to make it look real
- And all of the Photoshop tips, tricks, and special effects you need to pull off a convincing, professional composite.

No matter if you’re a professional, an aspiring professional, or a hobbyist, Photoshop Compositing Secrets will sharpen your skills and open up a whole new avenue of photographic expression in an easy-to-understand way that will have you creating your own composites in no time.

If you like Compositing or if you are trying to start it this is a great book for you.

You can order it at Lighting Mods Amazon Store here.


LR Preset: Holga-a-like by Dustin Leader

This weekend I bring you a new free preset shared by Wedding photographer Dustin Leader.

If you are a big fan of Holga cameras and the images they self produce then you will appreciate this 10 presets...

You can get more information about it's author at his page Dustin Leader and start following him over his blog as well as download some more free actions he got there.


Here is a sample image of what you could accomplish with these ones.


Enjoy and have a great weekend.

LR Preset: Pro Styled - Herb Ritts

Black and White were never my strong. Even on the film days I tried the the best I can but color was always more appealing to me.

A lot of you been asking for LR Presets for the Black and White and I found that X-Equals got, this week, an excellent Herb Ritts simulation so I decided to share it with you.

Hope you like them.

Herb Ritts – Pro Styled

The first and most impost step in emulating any photographer’s style is to study their work. You can start by viewing the gallery presented on Herb Ritts’ website. Further studies can be carried out by viewing his books such as Pictures, Duo, Africa and his other works.

Study the poses, look at how light and dark interplay with the human form. Note his use of lines and curves, and how they are used to guide the eye. Look at how he uses both balance and imbalance in his images. Try to unlock how all these come together to create the image. Spend some time exploring Ritts’ body of work and get a feel for his photographic eye.

Once you are comfortable with your understanding of his works, start thinking about how you would recreate the effects on your own.

Do note, most of Herb Ritts’ style is produced in camera, as with many other great photographers. You really need to focus on getting your images as close to the desired goal at time of capture, you simply cannot rely on post processing to accomplish the feat of simulating his unique style.

A few tips you may want to consider:

* Use a yellow filter to view your subject before shooting. Visualizing your shot through a yellow filter helps you see the difference in tones in your subject, eliminating much of the color.
* When shooting outdoors, go ahead and put that yellow filter on your lens. Since our target image will be a black and white image, the yellow filter will help by eliminating excess blue light, which will level out skies and bring a better balance to your image.
* Shoot both High Key and Low Key images, but be sure to have good contrast when doing so. Especially with abstract shots of parts of the body, you will want to consider a bright overall image with deep darks in the subject or vice versa. Use your environment and subject to your advantage.
* When shooting with your full dynamic or even high dynamic range, focus on a good balance of dark and light with good, but not extreme contrast. Look for emotion in your subject for these shots and pose for either strength or vulnerability depending on your specific goal.
* When shooting with natural lighting, think outside the norms of photography. Put the sun at your subject’s back, or shoot at high noon, and kick up the contrast wih filters or post processing.
* When using studio lighting or strobes, use some extra lights on a light back ground for High Key images. Or shoot on a dark background and focus more light on your subject, enhancing contrast.

These tips are just the tip of the iceberg, and you will have to experiment with them and your own ideas to find what works right for you. But to help you along, here are some presets we designed to help you get the final look a bit quicker.

These presets are designed to allow you to quickly take your image to one approximating the style of Herb Ritts. Be warned, these presets can be a bit heavy handed, so don’t be afraid to make some fine adjustments to what they generate. The presets included in the download are as follows:

* PS Ritts Curve 1 – This preset contains a fairly conservative Tone Curve, designed to enhance contrast, while maintaining the general brightness of the image. It has a moderate increase in Clarity to get a bit more pop.
* PS Ritts Curve 2 - Another custom curve, this time shifting the Tone Curve much darker, while retaining a high level of contrast. Also maxes out Clarity to enhance fine detail in darker images.
* PS Ritts Curve 3 - Again, a custom Tone Curve, dramatically brightening the image, with a minor kick to Clarity, creating an overall high-key and soft effect.
* PS Ritts Mix HIE - A customized version of the Cold Storage Kodak HIE infrared preset, providing a palette suitable for Ritts type work.
* PS Ritts Mix Pan-X - Another customized film emulation, using Kodak Panatomic X as its base.
* PS Ritts Mix Plus-X – Customized Kodak Plus-X preset for a more natural appearance.
* PS Ritts Mix Tech Pan – Kodak Technical Pan emulation tweaked for Ritts style use.
* PS Ritts Mix Tri-X - Tri-X as well, of course.
* PS Ritts Punch – A preset that endows a bit of surreal realism to your image. Brings out detail using Recovery and Fill Light and brings it back to Earth with a hit of Blacks adjustment.
* PS Ritts Yellow Filter – A preset that adjusts White Balance to emulate a yellow filter being used. Not for every photo, but can drastically lighten many.

As with all our X-Equals presets, these are designed to be used in unison to create the desired effect. Also, be sure to try other black and white color mixes, such as the Curve presets from our own Cold Storage to open up a world of new B&W effects. After you get the effect about where you want it, adjust Exposure or Brightness to balance out your image.

Thank you X-Equals for having made this wonderful set.


LR Preset: William Petruzzo Pack

Today I bring you a free Collection Pack from photographer William Petruzzo from Petruzzo Photography.

How many times you wonder, on your Adobe Lightoom photos, how an increment in Exposure or Fill Light would look like without having to move the slider up and down every time?

And how about the Blacks and Noise Reduction? Wouldn't it be good to have some presets that could help you visualize that, on the preview window, without having to move the sliders all the time?

Well maybe you have already thought about that but were too lazy to create them in Adobe Lightroom... well wait no more as William Petruzzo makes you life much easier on this subject.

Just take a look at this awesome pack I got for you today...

With this presets you can find some very useful tools, the Pack is a 3 folder content and you will find, on the first folder, a Common Basic Adjustments presets for the Blacks, Exposure, Fill Light, Noise Reduction and Recovery in increments. This could be a lot of help for those quick fine tunings you need on your images.


Next one is an HDR Effect from a Very Light state to a more Heavy and contrasty look.


And the 3rd folder gives a Split Tone look with 3 different effects.


A BIG thanks to William Petruzzo for sharing this with us, also say thanks by paying a visit to his webpage.

LR Preset: Sara-Ji Collection Pack

As many of you been aware, Adobe Lightroom as became a very powerful tool for the photographer if not one you cannot live without it, at least this is my case.

Although I still go to Photoshop for some fine and precise tuning of the images a lot of my base work is done in Lightroom. When you need a fast editing RAW system I rely more and more on tools that make my life easier and would put on the field faster to capture more images instead of siting down at the computer for long periods of time.

Well enough of this... let me tell that today I will bring you an excellent pack of presets for Adobe Lightroom created by photographer Sarah-Li from Chicago and I hope you enjoy them.


Sarah-Ji NE Presets

Sarah-Ji Night Owl

Sarah-Ji Autumn

Sarah-Ji LE

Sarah-Ji Vol.1


Sarah-Ji THANK YOU for sharing this brilliant presets with us.

LR Preset: OnOne Collection, Collage Templates & Film Emulations Pack

Today with the LR Preset article I want to bring you 2 collections of presets and an excellent templates collage for your Print module in Lightroom.

I'm pretty sure this would be something you would love to try out as this can create different configuration to your printer output so that you can present your photos to your friends, family or even clients in a different way and created by the wedding and portrait photographer Halina Veratsennik.

The other two packages are the well known OnOne Collection that I bring a direct link to download from their web page or you can click the download button here on Lighting Mods to get the 3 packages direct download.

Last but not least I've gather in a single folder 335 Film Emulations created by fellow photographer Michael W. Gray. These are also well known as LIDF (Life In Digital Film) because of he's blog and it's where he shares is thoughts about each of the Film Emulations he creates.

I've also created BIG download buttons instead of the links that were not so visible. Hope you like them ;)


I would like to pay a BIG THANK YOU to the participants for sending this Presets in.

If you have some interesting ones you would like to share feel free to send them over with some sample examples.


You can find some more collages here at the Venngage page, go check them out too.

LR Preset: Silver Lining, Strangers Collection & Farewell to Arms

First post of 2011.

Hope everyone got a great Holiday Season and some peace has come to mind. My heart is broken in two with what is happening in Australia and Brazil so to them also goes a BIG positive thinking and hope all goes well after the country dries out.

Today I bring you 3 more FREE presets you can use on your Lightroom to give a plus+ to all your images.

I choose Silver Lining, Strangers Collection and Farewell to Arms as I feel some of you might need some BW presets to go along with colored ones.

Enjoy


SILVER LINING


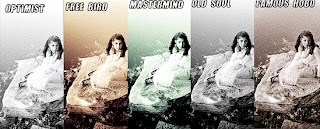
STRANGER COLLECTION

Inside the collection you have:

-Famous Hobo
-Free Bird
-Mastermind
-Old Soul
-Optimist


FAREWELL TO ARMS


LR Preset: Kevin Swan Presets & Magical Presets

Today I'm starting a new chapter on the Lighting Mods blog.

After a lot of people been asking me to make available some FREE Presets for the Adobe Lightroom I decided to create a new section for them.

You can share yours by sending them to me by email or pointing me the link and I will make the proper posting. Please include some examples so other users could see what they look like.

For start here goes 2 from the Free collection that I will be making available.

Enjoy, and have a fantastic Holiday Season!!!!!

We start out with a wonderful set of 21 Presets from Kevin Shaw collection


Here is the Second one for today, an impressive MAGICAL collection of 8 presets.


How to Install Them?

To install the presets in an organized fashion way, so you won't mix them with the pre installed ones, unpack the archive, copy that folder to the presets folder inside the Adobe Lightroom usually:


Windows:
 C:\Documents and Settings\\Application Data\Adobe\Lightroom\Develop Presets


Mac OS: 
Macintosh HD/User/yourusername/Library/ApplicationSupport/Adobe/Lightroom/Develop Presets/

In case you do not find it by this method you can Open Lightroom, go to Edit-->Preferences under Preferences go to Presets tag and choose Show Lightroom Presets Folder. Open that folder and locate Lightroom -->Develop Presets copy or create a new folder to put the presets in.
Restart Lightroom and you will have the folder with New Presets you have just created.

http://www.nudephotopro.com

LRB Graduated Filter Presets for Lightroom 2.0 by Sean McCormack


Today let's talk about some cool plugins for Adobe Lightroom 2.

My mate Sean McCormack is a wonderful guy and fellow photographer. In case you haven't notice Sean has been creating awesome galleries and slideshows modules for Lightroom since 2006 at Lightroom-blog.

With the introduction of Adobe Lightroom version 2 adobe has made available some tools that cause some great impressions over photographers and their workflow one of them was the Graduated Filter tool.

So Sean decided to create a very affordable set of presets with over 70 Graduated Filter (just €5.00, about $7.75) and simply called them LRB Graduated Filter Presets for Lightroom :)

Sean sent me the presets a couple of weeks but I can confess you that time and availability was against me for testing them and write this article... but now that I have test them I just want to say one thing AWESOME!!!!!

I could not leave you guys wondering where to get your Graduated Filter elsewhere except buying the Sean McCormack one's or take time to create your own, but after you buy them you can always change them to your taste and then create your own based on Sean initials.

With no more delays let's look at what he have to say about them and what you will find in the sent package.

"While I provide a lot of free tips, tutorials, and even galleries to users, sometimes I do a little that requires some return on my time.
To aid users in selecting the right look for their landscape images, I've created a set of over 70 Graduated Filter presets to get you started with making creative choices for your images. Covering both landscape and portrait orienations, as well as hard and soft line filters, these filters come in 3 standard colours: ND (Grey), Blue and Tobacco. As is also standard, they come in strengths of 1 stop (0.3), 2 stops (0.6) and 3 stops (0.9). It was a bit of work to create this, but I'm not charging a whole lot for them, just €5.00 (about $7.75). Obviously you can tweak the settings once applied. In fact I positively encourage it!

Why should you pay for these, when you could create them yourself? Well the fact that it takes a bunch of time to put them together is the best reason. Probably more than €5 of your time. Also by running down through the Presets panel on the left of Develop, you can preview them quickly to see how they look with your image. Much quicker than mucking around with sliders.

You can see some of the presets in sample form here: Download Sample Grads

To install these presets, drop the Sample Grads folder into:

User/Library/Application Support/Adobe/Lightroom/Develop Presets
on OS X,
C:\Documents and Settings\User\Application Data\Adobe\Lightroom\Develop Presets on XP-Note that Application Data is a hidden folder,
C:\Users\User\AppData\Roaming\Adobe\Lightroom\Develop Presets on Vista,
where User is your login name.
Or you can click on Preferences>Presets>Show Lightroom Presets Folders to open this folder in Finder/Explorer. Then open the Develop Presets folder from there.

The full version folder contains 4 Sub folders, place these folders in the Develop Preset location mentioned above.
You can also Right click on a preset or folder and import them from within Develop, which is fine for a small amount of presets, but for folders, manually placing them and restarting Lightroom is quicker.

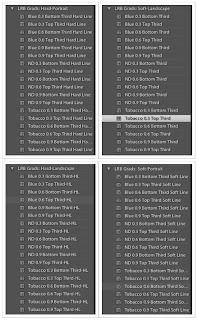
The 4 folders are:
Grads: Hard-Landscape
Grads: Hard-Portrait
Grads: Soft-Landscape
Grads: Soft-Portrait

Hard Grads have a tight transition, which Soft Grads user a wider transition. Landscape and Portrait Grads need to be separate as they don't rotate. The 3 colors (ND, Blue and Tobacco) come in 1, 2, and 3 stops varieties, equivalent to 0.3, 0.6 and 0.9 in standard filter terminology. Also as most Landscape photographers use the Rule of Thirds to compose, each type is set on the bottom and top third, allowing you to choose the nearest one quickly. To change the filter, click on the pin to select it (Press M to activate Grad Filter in Develop, if it's not open). Drag the pin to move the center of the grad, and the outside lines to make it softer or harder. Finally click the color chip to change the tint. The Blue and Tobacco colors I've chosen are simply ones I like. You may prefer a redder Tobacco, or different blue. Actually then ones I have look similar to the Cokin set I own, so I was trying to get close to them.


To Download, add them to the cart. Payment is Paypal via E-junkie, but can also take Credit Card. Once Paypal sends notification, an email will be sent with a download code.
Windows user that experience security issues related to downloaded Zip files should try an alternate decompressor such as 7-Zip.

Update: On the advice of Richard Earney, I've rezipped with BetterZip to remove Mac related components. Please let me know it you're still experiencing trouble after redownloading. Also rather than clicking on the link in the email, copy and paste it into your web browser. This works fine for me using XP under boot camp.

Update #2: I've found one of the presets had an incorrect value which has been fixed and the packages reloaded. Please download again. Apologies. I did check them before I posted, but somehow missed one.

Update #3: A few people commented the Portrait grads were upside down. Well, they're not.. They just shoot upside down! Seriously though you should turn the camera so you shoot with the shutter button up. It makes the camera more stable. Anyway for those that shoot upside-down, I added another 36 presets, duplicating the normal ones, but upside down. In fact they probably got more love!

A look at the sets (Click for Bigger version):

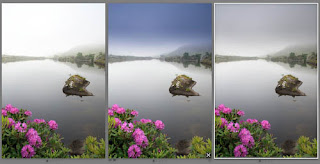
Here's roughly how they look, first the hard set, then the soft."


Please note that VAT is charged in the EU.

THANK YOU Sean for taking the time to create this beautiful presets and have them available so cheap.

You can also follow Him and his fabulous Lightroom work at Lightroom-blog or visit his home page for photography business here.