Showing posts with label 580EX. Show all posts

Tip: 580EX & 580 EXII Auto-shutoff Function For Remotes

My Gear - What you wanted to know but were afraid to ask_034If you are an owner of a Canon 580EX, like me, or upgraded to the 580EXII and plan to use it remotely, make sure you take this quick step to avoid having the flash auto-shutdown after each one minute period of inactivity and avoiding you some not so good mentioned comments like... what the fxxx happen to the flash?... or why this sxxx doesn't work anymore, it was working a couple of minutes ago?.

Well just save yourself from this and follow along :)

Most of the shooting I engage myself in that requires off-camera flash can be covered by my Canon Speedlites. The old 550EX power switch has 3 positions: Off, On, On w/Power-saving automatic idle shutdown.

With the 550EX's successor, the 580EXII (the updated 580EX), there are only two positions: Off, On. The automatic shutdown is enabled by default, and only requires an idle time of 60 seconds to shut the flash down. If you were using the flash on-camera, the flash would automatically power itself on when camera activity is detected but when the flash is detached, it doesn't wake back up.

These are the simple steps to disable automatic idle shutdown on a Canon 580EXII series flash:

1. Power the flash on (does not need to be attached to camera or PW)
2. Hold down the backlight/C.Fn button until "Fn 00 0" appears on the screen
3. Rotate the selector wheel until you see "Fn 01 0"
4. Press your selector button down so that the 0 begins flashing
5. Rotate your selector wheel to change the 0 to a 1
6. Rotate the selector to the "Fn 14 0" position and set it to 1
--- Update --- On the 580EXII is "Fn 01 0"
position and set it to 1 ---//---
7. Press your selector button to save this parameter
8. Press your Mode button to return to the main screen

Pay attention that in order to disable auto-shutoff on the original 580EX series, select the "Fn 14 0" and set it to 1.

--- Update --- And for the 580EXII to disable auto-shutoff is "Fn 01 0" position and set it to 1 ---//---

Done! Now your flash will stay on as long as your power switch is in the "On" position.

Remember to switch it back on whenever you need to save some power when using the on camera flash.

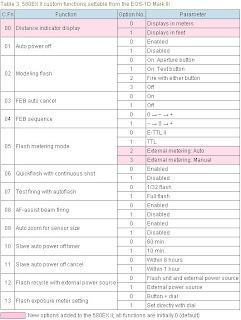
--- Update --- I'm adding, bellow, 2 images taken from the Canon website with all the functions for each of the flashes, this way would be much better for you to change what best suits you on both models.

Custom functions for 580EX

Custom functions for 580EXII
---//---

DIY: PW Stand Holder for less than 5,00€

PW supportIn my last post I wrote that I was working on 2 projects well here it is the first one.

I've been looking, for quite a while, for something to hold my PW when I use them.

Since I bought the Gadget Infinity system I haven't been using the PW a lot, first because of the too much wiring system required to connect them to my 580Ex, second their size and second because I do not like to have them bumping around on the tripod while on use.

I hang them by the little lanyard it bounce and bang on the stand every time I have to move the stand around for positioning the light so I was needing a solution for when I use them... this means that when you're into a more serious assignment you cannot trust the GI misfiring system and when a Client is near by watching every move you make this could be a terrible thing so I need the PW system.

There are people who are using the Velcro system with great usability but I do not think this would stick and hold very well on the thiner Manfrotto Nano 01 stands, so I was in need of a solution...

After seeing the Ziv's project for a Pocket Wizard holder that he's selling, a set of 3, on his blog for $24,00 plus shipping. I think this is a little bit too much for a small piece of metal that you have to bend, cut and shape.

But then again you could make one yourself, with the right tools, with no effort and with less than 5,00 euros I guarantee you that, just follow along.

I had to do some search around on several hardware stores near Luxembourg before I found the right one and the right holder. The one I bought was very cheap at Le Roy Merlin in France.

I know that there are a lot of hardware stores where you can get this stuff but the biggest one around here was Le Roy Merlin France, maybe IKEA would have this holder also I will have to check it out also.

As always I start with a picture from the setup light so you can see how one small strobe can do this kind of presentation.

PW Stand Holder_0001

580Ex shot through umbrella to camera left at 1/16 power. Camera ISO 100, Tv200, Av9.0.

Now let's go to business.

PW Stand Holder_0002

Picture of the inventory:

- Pocket Wizard (For testing purposes)
- Electric Drilling since I do not have a drilling one I used an Electric Screwer
- 1x 6mm (thick) snap ring
- 1x 6mm (thick) nut
- 1x 6mm (thick) stainless socket cap screw, size length 1,5cm
- 1x 8mm (thick) stainless socket cap screw, size length 4,5cm
- 1x Plastic Systemtac 2198 (used to hold together 2 corner pieces of a furniture) . It also bends in the middle making an L shape.

The Systemtac 2198 (name printed on the holder) you can find it near the pieces to build the pre-made furniture. At Le Roy Merlin they only had it in white but later on you can spray it black if you like.

PW Stand Holder_0003

Now let's drill on one side one hole of 6mm (thick) and on the other end a 8mm (thick). The holes are already made so it would not be very difficult to drill a larger one.

PW Stand Holder_0004

Since this is plastic you can drill them with almost anything. It's a kind of flexible plastic near the already made holes so it will be very easy to drill.

Just remember I did my holes with my electrical screwer :)

So you now have the 2 holes on each side let's move on.

PW Stand Holder_0005

Remove the original 8mm (thick) stainless socket cap screw from the flash adapter.

PW Stand Holder_0006

Here is a side by side from the original 8mm (thick) stainless socket cap screw with size length 3cm (on the right) and the new 8mm (thick) stainless socket cap screw bigger size length 4,5cm (one on the left).

PW Stand Holder_0007

Closer look.

The original 8mm (thick) stainless socket cap screw with size length 3cm (on the right) and the new 8mm (thick) stainless socket cap screw bigger size length 4,5cm (one on the left).

I choose another one bigger since this way you can now put the plastic holder between the umbrella stand and the stainless socket cap without loosing screw turns for better tight.

PW Stand Holder_0008

Let's assemble everything starting by putting the new 8mm (thick) stainless socket cap screw bigger size length 4,5cm back into the umbrella adapter.

PW Stand Holder_0009

Now we put the plastic holder, it's indifferent from which side you'll put it through I leave that to you.

PW Stand Holder_0010

I choose to put the white holder on the beginning part of the stainless socket cap screw instead of the end because this way you will have a more stable screw in since the socket cap will be fixed to the umbrella adapter see picture.

PW Stand Holder_0011

Now let's put a snap ring to better hold it together. On the final version I ended up adding another snap ring to the other side for a better tighten.

PW Stand Holder_0013

So the first part is now finished. You have the white holder in position so let's move on to the PW itself.

PW Stand Holder_0014

When I bought these 6mm (thick) stainless socket cap screw I took the PW with me and looked around for something that could be attached to the hole on the PW and that would not be very long so it won't stay out too much on the white holder.

The PW screw is not very deep so take this in consideration when buying yourself the stainless socket cap screw so they could fit in there. Maybe you could find some more fancy one's but where I looked I couldn't find none suitable for this except this one's.

------------ Update 05/01/2008 ------------

Found a better replacement for the PW screw in, much easier to screw and tight take a look at the picture below.

DIY Manfrotto Umbrella Adapter Improvements_013
-------------------------------

PW Stand Holder_0015

At the end of the 6mm (thick) stainless socket cap screw I put a Nut to hold it against the white holder.

PW Stand Holder_0016

Next screw in the PW.

PW Stand Holder_0017

This is what it will look like when everything is in place.

PW Stand Holder_0018

As you can see the white holder is bendable at the middle so it will be easier for it to bend where it won't collide with any swivel or the umbrella hole. Main reason why I choose this.

PW Stand Holder_0019

A view of the all thing assembled together.

PW Stand Holder_0020

This is the setup shot for the next sequence.

580Ex shot through umbrella to camera left at 1/16 power. Camera ISO 100, Tv200, Av9.0

PW supportPW support

This is a standing view from one side and the other.

You can see how it's holding the PW straighten up. You can even swivel it for a better position.

PW Stand Holder_0023

Full picture with the umbrella on. I even put the umbrella metal holder a little bit out so you can see that it would not touch it even if you put it in a little bit.

PW Stand Holder_0025PW Stand Holder_0024

Now for the final shots I would like to show them from above also made one straight and the other bend so you can see the possibilities.

Since you can bend this little piece of plastic you can point it to what best suits you.

------------ Update 05/01/2008 ------------

Finally got some time to paint it out for a more "Pro" look here are the pictures.

DIY Manfrotto Umbrella Adapter Improvements_012DIY Manfrotto Umbrella Adapter Improvements_011
------------------

Hope this all DIY would be helpful for you as it is for me.

Enjoy this inexpensive and very portable way to hold your PW while using your umbrella adapter and spray can it black if you like it better on black.

DIY: Black Straws Snoot Grid (Colored)

StrawsSnootsWColor_007This will be the last post of this month and with it I would like to make an improvement to something I had already built.

I already changed the normal snoots (Part 1 and Part 2) to colored one's so now it's time to make the same with the famous Black Straws Snoot Grid.

Some people have been asking about if colored straws would not do the trick but then again you will be stuck with that specific color in your bag and there aren't too many straws with nice colors unless you would want some green or orange fluorescent on somebodies background or head.

Anyway this will be a complement of the DIY: Black Straws Snoot Grid (Part 1) and the DIY: Black Straws Snoot Grid (Part 2) I posted.

I will not post the assembly here again, instead I will only show you what I have changed from the previous one.

And remember if you would like to have the Lee filters attached to your flash without having to worry with Velcro and at no cost just take a look at DIY: Lee Filters Flash Adapter.

Starting out with a new one I decided to make this one a little bit longer, so instead of having 5cm long I raised it 1cm more so it will handle better the insertion for the Filter Gel.

The measures are the same except the length for the 580Ex (I noticed that they will also fit on the SB-26):

1cm, 4,5cm, 7cm, 4,5cm, 7cm and length 6cm and straws 2cm length.

StrawsSnootsWColor_001StrawsSnootsWColor_002

You get the ruler and while peaking at inside to see where the straws end (mine were at about 3cm from the edge) you mark the cutting line. This will be where the Filter Gel will enter.

StrawsSnootsWColor_003

With a sharp knife or something sharp you will cut from bottom to top like on the above image. Just remember to cut on the side where the box is not glued, this way would be easier to pass the gel in.

StrawsSnootsWColor_004StrawsSnootsWColor_005

As you can see this is a simple way to do it. If you have already made one of this Snoots then you just have to cut it in and you are rockin'.

Do not worry about those straws that are not covered with the Gel, after you inserted the flash, they will not catch the light anyway.

StrawsSnootsWColor_006

Can you see it working with a nice Violet color??

Wait... I have some more for you!

StrawsSnootsWColor_008StrawsSnootsWColor_009

Now let's wrap it up to look more "Professional".
PAY ATTENTION to the hole. DO NOT under any circumstances cover the hole with tape or else you will end up with tape on the Gel Filter ruin it and we don't want that, RIGHT!!

StrawsSnootsWColor_010

I changed the Color from Purple Rain to some kind of Tequila Sunset Red. COOL!!!

Now let see what we can do when we hire a Professional model for the job :)

StrawsSnootsWColor_011

Professional Model with Black Straws Snoot Grid Colored on the background.

Hey let's lit the guy ;)

StrawsSnootsWColor_012

Hey, Hey, Hey let's wait a minute how did I end up here ??

The photographer sucks, look at the background light it almost vanished and he just put so much light on me... broad day sun ;)

Oh well, it looks like when you wanna do both things at the same time neither will come right just look at my smiling face :)

StrawsSnootsWColor_013

For the last of the sequence the setup shot.

Canon 580Ex camera left with the Black Straws Snoot Grid Colored 1/4 at 105mm, SB26 camera right shot through the white umbrella 1/2 at 14mm.
Camera ISO 100, Tv200 and Aperture 9.0.

Thanks to all for the support and stay tuned for more good stuff.

Also take a look at these:
DIY: Black Straws Snoot Grid (Part 1)
DIY: Black Straws Snoot Grid (Part 2)

DIY: Snoots with Color (Part 2)

Snoots with Colors (Part 2)As promised here is the part 2 of this DIY: Snoots with Color project.

I have already spoken about Snoots on a previous post and have made them with straws to create a grid, this time I removed the straws and add some color to them by making a way of putting the gels inside without messing too much with the design of what you already know or have.

A lot of you out there may already have made them based on what you have read on Strobist... GOOD!!, now let's see what are the results for each one of them with a couple of pictures to better illustrate.


Snoots with Colors (Part 2)_01

(L to R) 28cm, the BIGGEST one, produces the smallest light, the 22cm is not so bigger than the 16cm but for some things it could come in handy and the 16cm is the smallest of them all and the most portable.

I tried to put all of them on the same direction and position to the white wall and also tried to put in the same amount of light for comparative purposes between them.

Snoots with Colors (Part 2)_02

I moved the strobes a little bit, from the front of the light, so you can better compare the size of each one of them against a white wall.

You also have to take in account that when you are shooting, some object or person, the light will be a little boxed when in close range as you can see from this simple image.

Snoots with Colors (Part 2)_03

I now colorized one of them (16cm) with Gold Amber #21 from the Lee filter sample package. Notice that is no white spill on it.

I believe this is one good way to make the snoots having some color without loosing too much your head or trying to pickup something to hold them in front of the snoot at last minute.

Let's colorize another one.

Snoots with Colors (Part 2)_04


So from Left to Right we have 28cm with a Velvet Green #735, 22cm with no filter gel and the 16cm with Gold Amber #21.

This is what could be accomplish with the Snoots with Color. You can use them normally with white light coming from the flash and then put in any color you like from the Lee filter gels sample packager.

My Gear - What you wanted to know but were afraid to ask_007

The final shot I created for this was a very simple one using the 3 small strobes so you can get an idea of what I was talking about.

Snoots with Colors (Part 2)

The model was the best money could bought at the time but I think it did a pretty good job concerning that he had to be running back and forward to tune the lights, grab the book, take the picture and smile :)

Last but not least for all you guys here is the setup shot.

Snoots with Colors (Part 2)_05

(L to R) SB26 with 16cm snoot, Gold Amber #21 Lee filter gel 1/16 at 85mm to background, Canon 580ex 1/128 at at 105mm pointing at the models face and SB26 with 22cm snoot, 1/64 at 85mm and Velvet Green #73 Lee filter gel pointing at the book. All flashes triggered with Gadget Infinity system and model digitally removed ;)

You can click on the picture to see some Flickr notes I've added to the photo.

Bottom line... In my experience the 28cm snoot really becomes 24cm in size since for it hold on to the flash head you have to put it in 4cm. For this shots this did not happened since I manage to hold it on the flash with no problem, but if you are using it outside on an assignment this can become a problem since the Snoot keeps falling to the flash front.

So, unless you really need it to illuminate something specific, keep it out of your regular gear since the 16cm and 22cm make a great job.

Besides this minor issue it works like charm. The changing of the gels is so quick that the model would not notice it and with a little usage you can even make it with yours eyes shut... or maybe not ;)

Thanks to all for the support and for reading it.

If you missed anything take a look at the first part here goes the link to it:

DIY: Snoots with Color (Part 1)

Stay tune for more cool stuff subscribing the Lighting Mods blog.