Showing posts with label Setup. Show all posts

DIY: Snoots with Color (Part 2)

Snoots with Colors (Part 2)As promised here is the part 2 of this DIY: Snoots with Color project.

I have already spoken about Snoots on a previous post and have made them with straws to create a grid, this time I removed the straws and add some color to them by making a way of putting the gels inside without messing too much with the design of what you already know or have.

A lot of you out there may already have made them based on what you have read on Strobist... GOOD!!, now let's see what are the results for each one of them with a couple of pictures to better illustrate.


Snoots with Colors (Part 2)_01

(L to R) 28cm, the BIGGEST one, produces the smallest light, the 22cm is not so bigger than the 16cm but for some things it could come in handy and the 16cm is the smallest of them all and the most portable.

I tried to put all of them on the same direction and position to the white wall and also tried to put in the same amount of light for comparative purposes between them.

Snoots with Colors (Part 2)_02

I moved the strobes a little bit, from the front of the light, so you can better compare the size of each one of them against a white wall.

You also have to take in account that when you are shooting, some object or person, the light will be a little boxed when in close range as you can see from this simple image.

Snoots with Colors (Part 2)_03

I now colorized one of them (16cm) with Gold Amber #21 from the Lee filter sample package. Notice that is no white spill on it.

I believe this is one good way to make the snoots having some color without loosing too much your head or trying to pickup something to hold them in front of the snoot at last minute.

Let's colorize another one.

Snoots with Colors (Part 2)_04


So from Left to Right we have 28cm with a Velvet Green #735, 22cm with no filter gel and the 16cm with Gold Amber #21.

This is what could be accomplish with the Snoots with Color. You can use them normally with white light coming from the flash and then put in any color you like from the Lee filter gels sample packager.

My Gear - What you wanted to know but were afraid to ask_007

The final shot I created for this was a very simple one using the 3 small strobes so you can get an idea of what I was talking about.

Snoots with Colors (Part 2)

The model was the best money could bought at the time but I think it did a pretty good job concerning that he had to be running back and forward to tune the lights, grab the book, take the picture and smile :)

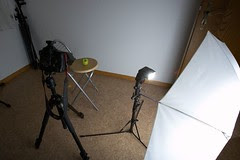
Last but not least for all you guys here is the setup shot.

Snoots with Colors (Part 2)_05

(L to R) SB26 with 16cm snoot, Gold Amber #21 Lee filter gel 1/16 at 85mm to background, Canon 580ex 1/128 at at 105mm pointing at the models face and SB26 with 22cm snoot, 1/64 at 85mm and Velvet Green #73 Lee filter gel pointing at the book. All flashes triggered with Gadget Infinity system and model digitally removed ;)

You can click on the picture to see some Flickr notes I've added to the photo.

Bottom line... In my experience the 28cm snoot really becomes 24cm in size since for it hold on to the flash head you have to put it in 4cm. For this shots this did not happened since I manage to hold it on the flash with no problem, but if you are using it outside on an assignment this can become a problem since the Snoot keeps falling to the flash front.

So, unless you really need it to illuminate something specific, keep it out of your regular gear since the 16cm and 22cm make a great job.

Besides this minor issue it works like charm. The changing of the gels is so quick that the model would not notice it and with a little usage you can even make it with yours eyes shut... or maybe not ;)

Thanks to all for the support and for reading it.

If you missed anything take a look at the first part here goes the link to it:

DIY: Snoots with Color (Part 1)

Stay tune for more cool stuff subscribing the Lighting Mods blog.

Light Painting on Vacations

Painting with Light_01Well it seems that the good days were over.

Back into Luxembourg and after almost 40 degrees in Croatia and a lower one's in Munich here the weather is not so good.
It looks like winter times have come in August, the weather is no longer the same as in the old days where they were almost fixed and now one day is summer the other is winter... what are we doing to the world :(

Anyway, I decided to pickup where I left, on the last post, and bring you some more cool stuff you can do with only your small strobe and also on vacation ;)

As we all know vacations are vacations and you're wife will tell you, almost of the time what to do, and keeps pushing you out "why did you bring the damn camera, aren't we on vacations?". Well if that happened to you you know what I mean, if not be prepared.

On vacation I usually travel light with my Powershot G6 but this time decided that I wanna to make some good photos and some good HDR (later on Flickr) and since I never been to that place why not carry a little more gear and take also the tripod, and again my wife complained (TRIPOD!!!).

Well enough of this bla, bla, bla thing and back to what I want you to see.

In the island of KRK photographic matter are everywhere from the beach to public places the people are nice and the weather helps also the light there is amazing the colors are so rich and the tones very nice.

One of those nights I went into the pear to make some night scenes and decided to use the flash on something different.

So I set the camera on the tripod, ISO 100, AV 9.0 and TV 15s and shoot the great sky at the marina.

Well... the shot did not came so good since it looked like so many others I've seen on some postcards they have there.

With Strobist in mind and after making my first try on Light Science and Magic book i decided to give it a live shot.

Grabbed the 580Ex popped up a couple of times to test how much light will be needed to fill what I wanted and this is what came out.

Painting with Light_01

Well I set the flash to 1/64 after several manual tries. I was popped manually for better control of what I wanted to illuminate. Also got some details on the other side on the docks.

The tourist were admiring the chimp (Me) from the other side of the pear while I was running from one side to the other with my 580ex on the hand painting the boats ;) cool.

Thank god my wife was at the rented apartment or else she would have laugh to.

Painting with Light_02

Setup shot is this one. You can still see me on the left side chimping ;)
This was a difficult to get focus on the boats since there were a lot of movement on the pear water and the boats would not stop for a moment, but I think I did I good and different capture.

The next shot I tried to put some people in it and balanced the WB to tungsten in order to get a stronger orange on the background and balance the tourists on the bench while they were admiring the BIG boat.

Painting with Light_03

Here is the setup shot:

Painting with Light_04

Since I was my assistant I had to run back and forward to and from the camera in order to get a clean shot and had to be careful so people would not leave their positions.

The settings were Av 5.6, Tv 1/3s and ISO 100. The flash was set to 1/128 and I was really very close to the people so the light won't spread too much into their fronts.

Hope that you make some great experiments with this technique that sometimes can save you in some difficult situations with parts of the photo with no light, also you get a different vacation photo.

Something com into my attention today while surfing around.
The subject is PHOTOGRAPHIC MEMORY and I was thinking I had a pretty good one until I saw this 2 videos from Stephen Wiltshire himself.


Take a look at them and take a minute to think how much information can your brain storage...

So go make yourself a favor and use it.

Until next time keep clicking,

Rui

Apparent Light Size (étude)

Lighting102: Unit-2.1-Apparent-Light-Size
It looks like I was getting a little behind on the Lighting 102: Unit 2.1 - Apparent Light Size.

But I manage to get a little bit of time, this afternoon, to post some of my images along with the setup shots and good info to help you out on your quest.

I did a lot of thinking after seeing a lot of good pictures about this exercise on the Flickr dedicated page so I decided to be a little bit more specific on what this is all about.

My starting point was ISO 100, Tv 200 and Av 9.0 this was then made through all the images in order for them to be consistent. The position of the light was to camera right and a couple of meters from the subject (Apple, not the computer) also not very far since the room was small but the distance enough to mount the umbrella.

The apple was standing still in a small kitchen chair, did I mentioned that since we moved to Luxembourg furniture is not abundant around the house, and I try to choose a good position so you can see the background effect as well as shadows around the subject.

So with this in mind my only concern was to get the flash with enough intensity to get a good exposure... I know I could have done it with exposure but at least this way you can see some easy to see results just by looking at the pictures, so blame me on this ;)

Since this étude has nothing to do with getting the best possible light for the apple or even trying to get too many lights to get it right. This time I only used one strobe (Canon 580EX) triggered by the Gadget Infinity and some reflective and translucent stuff to get an idea how BIG can a small light become.

Enough of talking and let's get to business...

Apparent Light Size_01Apparent Light Size_02

I set the 580Ex to 105mm and 1/16 for the power.
You can notice the harsh shadow cast on the left side of the apple produce by the small strobe pointing right at it. Also you can see part of the apple illuminated by the lighter part of the chair and also some light on the background the spill from the strobe onto the white wall behind the apple.

Apparent Light Size_03Apparent Light Size_04

Here the setup was the same 580Ex was set to 105mm and 1/16 but I used a StoFen on the flash head to create more of a candle light pointing right at the apple.
As you can see now we have a more "soft" light on all of the scene and a not so pronounced background and shadow.

Apparent Light Size_05Apparent Light Size_06

Now I changed the 580Ex light size and set it to 24mm and 1/8 power and used it through the umbrella to get bigger soft light.
You can now notice that the shadow is almost gone and all the scene as a more pleasing look.

Apparent Light Size_07Apparent Light Size_08

Here the 580Ex was set to 24mm and 1/2 but use it into the umbrella for reflective purposes.
It looks like the light is coming from everywhere. Look how soft everything is turn to. The shadows and the highlights.

Apparent Light Size_09Apparent Light Size_010

Next I decided to try with the same settings but with a silver umbrella, the 580Ex was set to 24mm and 1/4. Not much different from last one but if you look closer you can still see some at the background and also had to use less power.

Apparent Light Size_011Apparent Light Size_012

580Ex was set to 24mm and 1/1 but used up against the white ceiling and background wall to create a large reflective area.
This image shows how good can a large reflective area become when you use your small strobe against it. Very soft shadows and all around the apple you can see this soft light.

Apparent Light Size_013Apparent Light Size_014

580Ex was set to 24mm and 1/1 but used up against the white ceiling and background wall to create a large reflective area, now added the StoFen to the flash.
Have you noticed that even thou it was the same settings just by adding the StoFen it created a shadow cast on the apple and it's pole?
The background didn't look so pronounced either and the front light on the apple is now a little more visible.

Apparent Light Size_015Apparent Light Size_016Apparent Light Size_017

580Ex was set to 24mm and 1/8 but used through the umbrella and used a reflector to the left side to catch some light that could spill from the umbrella.
Here I posted 2 pictures of the same thing but the second one I changed the reflector to gold so you can notice were that little light is getting at the left side of the umbrella... can you see it?

Apparent Light Size_018Apparent Light Size_019

580Ex was set to 24mm and 1/8 but used through the umbrella and used a silver reflector to the left side catch some more light from the umbrella.
The changing was only on the reflector's color but that made some difference

Apparent Light Size_020Apparent Light Size_021

580Ex was set to 24mm and 1/4 used through a big white reflector.
I was trying to create a big softbox with the reflector or simulate a window on the right side.
It looks like I accomplish that since the light was coming through a BIG white reflector it also came out soft and diffused enough.

Apparent Light Size_022Apparent Light Size_023

To finish up I got to sheets of paper (so you don't start saying that you cannot make this étude because you do not have a big reflector or an umbrella and don't come up with any other excuse) and put one near, almost glued, the apple and the other one behind it so I could, almost, recreate
the last setup with 2 sheets of white paper.

The 580Ex was set to 105mm and 1/1, for full power since the paper is a little more thicker than the reflector, used through a white sheet of paper and also put a white sheet of paper on the left to catch some light on the other side of the apple.

Some of the light that went around the paper also gave a little ambiance to the background and illuminated the back part of the apple and the paper on the right gave it a little more fill in. NICE!!!

Hope you have enjoyed this nice étude and prepare yourself for the next one.

Please visit Lighting 102: Unit 2.1 - Apparent Light Size, make yourself a favor and make this one.

Enjoy.