This is the kind of feature I would love to see implemented on the Canon software. Although Canon has the ability to preview and record directly to card from the Remote Camera software provided it will not allow recording to the computer disk
This could be a good feature to implement and I'm pretty sure it will not be difficult to make.
Would no only allow us to remote control video but recorded it directly to a hard drive without having to buy those expensive cards and due to the 4Gb limit this would not be a violation of the video rules but a neat feature to have.
Did I mentioned any?? Well not direct Hard Drive recording for the moment but...
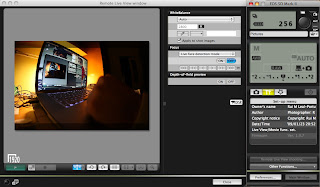
Anyway take a look at this Beta Beta Beta version of this cool piece of software unfortunately it is not available for Mac users nor for the recently released Canon cameras the 5D MarkII and the 50D giving a connection error :( hope this would be fix soon.
Enjoy... Recording video from EOS cameras with liveview was never this easy ;)
Connect camera to computer with USB, run program, press “write” button and check out the .avi file in program folder.
Sample Videos:
and this one
You can Download the software program (Windows only) Here.
And here is the Google translation for the article ;), just in case you could not understand Russian :)
--- Beginning of Translation ---
This theme is dedicated to the possibility of the record of short videotapes directly to the computer with the aid of the digital specular cameras Of canon EOS with the support Of liveView.
For this we used the program, located here, with a brief description there.
Video is written without the sound, codec - MJPEG, frame frequency of approximately 25 fps (it depends on computer), permission depends on camera, to 450D - 848x560, to 40D - 1024x680. The resulting file - this is simple the collection of personnel Of liveView without [obraboki] (and/or recoding) in the container of avi; therefore files are obtained such enormous.
If suddenly someone wants to be joined to the development, write here, truth can it is necessary to pass into the programmer branch of forum.
For many this is deprived of sense, of " [zerkalka] must remove [foto]" , strictly, probably I will agree, program was created for the indulgence, however, since users appeared, first it means to whom that it is necessary (i.e. also they frolic) By the author it was tested only to Canon EOS 450D, but it was explained that it works, also with 40D and 1000D. The 5D Mark II and 50D do not work for the moment.
I Already saw the opinion of some people, the fact that the matrix can burn about, I think this is not so bad, indeed in the program of canon EOS utility (in the regime Of liveView) we see also video, only without the possibility of record. In any event program is supplied as a test version without any guarantees, use it at your own risk.
I found this Incredible video where Scott Lynch, Steve Weiss,Jens Bogehegn and Joseph Stunzi exchange some impressions and test out some of the video cameras on the market and make a great video review about them.
You can see the resulting videos from cameras like the Canon 5D MarkII, Nikon D90, Red One, Film camera, HPX3000 and others.
This is a 10 minute video you shouldn't miss if you are a video fan or a photographer looking for the best field video device.
I know I have been a pain in the a... for not updating the blog more frequently but due to some personal problems things kind a turn out not so pink after all.
Well... we leave that for some other time and let's get to business.
I was sent one of the final production and sale models of the Canon 5D MarkII for a video and functionality review, during last weekend. I decided not to post the regular review with full specs and pics of the camera and the regular bla, bla, bla that almost all great review websites have but instead I decided to make a more non professional approach to it, tell you what my first impressions are for this piece of Camera/video equipment that's coming available to the stores during December 2008 and that maybe some of you lucky one's have it already.
for a full and great review of the camera you can take a look at dpreview.com or a more detailed one at Ken Rockwell.
Anyway, I think you can always google about it and there will be a million websites about the camera.
This video was recorded directly from the Canon 5D MarkII and edited later with some post processing software.
Now let's give it a try...
What I'm using to capture the next videos are:
- Canon 5D MarkII - 8GB Sandisk Extreme III 30MB/s - Canon EF 15mm FishEye - Canon EF 24-70mm L USM - Canon EF 70-200mm L USM IS - Manfrotto Tripod - Me :)
All videos were recorded directly from the Canon 5D MarkII with no editing nor post processing. The sound is recoded mono from the camera on a built in microphone, you can use a stereo microphone but you have to connect it to the camera and I had none available by the time I recorded these videos.
Sorry if the final quality here is not as good as the original but I had to compress it to fit on YouTube (Try to see them on YouTube in Full HD mode for a better quality). I think you will have a pretty good idea of what you can accomplish with the Canon 5D MarkII.
The Canon 5D MarkII features 16:9 Full HD video capture at 1920 x 1080 pixels and 30 fps as well as 4:3 standard TV quality (SD) video capture at 640 x 480 pixels and 30 fps.
If you are, like me, not yet into video mode, here goes some good tips for converting your big movies to HQ small size to fit YouTube, Vimeo or others. I use Apple Quick Time Pro for exporting these videos.
TIPS: VIDEO CODEC EXPORT COMPRESSION
Okay, I'm going to be honest with you: there’s no way I can make exporting/compression guides for every kind of video software on the market. It’s just overwhelming! However, I do want to give you some guidelines for compressing your videos for YouTube, Vimeo or other with great High Quality so look over these tips, find the corresponding settings in your software, and you should be able to make it work for you.
Note: Sometimes these settings are in ‘Advanced’ or ‘Options’ when exporting.
* Codec Choose H.264 for the video codec. Choose AAC for the audio codec.
* Frame rate This is usually 30, in Europe it's usually 25. If there is an option that says “current” just go with that. Please note that Vimeo converts all HD videos up to 24 frames per second for optimum playback performance.
* Keyframes Every 30 frames. This is basically how often the compressor references your uncompressed video.
* Data rate 1800 kbits/sec (for regular video) or 5000 kbits/sec (for high definition). Making this number higher will increase both quality and size.
* Size 640x480 (for regular video) or 1280x720 (for high definition). Please note, 1440x1080 videos will not be widescreen on Vimeo, you must compress them as 1280x720.
* Deinterlace Yes. If you do not deinterlace, you will often get weird-looking horizontal lines in your video.
* Sound sample rate 44.100 kHz
*Audio quality You want audio with a bit rate of 128 kbps. You can set your audio to really good quality without increasing file size too much.
Those are the basic principles that will apply to almost all of the video programs out there. Enjoy and if you feel like I'm missing something here please leave it in the comment section for others to follow, thanks.
First video recorded on the Lisbon subway (Original file 467,5MB after conversion 54MB). This was the first straight forward movie with no great deals about it, snap the lens on the camera and push the record button.
When I played the video on Full HD I noticed that it was a little jumpy on my Intel MacBook Pro with 4GB as moving people looked a little funny ;( and I can tell you that you will need a much faster card for recording in HD quality on the Canon 5D MarkII so that the recording will come out steady enough. I was not able to repeat this with a new ultra fast card because I lack one but I will do my homework and will update this later on.
On the second video (Original file 1,08GB after conversion 122,7MB) I decided to move into the interior of the subway train and capture some moving interiors as well as some shooting while recording. You can actually see the camera stopping and also ear the shutter taking the picture. I did 2 stills while recording, at about 2 minutes of video time I use the focus button to see what happened and we can ear the sound of the lens mechanism searching for focus, so no focus while recording ambient sound or you will get it on your home recordings.
I also found focusing a little clumsy (on button mode) as the camera search for the right focus for quite sometime when in a not so well balanced ambient light, hey this is not a VIDEO RECORDING CAMERA!!!
I found amazing that when people are moving in front of the camera, if you have the face detection focus switch on, it creates a rectangular around people faces and track them down like rabbits :) The tracking system is really fast I wish the focus was too, but this is me asking too much from such a new camera.
On the third video (Original file 1,37GB after conversion 147,4MB) I brought the camera, around the neck strap and start walking out of the subway and into the streets up into my front door. I wanted to capture different light scenes from the street with no so much caring about movement or focus, since I do not have a way to change the ISO on the camera and the aperture while recording, I wanted to check if the camera was responsive enough to the abrupt light changes and different color temperatures.
I can tell you that no one, on the street, noticed that the camera was recording while on neck strap and was all done with a 15mm FishEye lens so I pass like "Invisible Man" hey you can see my shadow sometimes ;).
On this matter the camera reacts well to lighting exposures, as you can see on the above video, but I do feel that it would be more flexible if you could control ISO and aperture. Unfortunately my L lens do not have an aperture ring :(
On the fourth video (Original file 1,02GB after conversion 134,2MB) I took the camera out and put it on a tripod to capture some movie of the Tallest Christmas tree in Europe that is laying here in Portugal. As the tree changes colors you can see the camera adapting to it kin of neat effect. The sound is ambiance nothing was changed. I also try playing a little with zoom on my Canon EF 24-70 L USM, took some shots while recording and also panned the camera while on tripod.
On the fifth and last video (Original file 364MB after conversion 43MB) I decided to start with a fade and the focus on fade. This was recorded on a Canon EF 70-200 L USM IS and I wanted to check the IS for stability purposes and also on tripod. when you use IS the camera does not stop it it's always on working even if you do not press the button. I felt that this is a good option but with too much battery consumption. I also use the zoom in and out so you can get a grip of the out of focus.
Final thoughts... although I did not have time to completely explore the video mode but I can tell you that if you are planning on buying the Canon 5D MarkII to record your kids at home please take in consideration to buy a VIDEO CAMERA instead since this one will not suite you because the lack of quick focus and aperture control.
But if you want to experiment with video I think this is a great camera to start with, although a lot of improvements could be made on direct video menu access, aperture control and pause mode just to name a few.
I felt that if you try this one you will not be disappointed with it and with the full frame 21MP this will be a major feature for quality purpose and also for portability as a second body.
Hope you have enjoyed the videos as I'm the first Portuguese to have test it on video mode ;)
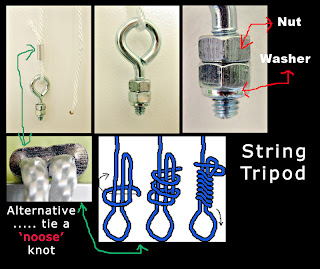
Carrying the tripod everywhere sometimes, at least for me, it's a pain in the a.. It's heavy and I have a heavier and a lighter model but to carry it with me with my Powershot G9 seems a little too much for such a small camera.
After taking a Google search I found out a great solution that could be a helper on those occasions when you need to take that quick shot with your Point and Shoot and do not have any tripod or place to put it in.
I also bought another great very useful gadget, but will talk about it on another post.
Just build this Image Stabilizer and see how much better your photos and videos can become.
Get professional results, well at least that's what they sold me ;), or maybe would be better to say "Get almost professional results" sounds much better for me :)
This instructional video made by Abby shows you how to build your own stabilizer in 5 minutes for less than €1,00.
It is super light weight and folds up small enough to fit in your pocket.
With this stabilizer, you can hand-hold your camera with shutter speeds at least 3 stops slower than without it.
It works also well with video cameras.
Want to see some more about this easy DIY you can take a look at another wonderful and well written tutorial by shoeBlade with lots of pictures and follow along instructions.
And if you are into Panorama photos you can have this technique applied as fellow photographer Bob Lorentzen show in one of his lessons (Hand held "Virtual Pano Head" Panoramas) or take a look at Philippe Hurbain page for some more resources on the "Virtual Pano Head".
Here is a shot video for panorama shooting presented by Bob Lorentzen:
I guess this would be a great idea to improve stability on my Canon Powershot G9 since, sometimes, it get my grips for not getting that image stable at maximum lens length or low light.
Great solution to travel all the time with you and in your pocket.
I'm getting a fan of Chase Jarvis stuff this guy is really a different commercial photographer.
He really makes photography in a different way.
Here is a presentation video at Phootshelter Town Hall in New York City where he talks about his work and some more great stuff like different angles, guns pointing at heads on ads, just take a look and follow his explanations on it.

 This is the kind of feature I would love to see implemented on the Canon software.
 Enjoy...