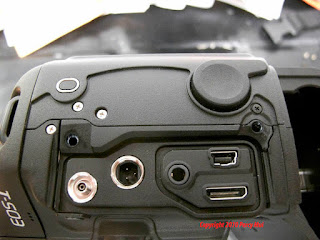
I would like to share with you the guts of a Canon 1D MarkIV.
Would like to thank Perci Mui (The Tech-Photographer) for these great pictures and he also explains how to get to the Pentaprism so you can attempt to clean it from dust bunnies.
Now you know what it takes to clean out that Pentaprism.
Grip and terminal views, external.
Back cover opened. Also front cover and back eyepiece has been removed.
Various connectors in the back assembly. These are for the power, a/d cards, etc.
Power supply card and the top of the prism assembly.
Top of prism assembly and the front of the body.
Back end of the body, different views.
Focusing screen and pentaprism.
Bottom and top views of the pentaprism.
Perci also explains how he removed the pentaprism for cleaning:
"THIS is the target area. Note the curved surface in the center of the
picture. This is the condenser lens, and the surface above it is the
flat area of the pentaprism. The area in between these two is not
accessible with standard or even semi thorough cleaning. Yes, I've
tried removing the focusing screen and looking for access points for
purified air to blow and clean the area - there are none.
What you have to do is remove the pentaprism, take out the lower LCD display and then you have access to this area.
Dust will definitely creep into this area when changing lenses. It
doesn't matter if you're holding the camera face down, or are very
careful changing lenses, it will eventually happen. There is enough of
an air gap to cause problems. If you have a EOS 1 series camera, look
at the very top of the mirror bumper (two foam pieces). Now look ALL
the way up - you'll see a thin gap. This is more than enough for the
junk to get into.
The pentaprism area isn't sealed with silicone around the edges. If Canon did this, there wouldn't be any problems."
Back view of the eyepiece. Other pic is of the power supply.
Pic of the top LCD interface board. Note the finger wheel and shutter
release contacts. Other pic is of the underside of the top cover where
the LCD panel resides. Note that the shutter release assembly is gold
plated. Bottom of the contacts have a "scrubber" to remove oxidation.
Take a look at the area above and to the left of the finger wheel.
That's the FEL button switch.
Media card interface. Look on the right hand side for the silver area.
That's the shielding for the card reader. Other pic is of the copper
shielding for the microphone. Note the area next to it - it's a
conductive adhesive blanket to make sure that any noise present goes to
the ground of the camera.
If you enjoy this please take sometime to check it's web page here.


5 comments:
NO WAY i'm gonna ever do that to my camera. Never ever. I'm not that brave.
Massive Kudos....I don't think I would have the guts to do that to my camera!!!
i love taking things to peices but this looks abit far out for me my camera stays in one peice
I am Thinking about doing the same to my Mark IV ,Them seal the gap so it doesn't happen again. Just a little worried as when i take apart anything and put them back together
i am almost always left with screws??
I am Thinking about doing the same to my Mark IV ,Them seal the gap so it doesn't happen again. Just a little worried as when i take apart anything and put them back together
i am almost always left with screws??
Post a Comment