Showing posts with label DIY. Show all posts

DIY: Cheap Image Stabilizer for Your Cameras


Don't be the slave of your tripod.

Carrying the tripod everywhere sometimes, at least for me, it's a pain in the a.. It's heavy and I have a heavier and a lighter model but to carry it with me with my Powershot G9 seems a little too much for such a small camera.

After taking a Google search I found out a great solution that could be a helper on those occasions when you need to take that quick shot with your Point and Shoot and do not have any tripod or place to put it in.

I also bought another great very useful gadget, but will talk about it on another post.

---Update 06-02-2008---

You can check it out in here.

---//---

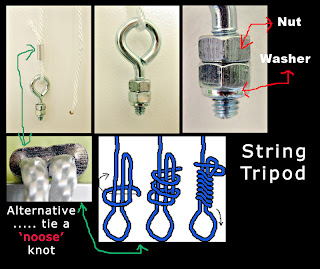
Just build this Image Stabilizer and see how much better your photos and videos can become.

Get professional results, well at least that's what they sold me ;), or maybe would be better to say "Get almost professional results" sounds much better for me :)

This instructional video made by Abby shows you how to build your own stabilizer in 5 minutes for less than €1,00.

It is super light weight and folds up small enough to fit in your pocket.

With this stabilizer, you can hand-hold your camera with shutter speeds at least 3 stops slower than without it.

It works also well with video cameras.


Want to see some more about this easy DIY you can take a look at another wonderful and well written tutorial by shoeBlade with lots of pictures and follow along instructions.

And if you are into Panorama photos you can have this technique applied as fellow photographer Bob Lorentzen show in one of his lessons (Hand held "Virtual Pano Head" Panoramas) or take a look at Philippe Hurbain page for some more resources on the "Virtual Pano Head".

Here is a shot video for panorama shooting presented by Bob Lorentzen:

I guess this would be a great idea to improve stability on my Canon Powershot G9 since, sometimes, it get my grips for not getting that image stable at maximum lens length or low light.

Great solution to travel all the time with you and in your pocket.

DIY: Fireballs - Special Effects for your photos

Here is a great video that shows you how you can make a Fireball in simple steps.

You can use them on your sets to create some great SFX effects.


How To Make Fire Balls - For more funny movies, click here

Enjoy and do not get burned!

Share some photos with us on the Lighting Mods Flickr Group and tag them Fireball.


DIY: Improve your Manfrotto 026 Lite Tite Swivel & Umbrella Adapter

As you may noticed I have made some changes on the right side panel so it would now be much easier, for all of you, to get a particular article without having to go through the blog Month by Month in search of the one you would like, now you will have a drop down Menu with all the articles available.

By experience I know that Strobist products are difficult to find in Europe and some times people do not have time or patience to look for them through Google so I decided to make available a compilation of stores in Europe where you can get them and compare prices, will try to update it frequently. Take a look under the Strobist logo "Strobist gear: Where can I find it in Europe?" also as a drop down menu.

On todays article I decided to show you some improvement you can make to your already purchased Manfrotto 026 Lite Tite Swivel & Umbrella Adapter.

For quite some time I was trying to get a solution to fix the annoying metallic screw on the upper part of the adapter but without great results. Decided to give it another try around some of the hardware stores around here and found one that finally got what I needed.

Butterfly Wing Screws, well I think this is the correct English name for it even that it sounds like a sexy hot kinda of thing came out of a Kamasutra book. So correct me if I'm wrong on the name of this thing.

DIY Manfrotto Umbrella Adapter Improvements_001

Here is what we will be needing to make this simple DIY:

- 1 Butterfly Wing Screw
- 1 Spray can of Black Mate ink

As you can see on the above picture I'm going to change that T-Type screw and replace it with the Butterfly Wing Screw. I do not know what you think about the T-Type screw but for me was kind of a difficult one to turn and sometimes I would get so desperate on how long it would take to screw or unscrew it.

DIY Manfrotto Umbrella Adapter Improvements_002

Just remove the T-Type screw by unscrewing it from the Manfrotto 026 Lite Tite Swivel & Umbrella Adapter.

DIY Manfrotto Umbrella Adapter Improvements_003

And now just replace it with the Butterfly Wing Screw on the Manfrotto 026 Lite Tite Swivel & Umbrella Adapter.

DIY Manfrotto Umbrella Adapter Improvements_004

This is what it would look like after you have replace it with the old one. Do not fear since it would not put in risk the use of the round screw just beneath it.

They will work great together since the Butterfly Wing Screw would stay out of the way when you screw it in with the adapter.

DIY Manfrotto Umbrella Adapter Improvements_005

The image above is another tip I wanted to show you and that a lot of people may not be aware of it.

Did you know that if you pull this lever out it will be able for you to put it on a different position without unscrewing it?

This is a great feature for when you have to store it on your bag and the handle always stays on the wrong position.

DIY Manfrotto Umbrella Adapter Improvements_006

After replacing the Butterfly Wing Screw this is what it would look like. See the difference between each of the screws?

Wondering what that white plastic part is?
It's a Pocket Wizard holder.

Wanna make one too so that your Pocket Wizards would not bang on the stands?
Just take a look at another post and see how you can build a Pocket Wizard holder.

DIY: PW Stand Holder for less than 5,00€

DIY Manfrotto Umbrella Adapter Improvements_007

I did not like too much the shinny Silver look of the Butterfly Wing Screw so I decided to paint it mate black.

DIY Manfrotto Umbrella Adapter Improvements_008

Spray that Butterfly Wing Screw !!!

DIY Manfrotto Umbrella Adapter Improvements_009

And while spraying that out I thought why not take the time and paint also the PW holder?

So I painted it, now have a much Pro look and less eye catcher.

DIY Manfrotto Umbrella Adapter Improvements_004DIY Manfrotto Umbrella Adapter Improvements_010

Manfrotto 026 Lite Tite Swivel & Umbrella Adapter and Pocket Wizard holder Before and After

DIY Manfrotto Umbrella Adapter Improvements_011DIY Manfrotto Umbrella Adapter Improvements_012

Take a look at one side and the other after mounting it to the stand and adding the Pocket Wizard to the holder.

DIY Manfrotto Umbrella Adapter Improvements_013

Closer look of the new Butterfly Wing Screw that I add to the previous version of the DIY: PW Stand Holder for less than 5,00€

Butterfly Wing Screw makes it easier to screw and unscrew the Pocket Wizard also making it more tight.

DIY Manfrotto Umbrella Adapter Improvements_014

Closer look of the Pocket Wizard Holder from the front side.

Hope you have enjoyed another easy DIY Mod for your Manfrotto 026 Lite Tite Swivel & Umbrella Adapter and Pocket Wizards.

View Blogs reaction

Add to Technorati Favorites

DIY: Westcott sharp tips protection

Westcott Umbrellas Sharp Tips Fix_001I hope that everyone had a good Christmas and a fabulous Happy New Year's day.

What a better way to start 2008 than a Do It Yourself tip ;)

I would also like to mention a place in Europe where you can get the Westcott folding umbrellas for a reasonable price.

Well that's right, I finally found a place where we all can get our Westcott umbrellas in Europe without being afraid for the expensive custom taxes nor those horrible Adorama logos.

You can check the full story on another post "Adorama uses Strobist photographers as free advertisers" and follow the Flickr thread in here.

During December and after my failed attempt on getting some Westcott folding umbrellas from Adorama I phoned the main house and they gave me the direct contact for the European importer.

The company is called Creative Video (CVP) and Pete Trevena is the manager. The company is based in the UK and they are the exclusive importers of Westcott products for Europe customers.

Westcott Umbrellas Sharp Tips Fix_002

I decided to give it a shot and ordered one 43" Soft Silver Collapsible Umbrella (# 2001) and three 43" Optical White Satin Collapsible Umbrella (# 2002).

After exchanging some emails with Mr. Trevena and explaining my problems and situation with Adorama logos He personally told me that they do not have the Westcott umbrellas without any company logo except for Westcott and that the ends were not sharp.

The price for each umbrella unit is €29,45 + €5,15 VAT (€34,60) plus shipping to your country this makes them a good option. The CVP company does not work with PayPal or VISA payments so you will need to make a Bank IBAN money transfer to their account.

If you visit Creative Video (CVP) website the umbrellas are not visible available through their products so the best way for you to get them is to send an email or call asking for prices and shipping to your country so they could send you an estimate email.

--- Updated 22-02-2008 ---
As per my suggestion Creative Video decided to make the Westcott folding umbrellas pictures and links available at their website you can check above the direct link for each model:

F J Westcott 2001 43inch optical white satin collapsible umbrella
F J Westcott 2002 43inch soft silver collapsible umbrella
F J Westcott 2011 43inch optical white satin collapsible umbrella

This way you no longer have to send an email asking for estimate, but if I were you I would send and email confirming availability and also the price to send it to your home country.

---//---

Here are the complete details of the company:

Creative Video Productions Limited
Castle Road
Studley
Warwickshire
United Kingdom
B80 7AA

Phone: 01527 854 222
International phone: +44 1527 854 222
Facsimile:01527 857 666
International facsimile: +44 1527 857 666
Email: sales@creativevideo.co.uk

Opening hours:
Monday: 09:00 - 17:30
Tuesday: 09:00 - 17:30
Wednesday: 09:00 - 17:30
Thursday: 09:00 - 17:30
Friday: 09:00 - 17:30
Saturday: 09:00 - 13:00
Sunday: Closed
Bank holidays: Closed

Westcott Umbrellas Sharp Tips Fix_003

After placing the order at the beginning of December I received it 3 weeks later, not bad, concerning that they had to order some of the umbrellas from the US.

Westcott Umbrellas Sharp Tips Fix_004

Although everything came with a good package I instantly noticed that the tips of the umbrellas were the sharp ones :(

Nothing that I was not expecting, since I had previously talked to Westcott headquarters in the US and they told me that the only umbrellas they make now with the round tips are the White one's with a removable black cover. They also told me that they had a few problems with the round tip production because they easily tear apart.

Well I have mine with round tips for a year now and never had any problem with them.

Westcott Umbrellas Sharp Tips Fix_005

Anyway since they only had the Westcott logo I decided to keep these ones and start look for a solution to not hurting myself on closing them nor hurting other people with those sharp tips.

This is what you will need for todays DIY sharp tips protection and pencil reinforcement:

- A normal pencil (for the reinforcement)
- Glue
- Scissors
- Lighter
- Plastic Electrical Heat Shrink (Sleeve)

Westcott Umbrellas Sharp Tips Fix_006

Get the pencil and cut it in order to fit inside the umbrella metal stick and had some glue to the pencil so it can stay inside after drying out.

Tip: The IKEA pencils do not fit tight so don't bother bringing them home instead get some of the office :)

Westcott Umbrellas Sharp Tips Fix_007

Here is the pencil going inside the umbrella with lots of glue, now you just have to clean that extra glue :)

Tip: Use some UHU glue or some other but pay attention not to choose one that dries quickly or else you would risk of having the pencil glued before you put it all inside the umbrella metal stick.

Westcott Umbrellas Sharp Tips Fix_008

Nice and easy. Take a look at the complete and detail article on another of my posts DIY: Westcott Umbrella Reinforcement.


Westcott Umbrellas Sharp Tips Fix_009

Now let's move to the part of the sharp tips.

What do I call "sleeve"?

Well Sleeve is an electrical plastic thing that is used to isolate the electric wires when you weld them. I think you can find this on any electrical/electronic components store and is commonly known as Heat Shrink.

The Heat Shrink I use here measure 1,2mm thick and they fit very nice on to the umbrellas tips. They are identical to the ones I used on the article DIY: Flash Hot-Shoe MOD.

Westcott Umbrellas Sharp Tips Fix_010

Now let's cut them up so they can be put on all of the sharp tips as a protection. Measure the tip by putting it through the tip just remember to leave a little bit out.

Westcott Umbrellas Sharp Tips Fix_011

You will need to cut 8 of them to each of the umbrella tips.

Westcott Umbrellas Sharp Tips Fix_012

Cut them like this and put them in. Leave a little bit out so when you shrink them they will not be too small.

Westcott Umbrellas Sharp Tips Fix_013

Use the lighter to tight them up since as soon as you got them hot they shrink and mold to the shape of the tip.

Tip: use the middle part of the flame (blue) so you won't burn them out, this way you will get a lot of heat and will not burn the Heat Shrinker (Sleeve).

Westcott Umbrellas Sharp Tips Fix_014

This is what it will look like when you finish. Make each one carefully so you won't burn any part of the umbrella.

Westcott Umbrellas Sharp Tips Fix_015

Here is what it look like on the Silver umbrella.

Westcott Umbrellas Sharp Tips Fix_016

And here is the look like of the finish of the white umbrella. This would not interfere with the lighting situations and would be much safer when you close the umbrella and also if anyone, by accident, pass by it.

I hope this would help you out with the sharp tips on the umbrellas.

I also would like to wish you all a great 2008!!!

DIY Grid/Snoot - Template PDF Files

Passionate Photographer Jon MacKinnon, like me, he's an aficionado for the DIY stuff.

He contact me a couple of weeks ago saying the he recently started a Discussion group at Flickr concerning my Lighting Mod posts DIY: 580EX Color Gels Printing Diagram and DIY: Black Straws Snoot Grid (Part 1) (do you still remember them?) and the discussions are all about diagrams for different flash models and you can even add your own model if it isn't already there.

Also visit Jon's Flickr stream for some great DIY stuff.

Here is a list of the strobes Templates available for download at the bottom of this post.

CANON
- 580EX & 580EXII 

(Although the 580EXII is not on the files you can use the 580EX Template to create it as they are very similar).

NIKON
- SB-25 and SB-26
- SB-28
- SB-600
- SB-800

SIGMA
- EF-500

VIVITAR
- 283

I think this would be a lot helpful if you are into building one of these babies.

Thanks Jon for this wonderful idea and keep up the good work.

You can download the complete package at this MediaFire link here.


---//---

Pimp Your Laptop Case with Chase Jarvis


Could not resist on putting this great video from Chase Jarvis collection.

DIY: Soft Light Panel - Small Improvements (Part 2 of 3)

Improving Light Panel_038A lot has been said about Light Panels and the use of them.

This simple home made panel can make a huge difference on how your light will fall into the subject. You can use it as a reflecting surface as a shot through or simply as a fill.

The light is very soft and will wrap around your subjects in such a way that after you test it you will not want another thing.

If you have already build yours with the guidance I explained at DIY: Soft Light Panel - Basics (Part 1 of 3) now it's time to improve or tweak it a little with some small features.

The small improvements, you can make them yourself, and you will see that they will not cost you too much money and time to put together.

Improving Light Panel_001

First let's start by cutting our sheet of white or black fabric (1,25 m (L) x 2,10 m (H)) to the measures of our tube structure in this case 1m long x 2m tall.

Many of you were mailing me advising that you can get inexpensive pieces of Ripstop fabric (this stuff is used to make Hot Air Balloons and Parachutes). You can find them at Fabrics-n-Stuff in the UK (I've made a link on the "Stores in Europe" at the right side panel for future references).

Anyway, since I couldn't find the Ripstop fabric here and by the time I'm writing this I couldn't have any available I just made mine with a normal white fabric.
Pay attention not to get the silky shiny ones since they will block more light than the normal white fabric.

My advice is: when you're buying the fabric take your strobe with you and test it on the store to see how much light will come through it and by doing this you can choose what best fabric will serve your purpose.

Improving Light Panel_002

I put the assembled frame on the floor over the fabric so I can better see what I'm cutting. Choose one the corners of the fabric and align it.

Improving Light Panel_003

This is how much fabric space I'm leaving after cutting it out. By doing this you will have some spare tissue to adjust and stretch the panel later on.

Improving Light Panel_004

Now get the scissors and start cutting. Remember that with the measures of the fabric you will only be cutting 2 parts of the fabric. One on the tallest and another on the widest side.

Improving Light Panel_005

Here is the final shot after all cutting. See the small amount of fabric out of the frame?
I left mine 6cm all around from the edges since this is more than enough.

Now let's move into a part that many of you were asking about.

How to make this thing stand up?

Well, I use my panel with no legs because because I attach it to another panel with some collars joints. This will give me some more flexibility on where I can use it and even to transport it.

Anyway I will put here some photo options that you can make yourself and decide what best suits you.

Improving Light Panel_006

Here is the joints or collars (Colliers in French) bought this at LeRoy Merlin in France and they are part of the water tube section on the hardware store.
They are used to joint tubes together and be fixed on a wall as you can see by the center screw it has. They come in a pack of 5 and the pack costs 2.20 euros.

I also bought a screw and a nut so I can join 2 together so this will make a jointing section.

Improving Light Panel_007

Here is the picture of what I mean earlier when I said join them together.
You simply have to remove the inner nut, that comes already with the collar, because the one that comes won't let you screw completely.

Improving Light Panel_008

When you join them together they will look like this and they are ready to be used.

Improving Light Panel_009

A close up of the collar joining 2 panels together.

Improving Light Panel_010

I use 2 of these to assure that the panels stay firmly connected and standing straight.

Improving Light Panel_011

Full panels joint together with 2 collars. This is practical because you can move the panels around until you get the position you like.

You can even put one white and the other black to prevent flare on the camera or background or put a white fabric on each and create a folded white panel for something you need.
I leave those options up to you.

Improving Light Panel_014

You can use 45º joints to put in between the 1 meter tall tubes and get some feet for your panel.

Improving Light Panel_015

Here is what it will look like after making this. In this picture the panel is not standing straight because the tube for the feet was too small I didn't have a longer one so I just used a 1m to show you what this will look like but you will need at least a tube of 1,5m or 1,75m long so it can be straight.

Improving Light Panel_016

Another option is to use the previous made joint collars to put up 2 feet's.

Improving Light Panel_017

This is what it will look like.

Improving Light Panel_018

And another shot of it standing up. As you can see I left the 45º joints so you can compare both and decide.

Improving Light Panel_019

Last option for the feet standing is to use one of your spare stands and lean it to it on one side. In this example I used a Nano01 from Manfrotto that I normally carry with the strobes.

Improving Light Panel_020

Another view of the stand holding the Panel. I put the stand visible so you can see what I mean but normally I do not put it on the middle of the panel because this can cause a shadow on the subject. You just put it lean on one side and it will hold the panel. In case you want to keep it firm use just use a clamp to hold it better.

Now let's move to improve the quick assembly process so you won't stick your head on the ground when you need to put the panel up very fast.

Improving Light Panel_013

First glue some joint parts to the tubes.

Improving Light Panel_012

I glued like this, on the corner and in the middle part as you can see in the above photo.

Improving Light Panel_021

This is a piece of elastic that I bought from Leroy Merlin at 0,65 euros a meter. You will need, more or less, 6,5 meters to put it through all the tubes.

When choosing the elastic make sure it's a thick one because I bought also another not so thick and it took me longer to put through the all tube system but it makes the same effect only takes longer to put it through.

Improving Light Panel_022

Put the elastic through the tubes. You do not need to start by any specific point.

Improving Light Panel_023

After putting it through all the parts it will look something like this.

Improving Light Panel_024

Then you just have to pull , a little, both parts of the elastic so it will stay firm and after you cut it and make a knot with the both ends it will go and stay inside the tube.

Improving Light Panel_025

Here is the final shot ready to transport it anywhere.

Improving Light Panel_026

A closer look of what it will look like after running the elastic through all the tubes and bending it all together for transportation.

Improving Light Panel_027

You can even use the part of the elastic that you cut and will not use to hold them together like this.

Improving Light Panel_028

Let's bag this baby.

Improving Light Panel_029

I can stiff 2 Panels with fabrics inside one Manfrotto stand bag and this is lightweight and easy to transport. Also with the elastic inside the tubes it will be much easier, and faster, to assemble and you will not loose any tube part along the way.

Now you are ready to go anywhere with them :)

For final on this improvements you can sew the fabric all around so it won't unweave.

Improving Light Panel_031

Improving Light Panel_030

Improving Light Panel_032

I bought a white elastic band (25mm width) to sew it on the corners of the fabric so it will be much easier and faster to put the fabric on the structure tube.

I measure and cut 13cm long for the elastic band and from the corner to the interior of the fabric I measured about 20cm so that the elastic could be a stretched.

I made the sew myself and this was a not so well done job since I'm not a sew man but it got very good for the purpose I wanted. So don't come with any excuses when you need to sew it ;)

Improving Light Panel_033

Here is the final shot. As you can see the sewing is not in a so good shape but it holds :) and I didn't make the all around sewing, blame me!!

Improving Light Panel_034

This is what it will look like after sewing the elastic at the 4 corners of the fabric. You can notice that by doing this the fabric will stretch a little and this would make our light task more easy.

DIY: Soft Light Panel-Basics_005

I decided to change my approach to attach the panel to the tubes by putting 3 collars at each 1m tube (Making a total of 18 collars for panel) instead of using the clamps.

First because the clamps are too big and clumsy and not so good at holding tight the fabric, second because it will not make possible to twist it to stretch the panel the way I want it and third the 18 pieces I needed they become very bulky to carry around in the bag.

Improving Light Panel_036Improving Light Panel_035

You can see here what I mean by twist... You attach the collar to the front part of the panel with the fabric already on and twist it to the back until you get the right stretch.

Improving Light Panel_037Improving Light Panel_038

Here is a shot of the back and front of the panel after all the Improvements were done.

See how small the collars are you can hardly notice them on the panel frame. This collars are almost like an adjustment feature that you can stretch the panel at the places you need.

Improving Light Panel_039

Here is the panel in action with a SB26 at 18mm a 1,5 meters from the panel. The bottom part may need a little improvement but the space was not much to make this... oh well maybe on part 3 ;)

Improving Light Panel_040

And if you move the light towards the panel you can get this halo effect that, eventually, could be useful in some cases.

Hope you enjoy the improvements and stay tuned for the last part of DIY: Soft Light Panel - Functionality (Part 3 of 3) where I put some examples of what light you can get with this Panels.

DIY: Soft Light Panel - Basics (Part 1 of 3)
DIY: Soft Light Panel - Functionality (Part 3 of 3) - Soon