Showing posts with label DIY. Show all posts

DIY: Ball Bungee


It's been a while since I did not posted any news here on the blog but the boat has started to put some water and the holes need to be closed. Since there are so many holes to close it's taking a little bit longer to maintain Lighting Mods at full speed but I hope that soon it will be at full speed again.

I would like to thank you all for the kind words that has been arriving through the sooo many emails and for the numerous requests for some more DIY projects.

While you wait for more new stuff take a moment to go through the right side menus and check the other stuff, you may find something useful in there for your small strobes and maybe it could even help you out at some point.

THANK YOU readers for hanging out.

A lot of people been asking me where to get the Ball Bungees because not every corner have them available.

I decided that it was time to put out this inexpensive Do It Yourself (DIY) Ball Bungee project. I name it Ball Bungee as title for today's article, just as a reference, but the real name I call them is NUT BUNGEE.

Sounds a little like what I feel sometimes... but it fits it's purposes and that's what matters.

Let's begin by explaining what are these Ball Bungees and what they are useful for.

They are loops of a thin elastic rope whose nodes ends on a plastic ball. With this Ball Bugees you can, not only stretch tight schedule, but they are simply a versatile tool to fix things together. I use it for a lot of different purposes and one of them is secure the umbrella to the light stand for a much easier way to carry them both.


Unfortunately, buying these loops are not offered in Portugal like in so many other countries. So I decided to create a simple, but with lot's of images, DIY project so you can create yours in a blink of an eye.


First you need to move your body to a hardware store near you and search for these next items:

DIY: Nut Bungees 001

Elastic rope with 4mm or 6mm. I do prefer the 4mm and let you know why later on, but you can always make these with any thickness and color you like.

Next we go NUTS!!!!!

DIY: Nut Bungees 002

Thickness M8 or a M10 size nut depending on the thickness of the elastic rope you have chosen for your project.

DIY: Nut Bungees 003

I also bought some M12 just in case the 6mm elastic rope would not fit inside the M10.

DIY: Nut Bungees 004

So let's take a closer look at what you really need:


- Elastic rope about 1 meter or more, depending how many you would like to make.
- Nuts M8 or larger, depending on the thickness of the rubber rope.
- Scissors.
- Lighter.
- Ruler or Metric Tape.

DIY: Nut Bungees 005
DIY: Nut Bungees 006

These are 2 different Original Ball Bungees with different sizes to tight different things.


Now that we have what we need let's begin...

DIY: Nut Bungees 007

I'm cutting the 6mm Elastic Rope with a 40cm long to produce a 20cm Nut Bungee, so if you need to make a longer one just cut it more, simple as that.

DIY: Nut Bungees 008

Now you understand why the lighter ;) So in order for the tips would not come apart is better to burn them a little so that the elastic would not unweave itself.

DIY: Nut Bungees 009

Here it is burned but not toasted.

DIY: Nut Bungees 010

Now let's grab the 6mm Elastic Rope and put the both ends through the tiny Nut hole with the help of the scissors (this sounds like weird but it's not... hole, nuts, nut, hole... well simple), let's move on.

DIY: Nut Bungees 011

UFFFF!!!! DONE!!! The 6mm is very thick and difficult to tight the not so that's why I prefer the 4mm Elastic Rope. They also make the job done and for the small strobes are perfect unless you are trying to tighten together heavy stuff.

DIY: Nut Bungees 012

This is what it should look like in the end.

DIY: Nut Bungees 014

This is something I was searching through the shells and found interesting so I bought it to test if was really cool. And in the end it does :)

What is it, you may ask?

It's a cover for the 10M Nuts with this you can cover your Nuts (uppsss!!) your Screws, well not that a... hum!! well this writing is a different lead. STOP STOP STOP REWIND!!!!!

So, as I was saying this is a cover to conceal the Nuts and this way they would not be banging on your stuff while in the bag. Unfortunately I only saw for the M10 Nuts, maybe they will have it somewhere else. Anyway I will give you an idea of what I'm talking about.

DIY: Nut Bungees 015

This is the box where they came in.

DIY: Nut Bungees 016

See what I mean? To cover the Nuts, just that :)

DIY: Nut Bungees 017

Since they do not have a hole in the back end one need to be made.

DIY: Nut Bungees 018

So grab the scissors and make a nice hole that corresponds the size of the Elastic Rope thickness you have.

DIY: Nut Bungees 019

This is what it should look like in the end.

DIY: Nut Bungees 020

Put it through the Elastic Rope right before you put the Nut.

DIY: Nut Bungees 021

Then make a loop knot at the end and you have your Nut Bungee ready to use.

DIY: Nut Bungees 022

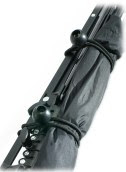
That's it. I also made a bigger ones with the small Elastic Rope just in case I need them bigger than my originals.

DIY: Nut Bungees 023

An example of what you can use them for.

DIY: Nut Bungees 024

Another example of what you can use them for.

DIY: Nut Bungees 025

You can even use them to hold your strobes either together or against something. Just use your imagination.

If you prefer you can always get original ones at FlashGels in the U.K. Just tell them you are coming from Lighting Mods for a discount ;)

Hope you enjoy this DIY and see you again soon.

DIY: Inexpensive Strap Mod

Strap Mod_013

Today I want to share with all of you an easy solution for you to start carrying your Tripods, Monopods and even the Strobist Stands.

For quite sometime I was trying to find a good and inexpensive way to add a strap to my stands, tripods and monopods that would help me to carry them on my back without the effort of also carrying the pouch bag that comes with them.

This pouch bag was always a big pain in the a.. since that when you wanted to take a picture with your tripod during those night photography scenes you always had to first remove it from the bag and then put the bag on the floor or put it back on your shoulders and then set the tripod...

oh well this is a normal and regular procedure when you are out on the filed doing some great night shot, but after doing this 30 or 40 times a night you will eventually become a little frustrating and start asking yourself why in the hell did I brought the bag with me? - I better leave the bag on my shoulders and carry the tripod always at hand.

So if you ever think about this and your pouch bag has been pissing you out just check this out...

First things first, let's take a look at what you will need to make this.

Strap Mod_001

Here is the inexpensive list:

- A bag of metal rings 18mm diam. (or you can use some rings from old key chains) 0,80 Euro cents
- Strap from and bag or carrying case that you can have in the attic
- Some nylon cable ties or braces (100 pieces pack 4,8x188mm) 3,20 Euro
- Scissors (not included in the picture) ;)

And you're done.

Strap Mod_002

My tripod has a place to put a key chain on the top part near the head, but if yours do not have it do not be afraid since you can always make a loop with the plastic brace to the head just below the screw part or anywhere you feel it's good to have it. Just take a look at your tripod or monopd and see where it best fits.

So just loop the plastic brace around it (I choose the
4,8x188mm plastic braces because they are a little bit more thick and strong to hold the weight of this tripod but you can always choose the less thicker ones) and while doing so, and before closing it, grab one metal ring and put it through it or inside, call it what you want but as long as it stay inside before you close it then you are in the good way.

Strap Mod_003

Tight it well and now cut the plastic brace and this part is done.

Strap Mod_004

Next I made the same thing on the legs of the tripod. I choose the opposite leg to the front part I have chosen to put the first
plastic brace since this will allow me to have a more balanced tripod when I put it on my back.

Strap Mod_005

Hey and you are done!!! Take a look at this baby.

Now you can carry the tripod on your back or sling it through your arm anywhere you go without the inconvenient pouch bag :)

Strap Mod_006

Here is a closer look of the
Nylon Brace, the ring and the strap attached to it.

Strap Mod_007

I first took approach to my carrying stands at the Strobist blod Lighting 101 where David Hobby shows how you can make them as portable as possible, in case you have missed it take a look here.

And as you can see on the picture above this was what I was using to carry my stands around. I drill 2 holes on the stand legs and just attached the strap to it.

On this image you can see the bottom hole on the stand leg.

Strap Mod_008

Here I'm pointing at the top hole on the stand.

Strap Mod_009

Let me show you where I drilled those holes.

Strap Mod_010

But... if you do not like to make holes on your stands or they are not like the Manfrotto Nano 001 then you can always use this DIY tip I'm showing you today to use them the same way.

Let's take a look how to make it, and as you can see from the above picture it will be positioned at the same place as the holes and will not interfere with the way you will normally use your stand.

Strap Mod_011

On the top part of the stand you can loop the plastic strap around the first part of the stand right above the umbrella adapter swivel. This is a good way to put it since it will not interfere with the extension of the stand.

And as you can see it will be position almost on the same place has the previous hole I made on the stand leg.

Strap Mod_012

Next you will make a look around the center part block of the stand and almost near the edge (as showed in the above photo). This is a good place and as you can see it will stay further down the stand than the hole I made previously making it more stable while on your back or shoulder.

This is also a great place to make because even if you open the stand legs all the way up they will not touch the plastic braces.

Strap Mod_013

Here is the final shot and as you can see this will be very easy to carry around and you can also loop 2 umbrellas to it with some ball bungees and you're done to the assignment.

Hope this helps you out as it's helping me carrying my Stands, Monopd and Tripods more easily.

DIY: Depth Of Field Calculator

Since I did not had much time during the weekend to write these week Monday Tip I decided to leave you with a Depth Of Field Calculator and Hyperfocal Distance for your camera.

You can use it on your computer or you can print it out and use it on a lens cap, your Ipod, Iphone or even in your Palm OS.

Take a look ate the following link, download it and see how you can make yourself a very nice one.
Depth of field scales are elegant tools for quickly and easily calculating depth of field and hyperfocal distance. Unfortunately, lens manufacturers don't engrave scales on lenses anymore. Now you can use DOFMaster to make your own scales.

Use DOFMaster to make depth of field scales for use in the field. Just set the focus distance, and read the near and far focus distances. Easily calculate the hyperfocal distance for your lens at any aperture.

Customize the scale for your needs:

* Use feet or meters on the distance scale
* Stretch or shrink the distance scale as necessary for focal lengths from 3 mm to 1200 mm
* Print a scale for any format, digital to 8x10
* Put as many as 4 focal lengths on a scale
* Select apertures as small as f/64
* Choose any circle of confusion

Instructions for calculator assembly are included in the DOFMaster help file.

You may be asking what is Depth of Field?

Depth of field is the distance between the nearest and furthest parts of a subject that can be imaged with acceptably sharp detail at one focus setting of the lens.

When an object is in focus, everything from a certain distance in front of the object to a certain distance behind the object will also be in reasonably sharp focus. This distance from front to back that will be in reasonably sharp focus is called the depth of field.

Depth of field refers to the section of a photograph that appears to be in sharp focus.

And what is the Hyperfocal Distance?
The hyperfocal distance is the point you focus on when you want to maximize the amount of depth of field in a photograph.

Hyperfocal distance is the point of focus at which subjects from half that distance to infinity are in focus.

With this tool it will help you calculate this on the field.

Depth of Field calculator glued to a lens cap.

Enjoy

DIY: Disposable Camera Ring Flash

A lot has been said and a lot has been made concerning Ring Flash.

I've been seeing a lot of DIY Ring Flashes with great results but all had a single flash in them except for the attempt on creating a ring flash with 6 strobes and some Tape and let me tell you that was a heavy one, but if you think that was HEAVY just take a look at this one here.

I came into this model (Disposable Camera Ring Flash by Divet) a couple of days ago at the Instructables.com and found it quite appealing except the fact that you will have to get your hands on a couple of disposable cameras and some electronic stuff but I do think this would give a pretty good Ring Flash.

Take a look at what you will need to make the disposable one:
Materials:
10" Cookie tin
6" Metal dog bowl (Dollar Store)
Disposable cameras
Radio Shack AA battery pack (with built in switch)
RD616 wireless flash trigger ($20 Ebay - search: "flash trigger 16 channel wireless")
Surgical tubing
Old tripod plate
Broken door cloths hanger
3.5mm phone jack
Packing Tape
Velcro
Wire
Bolts
Carl Vogt's $5 Photo Slave
SCR 400 Volts 4 Amps (NTE5457 or Phillips C106D)
1 meg ohm 1/4 watt resistor
.05uF 400 Volt capacitor
Perf board
Solar cell from a dollar store calculator (WARNING: Dollar stores often sell calculators with fake solar cells)

Tools:
Nibbler (Radio Shack)
Punch (or nail)
Drill
File
Screwdriver
Soldering iron
Solder sucker
Wire stripper
Hot glue gun
Multimeter
Alligator clips

Then you just have to follow the steps in here and voilá you got yourself a DIY: Disposable Camera Ring Flash.

If you do not have such electronic skills you can always attempt one of the above Ring Lights links and make yourself one.

But how did this craziness about Ring Flashes started to spread into the Strobist community anyway?

Well, it all started out when David aka Strobist put a week challenge design on his blog so people could create this accessory and experiment this kind of lighting without having to pay lot's of money for a Professional Ring Flash... hey ain't that photography all about? Experimenting, testing, shooting, lighting, lighting, lighting did I forget lighting? ;)

There is a pool on Flickr for RingFlash/RingLight photos here.

Take a look at some of the models available out there in case you wanna build one yourself:

- Ready Made Ring Flash (I got mine but lack the time for the moment for the review, soon you will see)
- David Hobby aka Strobist
- Tanya Shields
- David X. Tejada
- Jedrek
- Aki Korhonen
- Dennison Bertram
- Jason Lee
- Doug R.
- Sebastian Kubatz
- Samuel Potter
- Nick Wheeler
- Kyle Gerstner
- Ladytrae
- Mike Osborne
- James Hamilton
- Bankara
- Richard
- Jack

And I leave you with Geoff Johnson on this great video where he makes a Ring Light of a ring fluorescent light and a pan that you can get on a local hardware store.

Just see for yourself how he did it and if you have already made one and have pictures please leave a link on the comments so we can all check them out.

Lighting Mods featuring as one of the diyphotography.net Favorites

Today I just got another great news!!!

I know it came a little late to my attention but I think that things like this do never come too late :)

Lighting Mods has feature, in 2007-07-15, on the www.diyphotography.net blog as one of the favorites right above Strobist.

Thank you Udi J. Tirosh for the confidence and wonderful support at diyphotography.net, you really got yourself a pretty good page there with lots of great information.

I also wanna take the time to THANK YOU ALL for the wonderful support, over the last year, and for all the emails with questions and suggestions. Keep them coming :)

I also would like to mention that My Wife and I we're expecting 2 Babies David and Tereza and they will start to see the "available light" on the 13th February, today doctor's confirmation.

My new "toys" are coming

Things may become a little bit slower than the normal posting but I'm preparing some good articles in advance ;)

I'm also planning on creating the Monday tip of the week so that each week you will have a tip to improve your shooting either with flash or non flash subjects.

Hope I can make this on a regular basis since time will only tell.

As usual suggestions and tips are more than welcome.

Again, THANK YOU ALL FOR THE SUPPORT!!!!

Rui