Showing posts with label Mods. Show all posts

PictureDefense Helps when Dealing With Photo Theft

Road Alone...I'm pretty sure it has happen to you before so today's post goes directly to you who has been robbed or have been dealing with photo theft recently.

PictureDefense.com website is a page that you will want to keep track of and have it always at hand. Had it to your favorites, blog about it, share all over the place...

This is something that you eventually will need right now or in a near future and if you are dealing with your photos all over the place posted by another person.

READ IT RIGHT NOW !!!

What PictureDefense.com has to offer you?

On their free website they will address what to do if you found your photo on...

- Someone's Facebook profile, fan page, or group
- Any website hosted and owned by Google. Like Blogger, Blogspot, YouTube, and Google+ - Any website owned by Yahoo like Flickr.com
- Another photographer's free standing website
- Used in a web advertisement on a business website Hope this could give you a starting point to track and remove down your photos from those posers out there.


To have an idea on how this could help you out, here is a great video explaining it and posted by James Beltz from PhotoTips.

Tip: Color Label Matching between Photo Mechanic and Adobe Lightroom & Bridge


Happy New 2013 everyone!!

Today I wanted to call your attention to Star Ratings and Color Labels crossing information between Photo Mechanic and Adobe Lightroom & Bridge that I hope you will find interesting.

One thing that has been bugging me around for quite some time has been the Color Label synchronize settings between Photo Mechanic, Adobe Bridge and Adobe Lightroom.

By now most of you been laughing at this but I find it quite a bit disturbing and annoying why the same company would keep Adobe Lightroom and Bridge with different settings on these matter. It took me quite a while to figure it out how they could simply match and sync the Star ratings but not the Color Schemes.

Simply frustrating for people who want to have the Star Ratings for one thing and then Color label them to do another thing, maybe have the Star Ratings for the client and Color labels for internal purposes or something that one could find it useful.

I contact Photo Mechanic team has they have been so great on support and also on beta testing that Bob Russel promptly sent me an answer saying that Photo Mechanic has its IPTC/XMP to match Adobe and some other software both in Star Ratings and Color Label schemes.

WOW, the answer came fast... but after trying out their solution to the problem I still could not find a away to get them to sync. I changed Colors, I moved to Bridge and nothing, Lightroom on the other hand indicated that something has been changed in the xmp file and needed to import the new files but when I did so the Star rating would appear but not the color :( it just simply gave me a white square on the right corner, in Library module, of the photos I did change the Color labels. Damn!!!

So I decided to investigate since the square had changed, there must be something to configure or something was not playing right between these applications.

And here are my findings: In fact they work pretty well altogether and they go nicely you just need to configure them properly and here is what you will need to do to each one of them.

Go to Photo Mechanic preferences and on the General tab you will get the Color Classes (has they called them) by default you should get something like this:


So, with this settings I went to Photo Mechanic and set Star Rating and Color Label to Red for one of my testing photos (see that I have already checked the Synchronize tag for Color Class with IPTC/XMP).


 Then opened Adobe Lightroom and went into the folder that I previously have imported and got the sign message on the top right of the photo that something has changed.


 Click on the icon on top right and you will get the Import dialog showing you that something has been changed in that xmp file.


After import this is what the photo looks like in Adobe Lightroom.


You can see that the Star Rating is correct but the color should be red around the photo and not represented by a white dot on the right corner...

Did the same thing on Adobe Bridge and this is what happened.


Exactly the same thing :(

So how do you configure this to work between them and correctly?

Simple and here is how...

First you need to configure Photo Mechanic to use the same Color Labeling system has Adobe Bridge.

And why Adobe Bridge you may ask??

- Well to tell you the truth I match them all to Bridge because I did not seem to find a way to relate Adobe Bridge with the other two so I decided that Adobe Bridge would be the main sync for the others.

So go into Photo Mechanic preferences and into General tab and set your Color Classes as follow:


You can save it (on that thunder icon above the To Do on the right) has Adobe Bridge Default for a later reference.

Afterwards you move into Adobe Lightroom and you can find the Color Label settings in the menu. Look at image below:


Set it to Bridge Default or you can edit it with your own settings. Take a look at the editing menu below:


When you go through all the Presets you can see that they already have one for Adobe Bridge Default, Lightroom Default and a Review Status that have some other Color Labeling. At this point you can create whatever Color Labels you want for your work but have to remember if you want to have them all 3 in sync you have to choose the Bridge Default.


 And that's it!! Well it took me a while to figure this out so I decided to share it so that if anyone would encounter this would not take time and loose their patience over this simple thing.


I've also created 3 presets for Photo Mechanic that I've saved and gave them the names to each program so you can always reference and change them later has you please.
This would make your life much easier.

Download them here.


I do not understand why Apple did not sync Adobe Lightroom with Bridge and created instead a different way to sync them. Maybe it has something to do with the fact that you can create different Color Labels in Lightroom for different situations of your work.

I'm also hoping that Adobe would fix the re-import of the xmp files after been altered in Photo Mechanic as this would cause the lost of all the editing.

Did you noticed that in Adobe Lightroom Develop module the only slider that does not have scale is the Exposure slider, did they forgot or is this done on purpose and all the sliders get the darken part on left except for the contrast?? LOL   


Hope you enjoy this tip, and see you for the next round.

Cheers 2013!!

Educate yourself

Season Greetings to everyone,

I know that I've been a bit lame with the blog lately but running around from one place to another doing assignments and not having too much time for anything else been putting this blog a little bit behind.

It's something that I just can't avoid and and has you may all know time is money.

I just want to wish you all a Great Season Greeting to you and all yours and that the nest year may bring you all that you have deserved and wish for.

It's never too late!!!

Today's post it's all about education. I've decided to put out a couple of pages that I've been following regularly with some great teaching techniques that I'm certain it will help you learn and evolve.

Starting is shutha project where you can find out for example what is stock photography, types of markets, stock photo licensing,  book publishing, publishing rights, fine art prints, decorative and commercial prints, editorial assignments, commercial assignments, selling photographs, selling video and a lot of more interesting information.

You also have some Free courses from Business, Image Workflow, Digital Imaging and Multimedia.

Who is behind Shutha?

Shutha is one of the outputs of the Twenty Ten: African media on the road to twenty ten (and beyond) project. The project is a partnership between World Press PhotoFreevoice (now rebranded as Free Press Unlimited), Africa Media Online and lokaalmondiaal and is funded by the Dutch Postcode Lottery. Shutha benefits from this funding.


Next one is dpBestFlow.org and this is a terrific place to get some very good teaching and resources from Workflow to est Practices.

What is dpBestflow.org?

dpBestflow.org is a rich web resource which includes a series of on-line educational seminars, software & hardware solutions, workflow guides and book references, designed to match a wide variety of working styles.

Now, by accessing the web site, photographers and others in the visual arts community have real-world solutions for preserving the quality and integrity of digital images, proven best practices that have been shown to produce superior results, and guidelines for streamlined production workflows.


Then came project52, created by Don Giannatti, this is basically a page with lots of online assignments and Audio/Video critics about your sent photos that will help you develop your photography senses. You can also subscribe de Pro service and have a couple more benefits.

Real World Assignments

What does “real world assignments” mean? It means you will be given assignments that are similar in scope and diversity as any commercial photographer in a small town. It means authentic work that is exactly the kind you will get the day your shingle gets posted. We work hard to make assignments that both challenge the creative, and produce work that could end up in your portfolio.

Audio/Video Critiques

Each week we will review the previous assignment. There is a two week assignment completion schedule, so we are not critiquing the work of the previous weeks assignment, but that of two weeks prior. I am sure that will be less confusing as we get into the program.


And the last one I would like to mention is creativeLive that has been putting it's claws around the photography community with lots of great and fantastic online teaching video as well as some Live Feed with all the best photographers of our decade.

You can stream the courses has they are live on location or you can purchase, the full course, later on to view it as you please and how many times you would like.

The teachings run from photography, business, software, design and video&film with some the biggest in their business.

Just to name a few... Zack Arias, Sue Bryce, Vincent Laforet, Lesa Snider, Tamara Lackey and Ramit Sethi.

There are, of course, a lot of more places where you can get yourself educated and that is a good thing, just wanted to name a few that I found important to keep your eyes at.

Happy Season and see you in 2013. 

Adobe Lightroom 4.3 and Camera Raw 7.3 Final Releases Available

It's here and just before Christmas time the Adobe Lightroom 4.3 and Camera Raw 7.3 as a final releases on Adobe.com and through the update mechanism in Lightroom 4.

The goal of this releases is to provide additional camera raw support, lens profile support and address bugs that were introduced in previous releases of Lightroom.

Bugs Corrected in Lightroom 4.3:

The following bugs that were part the Lightroom 4 releases have been corrected. The team appreciates the very detailed feedback the community has provided on Lightroom 4 and we’re excited to correct a number of issues experienced by our customers. These issues have been FIXED:
  • Autolayout produces a Book with the correct amount of pages but without any images added. Please note that this only occurs when the filter is set to “Unused”.
  • Uploading large panorama images to Revel caused Lightroom to crash.
  • The “Unused” filter was not properly filtering images within the Book Module.
  • Lightroom hangs while changing the Exposure adjustment by typing in a numeric adjustment. Please note that this only occurs when the Enter key is not typed to confirm the adjustment and another Develop adjustment is tried. Also please note that this only occurs on Windows.
  • After creating a new folder in Lightroom, attempting to undo that folder can sometimes cause a corrupt catalog.
  • An image can be simultaneously flagged as both a Pick and Reject at the same time.
  • Using multiple colors within a single text cell within the Book Module can cause Lightroom to crash.
  • Unable to post photos to Flickr when the image filename contains an apostrophe.
  • The active Develop slider, the one controlled with + and – keys, defaults to Exposure when moving from one photo to another.
  • Catalogs from Photoshop Elements 11 would not update in Lightroom.
  • Site titles longer than 70 characters created in the Web Module can cause Lightroom to freeze.
  • Cell padding linking lost between sessions.
  • Deleting the top image in a stack causes the entire stack to disappear.
  • Tethered capture fails when turning camera off and back on. This also can occur if the camera goes to sleep and then wakes. This occurs only with Canon cameras and on Mac only.
  • Cropping an image to a small size sometimes causes the image in Develop to become blurry.
  • AVCHD video formats are not properly importing into Lightroom. Please note that this only occurred on Mac.
  • Enable Profile Corrections does not auto find iPhone 4 profile.
  • Crop doesn’t update in second monitor if navigator panel closed. Please note that this only occurred on Mac.
  • TIFF files can experience tonal shifts within Lightroom.
  • Mask overlay are displayed in filmstrip and navigator. They should only be displayed in the Develop Loupe.
  • Video files created on an iPhone 4 flickers when played in Lightroom.

New Camera Support in Lightroom 4.3:

  1. Canon EOS 6D
  2. Canon PowerShot S110
  3. Canon PowerShot G15
  4. Canon PowerShot SX50 HS
  5. Casio Exilim EX-ZR1000
  6. Casio Exilim EX-FC300S
  7. Leica M-E
  8. Nikon 1 V2
  9. Nikon D5200
  10. Nikon D600*
  11. Olympus PEN E-PL5
  12. Olympus PEN E-PM2
  13. Olympus STYLUS XZ-2 iHS
  14. Panasonic DMC-GH3
  15. Pentax K-5 II
  16. Pentax K-5 IIs
  17. Pentax Q10
  18. Sony DSC-RX1
  19. Sony NEX-VG30
  20. Sony NEX-VG900
* Please note that preliminary support was available in Lightroom 4.2.  This release adds full support for the Nikon D600.

New Lens Profile Support in Lightroom 4.3:

Lens Name Lens Mount
Apple iPhone 4S Apple
Apple iPhone 5 Apple
Canon EF 24-70mm f/2.8L II USM Canon
Sigma APO Macro 180mm F2.8 EX DG OS HSM Canon
Tamron SP AF 70-200mm F/2.8 Di VC A009E Canon
Tamron SP AF 90mm F/2.8 Macro Di VC USD F004E Canon
LEICA APO-ELMARIT-R 180 mm f/2.8 Leica
LEICA APO-MACRO-ELMARIT-R 100 mm f/2.8 Leica
LEICA APO-SUMMICRON-R 90 mm f/2 ASPH. Leica
LEICA APO-SUMMICRON-R 180 mm f/2 Leica
LEICA APO-TELYT-R 280 mm f/2.8 Leica
LEICA APO-TELYT-R 280 mm f/4 Leica
LEICA APO-TELYT-R 400 mm f/2.8 Leica
LEICA APO-TELYT-R 400 mm f/4 Leica
LEICA APO-TELYT-R 560 mm f/4 Leica
LEICA APO-TELYT-R 560 mm f/5.6 Leica
LEICA APO-TELYT-R 800 mm f/5.6 Leica
LEICA ELMARIT-R 19 mm f/2.8 Leica
LEICA ELMARIT-R 28 mm f/2.8 Leica
LEICA MACRO-ELMARIT-R 60 mm f/2.8 Leica
LEICA SUMMICRON-R 35 mm f/2 Leica
LEICA SUMMICRON-R 50 mm f/2 Leica
LEICA SUMMILUX-R 35 mm f/1.4 Leica
LEICA SUMMILUX-R 50 mm f/1.4 Leica
LEICA SUMMILUX-R 80 mm f/1.4 Leica
Leica VARIO-ELMARIT-R 28-90 mm f/2,8-4,5 ASPH. Leica
Leica VARIO-ELMAR-R 80-200 mm f/4 Leica
Leica VARIO-ELMAR-R 35-70 mm f/4 Leica
Leica VARIO-ELMAR-R 21-35 mm f/3,5-4 ASPH. Leica
Leica VARIO-APO-ELMARIT-R 70-180 mm f/2.8 Leica
Sigma APO Macro 180mm F2.8 EX DG OS HSM Nikon
PENTAX 06 Telephoto Zoom Pentax
Sigma APO Macro 180mm F2.8 EX DG OS HSM Sigma
Sigma DP1 Merrill Compact Digital Camera Sigma

Download Links

WindowsMac

Camera Raw 7.3 is now available as a final release through the update mechanism in Photoshop CS6. 

Customers of previous versions of Photoshop can utilize DNG Converter 7.3 for raw file support for newly added cameras.

New Camera Support in Camera Raw 7.3:

  1. Canon EOS 6D
  2. Canon PowerShot S110
  3. Canon PowerShot G15
  4. Canon PowerShot SX50 HS
  5. Casio Exilim EX-ZR1000
  6. Casio Exilim EX-FC300S
  7. Leica M-E
  8. Nikon 1 V2
  9. Nikon D5200
  10. Nikon D600*
  11. Olympus PEN E-PL5
  12. Olympus PEN E-PM2
  13. Olympus STYLUS XZ-2 iHS
  14. Panasonic DMC-GH3
  15. Pentax K-5 II
  16. Pentax K-5 IIs
  17. Pentax Q10
  18. Sony DSC-RX1
  19. Sony NEX-VG30
  20. Sony NEX-VG900
* Please note that preliminary support for Nikon D600 was available in Camera Raw 7.2  Full support for Nikon D600 was added in Camera Raw 7.3.

New Lens Profile Support in Camera Raw 7.3:

Lens Name Lens Mount
Apple iPhone 4S Apple
Apple iPhone 5 Apple
Canon EF 24-70mm f/2.8L II USM Canon
Sigma APO Macro 180mm F2.8 EX DG OS HSM Canon
Tamron SP AF 70-200mm F/2.8 Di VC A009E Canon
Tamron SP AF 90mm F/2.8 Macro Di VC USD F004E Canon
LEICA APO-ELMARIT-R 180 mm f/2.8 Leica
LEICA APO-MACRO-ELMARIT-R 100 mm f/2.8 Leica
LEICA APO-SUMMICRON-R 90 mm f/2 ASPH. Leica
LEICA APO-SUMMICRON-R 180 mm f/2 Leica
LEICA APO-TELYT-R 280 mm f/2.8 Leica
LEICA APO-TELYT-R 280 mm f/4 Leica
LEICA APO-TELYT-R 400 mm f/2.8 Leica
LEICA APO-TELYT-R 400 mm f/4 Leica
LEICA APO-TELYT-R 560 mm f/4 Leica
LEICA APO-TELYT-R 560 mm f/5.6 Leica
LEICA APO-TELYT-R 800 mm f/5.6 Leica
LEICA ELMARIT-R 19 mm f/2.8 Leica
LEICA ELMARIT-R 28 mm f/2.8 Leica
LEICA MACRO-ELMARIT-R 60 mm f/2.8 Leica
LEICA SUMMICRON-R 35 mm f/2 Leica
LEICA SUMMICRON-R 50 mm f/2 Leica
LEICA SUMMILUX-R 35 mm f/1.4 Leica
LEICA SUMMILUX-R 50 mm f/1.4 Leica
LEICA SUMMILUX-R 80 mm f/1.4 Leica
Leica VARIO-ELMARIT-R 28-90 mm f/2,8-4,5 ASPH. Leica
Leica VARIO-ELMAR-R 80-200 mm f/4 Leica
Leica VARIO-ELMAR-R 35-70 mm f/4 Leica
Leica VARIO-ELMAR-R 21-35 mm f/3,5-4 ASPH. Leica
Leica VARIO-APO-ELMARIT-R 70-180 mm f/2.8 Leica
Sigma APO Macro 180mm F2.8 EX DG OS HSM Nikon
PENTAX 06 Telephoto Zoom Pentax
Sigma APO Macro 180mm F2.8 EX DG OS HSM Sigma
Sigma DP1 Merrill Compact Digital Camera Sigma

These items have been FIXED in Camera Raw 7.3:

  • Lens correction does not auto find iPhone 4 profile
  • TIFF files can experience tonal shifts within Lightroom
  • Bridge is unable to show TIFF files

Download Links

Camera Raw 7.3 – Please use the update mechanism in Photoshop CS6
DNG Converter 7.3 - WindowsMac


Enjoy!!!

Adobe Configurator 3.1RC must have tool

Recently I discovered this wonderful tool for my Photoshop/InDesign tools and panels.

The Adobe® Configurator is a utility that enables the easy creation of panels (palettes) for use in Adobe Photoshop® CS5.x/CS6 and Adobe InDesign® CS5.x/CS6.

It makes it easy to drag and drop tools, menu items, scripts, actions, and other objects into a panel design, then export the results for use in Photoshop or InDesign.

Distribute and share panels with other Creative Suite 6 users via the Adobe Exchange, also available on Adobe Labs.

This is the kind of tool that can help you when you just need a couple of buttons/panels on your setup and do not want the all panel. If you normally just use a couple of tools then you can configure it to your best purpose and the most important of all... makes you work faster.

You can download Adobe Configurator 3.1 here on Adobe Labs for CS 5.x or CS6 users.

Nori - Rethinking The Collapsible Reflector

It came into my attention this great and different collapsible reflector that company NORI has put up in the market.

I've been seeing a lot of refletors but this one with it's unique shape could be useful when you are alone on location or when you need to move fast from one place to another while having your assistant holding it and also great for video.

Check for yourself at NORI page here.

Here are some more images of the product:


It comes in a package of 2 units a Silver and a White one and they collapse like an umbrella which is great for when you need t pack light.


And also comes with a great carrying bag.


Check them out and leave your thoughts...

Demo Video

How to Educate Yourself about Photography

Technicolor filmPhotography is a very enjoyable and rewarding activity.

You can capture a moment in time and share it with others.
You can use your creative energy to produce something of emotion, beauty and inspiration. You can bring out the detail in subjects and events that you might not otherwise notice in real time.

Many people think that taking photographs is just a simple procedure of point and click. While this is obviously part of the process, it takes a lot more to take a quality photograph that is both moving and memorable.

Below are some guidelines for educating yourself about photography. If you are interested in pursuing a career in photography, find out more information on photography degree programs here.

Guidelines

  • Learn Basic Visual Composition – For learning visual composition, this involves such principles as the "rule of thirds," using leading lines and simplicity. These techniques help improve the quality of your photo. It is important to not to just point and click at scenes of interest, but also take the time to look through the viewfinder in the camera and assess the scene. Put in the time and practice taking hundreds of photos using the basic visual techniques and compare the differences in the photos.
  • Learn Camera Settings and Functions – As you are learning to take photographs, it is crucial to become familiar with all of the buttons and controls of a single-lens reflex (SLR) camera. A SLR camera is preferable to an automatic camera as it will enable you learn photography more quickly and it gives you much more control in taking a shot. The controls on the camera that are especially important to know pertain to exposure. This includes shutter speed, aperture, and ISO (International Organization of Standardization). These controls affect how much light is let into the camera. Incorrect use of these features lead to overexposed or underexposed shots. Once you become more proficient with these controls, you can be more creative with your photography.
  • Look at Professional Photographs – Closely observe the features in these photographs and compare them with your own. There are also many how "how-to" photography books that show examples of photographs and the techniques used to take them.
  • Formal Education – While not all professional photographers are formally educated, it would be helpful to enroll in a photography degree program or take classes at an art school.

Sources

PhotoTechniques (2012)
Benjam (2012)

RAW vs JPEG what's the best for you...

A lot of talk has been made about this 2 formats. Since the Digital era started to arise a couple years ago many would say that JPEG was the killer but many defended the RAW as the true pure film equivalent.

What is what and what the advantages and disadvantages of each one?

Well SLR Louge created this great in-depth visual guide so you can decided for yourself what will go and what will not fit on your photographic profile.

Excellent read is all I have to say, take a look at their page link here.

Enjoy

Nero triggers DSLR by Light, Sound and Motion

Ever thought of how they do it to trigger the lightnings that occur in Nature or even how that make those crazy dynamic photos of exploding balloons?

Well, think no more... Nero multi trigger will make that and much more into your photographs.

Such a small device that you can attach to your camera via hot-shoe mount and capture all those great moments.

The device is powered by 2 AAA batteries and will last a couple of ours until it drains out, it also have an intervalometer with time lapse features, built in audio, optical and laser sensors so you could easily use it under any situation.

You can get them for Nikon and Canon at the manufacturer page here.

If you like to shoot this  kind of scenarios you would not want to miss one of these babies.

GalleryPro, Show Your Work Everywhere

Scott Forman and Don Giannatti has joined forces to create a ultimate online gallery manager.

Scott Forman is the guy behind the 2008 project called ShutterVoice (mentioned here at LightingMods and Don Giannatti does not need too much introduction as he's been giving us a lot of photography information at his page.
If you do not know his go check out his page it has awesome information to share and called Lighting Essentials.

About this GalleryPro it is a one-stop solution for online portfolio management which allows for easy integration with a photographer's website, blog, facebook page, etc.

Essentially it allows a person to very easily manage their portfolio and include it on as many of their various web sites and social networking sites as they would like with only a tiny bit of code.  It is cross platform and the same gallery works on desktop as well as mobile and tablets.

Aside from the online control panel to easily manage your portfolio, the intention was to make it very easy for a person to quickly view a photographer's body of work all at once so they could quickly decide if they want to see more rather than having to chase scrolling thumbnails with their mouse or look through pages of thumbnails.

Here is a short presentation video about it


You can Visit the GalleryPro page for more information and how to subscribe it.

TriPad holds your Computer for You

Ingenious is what I can say about this TriPad thing...

It came into my attention this great accessory named TriPad, you may ask what is this all about and let me tell you you won't regret it.

If you are the kind of shooter who continuously use your computer tethered to your camera and using long cables to make it happen then your suffer is over... I know it sounds kind of a commercial add but this accessory comes to your help by attaching your computer close to your camera and helping you out on the field or in the studio.

Just take a look at their webpage for more information.

Color Accuracy Test


How is your color accuracy today?

With this fun game you can check if you are color blinded or if you can measure correctly the colors.

Click HERE to play the game,

Have fun and a great photographic week.

Copyright In Europe: Protecting Your Photographs

In an age of digital photography and the internet, it has never been easier to copy, steal and take somebody else photographs.

With a click of a mouse, a user can take any image from any website and make an exact copy, using the photograph for whatever purpose they like.
However, this doesn’t make it right nor does it make it legal, and to prevent pictures from being stolen, it is important for photographers to understand how copyright works and how it protects their rights Copyright theft is rife.

Many photographers have found themselves aghast to see their work reproduced on blogs and websites without their knowledge, often resulting in a loss of much-needed income.
This makes some professional photographers think it necessary to get some kind of professional indemnity insurance to protect against these losses. However, you don’t have to put up with copyright theft. 
Any photograph you take belongs to you, and you have every right to expect payment or some form of accreditation for its use.

Copyright of Pictures
A lot of photographers believe that to attain copyright for photographs you have to go through some form of registration process or application, but this isn’t true. The moment you take a picture, you become the copyright owner. In Europe, all countries have their own copyright law, such as the UK’s 1988 Copyright Act, but the Copyright Law of the European Union also protects a photographer’s copyright.

These laws ensure that every photograph you take, whether it’s at somebody’s wedding or is a commissioned work for a newspaper or magazine, is automatically copyrighted to you.
There are a few occasions when the photographer doesn’t own rights to copyright. If you are an employee of a company and your job is to take photographs, such as if you work for a press agency or newspaper, the copyright reverts to the employer, but freelancers, even those paid a commission, retain the rights to any picture unless it is signed away in a formal contract.
Registration, such as through the UK Copyright Service, is unnecessary, although it can help prove ownership when the rights of a photograph are disputed. Generally though, proving you took the picture is relatively simple as the first usage of any publication, such as on your own website, would be proof enough. In Europe, you retain copyright for your entire life, and your estate keeps copyright for a further 70 years after you die, by which time, copyright is lifted and the photographs become freely available.

Your Rights
Copyright remains with the photographer even when you sell a photograph for publication. By purchasing a picture from you, a magazine, website or newspaper is acquiring a license to use the image. Licensing comes in various forms. Usually it is to use your work once, such as in one issue of a newspaper or magazine and in one particular territory (such as Britain).

This is called “First Serial Rights” or “First Electronic Rights” if it’s for a web-based publication. These rights mean you can’t sell the picture to anybody else, or indeed publish it yourself, until it has appeared in the publication or website to which it has been sold. Sometimes an organization may wish to acquire “All Rights”. 

This essentially means you are selling the copyright and the image would belong to them. If somebody asks for this, make sure you are prepared to lose all rights to the picture and are being properly compensated for it.
While it is common practice for photographers to receive accreditation on a picture, often declaring your copyright, not all publications do this, especially newspapers, but is always worthwhile asking, as having your name followed by a copyright symbol helps to deter others from reproducing the image.

Defending your Rights
You can take measures to prevent unauthorized usage of your images, such as including a digital watermark on any portfolio pictures, which in effect marks the image, or by including a minor alteration to the picture to help provide proof of ownership, but in the digital age, image theft is virtually unavoidable. However, if you find that an image has been reproduced without your permission, there are steps you can take.
Firstly, simply contact the publication, website or blog that has reproduced the image and explain that it is your picture. It may well be that they were unaware the picture was copyrighted; they may even agree to pay you for its usage. If that doesn’t work, send a “Cease and Desist” letter. This is just a formal letter telling them they are in breach of copyright law and that if they refuse to remove the offending image in a certain time frame (usually 28 days), or pay you for the work, you will take them to court. Often, this letter is enough to scare most people into removing the image.

Finally, if all else fails, you can begin legal proceedings for copyright infringement and apply for damages and/or royalties to a court. To do this, you will of course need a solicitor, but specialist copyright lawyers are easy to find. While the costs of legal assistance will be awarded to you if your case is successful, you need to bear in mind that if you are prosecuting an individual, such as a blogger, they may not have any money, and you could be left with a large legal bill.

While understanding copyright won’t stop it from happening, at least by knowing your rights you can now take steps to prevent people from taking advantage of all your hard work.


Credit: Imogen Reed

Selling Your Photos Online

Using a stock image agent

This is by far the most popular method for the sale of photographs nowadays. The bulk of images purchased are for use in some sort of marketing or electronic production. For the people who use images for publication via print or on the web they use stock image agents to ensure they do not fall foul of copyright infringements. So if you are looking to be able to sit back on your sofa and watch your pictures roll out and the profits roll in, this may be the method for you.

How does it work?

The stock image agents use photographers to amass a database of images which they allow the public to select and purchase. The images are generally watermarked and secured to prevent illegal downloading. In the majority of cases this sale is for the rights to use the image rather than exclusivity. This means the client can use the image but it remains available for resale to anyone else who might wish to use it.
For each of the images sold the photographer is paid a commission and the image agent will get paid a handling fee. The prices and allocated percentage differ greatly from one agent to the next. There are a number of variables involved in the set up of each stocking agent. The amount of images, and space available for storage is a consideration and differs depending on the provider. The length of time you are allowed to have images stored without any sales can also vary. There are also different approaches to how the images are promoted with some agents using a range of direct marketing techniques to ensure they promote business.

Which agent is best for me?

All of the various strategies are important to consider before you commit to using any one stock image provider. Subscription to a stock image agent is usually free, all you will need is an email address. Payment is generally arranged via PayPal, or other alternative methods. Each agent will insist on exclusive use of your images, so you cannot enroll with five different agencies to ensure the widest dispersal of your material. There is no fail-safe method of ensuring this does not happen, but it is considered best practice to choose one which is tailored to how you want to work.

Can I change my agent?

There is no contract, just terms and conditions, with the agents and you can generally control your stock of images by adding and removing images from your own personal directory. It is worth checking this facility first. You can do this by making a small test folder of images and check how easy it is to add or delete pictures. If you feel as though you are not getting the best service then you can stop using one agent and start using another. Generally there is no fixed length of contract, but you should check this out when you are going through your subscription process. If you have already sold a photo through one agent you will usually not be able to remove this picture from their archive. You will also not be able to sell the same picture with a different agent as that is usually a breach of the terms and conditions of the website.

How do I know if it will work?

There is no sure fire way of guaranteeing you will sell your photography via a stock agent. The market for photographs and the quantity of pictures on the web is intensely competitive. Often it is as much down to luck as anything else that your photograph is selected for use. The stock agents are a global 24hour a day business and they thrive on having the largest number of photographers regularly updating their files. It is worthwhile if you have a regular customer asking their opinion on the services provided and get some genuine honest feedback. If you are just starting out then your best bet is to choose the one that has the right set up for the type of business that you want to develop.

If I use an agent will I need my own website as well?

It is possible to manage this sort of a business without having your own website, but if you really want to create a portfolio of work that reflects how you operate as a photographer there is no substitute for your own bespoke website. Be careful not to use a Facebook page for your work as the process of protecting your pictures via Facebook is notoriously tricky.

Which stockists should I use?

The most popular ones on the web at the moment are; iStockphotos, Photo Biz, Instaproofs, Photobox, Shutterpoint, PicProofs. These are some of the main agencies (in order of preference) but there are other smaller operations out there which might be more in tune with your business needs.

Credit: Imogen Reed

Hands On: 5D MarkIII, 24-70 2.8 USM L II and Flash 600 EX-RT (Part 1)

Hands On 5D MarkIII & 24-70 f2.8 USM L II
Today I got the opportunity to try out, for a couple of minutes, the new Canon 5D MarkIII with an attached brand new Canon EF 24-70 f/2.8 USM L II and also the new flash series and flagship the Canon 600EX-RT with radio trans-receiver built in. 

Although I do not pretend to make a complete detailed and analytic review of any of these items, I'm pretty sure there will be plenty of people making it as soon as the camera will be available in the market and they will be making them much better than I will, but I just want to show you some quick hands on for this Canon items and give you my personal opinion about it while a regular user of Canon products for sometime.

This would be my evaluation of the camera during the period I had with it as all the items are still in sample mode and maybe it would come out with some late minute refinements.
I will also post some images I took with my powershot G12 of the items as well as some sample images (raw+jpg) so you can download and review them if you want to. (For the moment Adobe Lightroom 4.0 does not support the CR2 raw files from this camera but for the moment you can go to Adobe Labs and download the Camera Raw 6.7 Release Candidate and play with them on Adobe Photoshop CS 5.1 and Bridge after the update)

I will make this article in 2 parts has it will be much easier to read and also comment on the images taken with the camera, the news lens and flash.

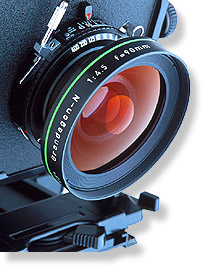
Canon lens 24-70 f/2.8 USM L II

I'll start out with the new 24-70 f/2.8 USM L II, this lens is completely new. Feels like the 100mm Macro lens as the coating and touch feelings are very similar to it. The filter thread now gets a bigger version up to 82mm and this would bring another level to the lens as the filter for it would be more expensive and if you use polarizer filter it's time to upgrade them as well to fit the new threat. Canon has already made this when they upgraded the 16-35 f/2.8 L USM to the same filter thread so if you own one of these you may already bought a polarizer to fit. It's a good thing to have most of the lens on the same thread as you do not have to carry a lot of stuff when you go outside taking pictures with filters.

Hands On 24-70 f2.8 USM L II

In the above picture you can see the 2 lenses side-by-side. Indeed the older version of the 24-70 feels more heavy and bulky but when you put then on both hands to weight them they kinda feel the same although I did find the new one a little lighter and when zoomed into 70mm it comes out of the body less than the older version.
The lens wood it's much smaller (very similar to the one the 24-105 f/4 has) and it's attached on the far end of the lens. This is one thing that made me scratch my head for a while... the older version the lens wood would give a little more protection to the inner part of the lens when it is extended and the new version let's the inner part be visible and you need to have more caution when using it on dusty and water environments as it may enter inside the body of the lens now that it's completely exposed when zoomed to 70mm. (This was my only complain on this lens and for the price it would come out in April Canon should have had a little bit more attention to this).

Hands On 24-70 f2.8 USM L II

This lens also do not have Image Stabilization and I think it has more to do with the design of the lens and to the fact that it could created it also more bulky. The lens also have a lock switch for storage and carrying around has this would prevent the lens front extend when you put it in your bag. (This is a normal feature that occurs to the older version when used extensively and for a long period of time as it would become loose after a while). This version, has I mentioned before, is a sample version used by many people already in the event I was in today and I can tell you that the front part had already become a little bit loosen just by using it so count for it in the field and if you're planning to buy it take that also in consideration.

This is an exceptional lens producing a very clean and crispy sharp images from edge to edge and with no chromatic aberrations visible and noticeable so far. Canon did manage to correct all the soft image problems with previous version but I think the price is a little bit to high for this piece of glass considering it is almost 1000,00 euros more than it's previous brother.

The Canon flash 600EX-RT

As you may all be aware that I'm a BIG aficionado of David Hobby techniques at the Strobist when I hear the good of the Radio triggering system coming to this new flash I started to hear bells and whistles all over so I wanted to check this ASAP as it was a long time promise from Canon, and we all know how Canon was getting a little behind on portable flash over the dark side ;)

Unfortunately Canon CPS Portugal only had one 600EX-RT and I could not perform any sample tests with 2 units and the time I had was too short to make the review for the %d MarkIII an also get some sample shots from the camera with the flash. Also the new flash comes with a very... when I say very it's VERY different menu that at least need to read the manual a couple of times before I could even adventure on it for the real deal.

Anyway I manage to grab a couple of shots of the flash and the menu system and played with it a little bit, although was not enough... more people on the queue line waiting to see it than I've ever seen before on a previous Canon stuff release.

Hands On Canon Flash 600EX-RT

Syde-by-syde they are much alike. Here in this picture they are not very align with each other but they are pretty much the same height. First thing noticed is that the old Stofen for the 580EXII will not fit on this one... so count on buying a new one.

Hands On Canon Flash 600EX-RT

This flash is a little bit thicker than it's older brother because it now has 2 color temperature caps that you can put on it. As you can see on the above image it has some kind of edges at the middle of the head that is where the dedicated gels and gel holder will hold onto (The caps were not available at the event, sorry no photos of them).

Hands On Canon Flash 600EX-RT

On it's front side you can also see, on the top head, where the dedicated gels and gel holder would make connection with the flash.

Hands On Canon Flash 600EX-RT

On the side of the flash you have the connectors for the CP-E4 Battery Pack, PC Terminal and the SR-N3 remote terminal connector, there is another 1/3 connector at the top but for the moment Canon representatives could not give me a straight answer what was it for as the flash is still very new and a sample unit without any instructions manual.

Hands On Canon Flash 600EX-RT

On the back part you have four buttons that now play a different role on the menu.They are now the one's in charge of selection things on the menu. Also there is a dedicated radio trigger button on the left side with it's own symbol that would help to get into the radio functions in a snap.

The LCD is much better to read out things and it feels a lot more easier to use. The hot-shoe is still the same difficult thing they gave us last time with the 580EXII so do not expect much on this one.

The LCD comes with 3 colors the green one for normal operations, a amber/orange style for when you put the flash in remote mode (this way you will always know which one is what) and a red one that would only be visible when the flash has reach the hot temperature, during my tests never appear ;)

The New On/Off switch is much better this way as you can lock the features directly or in a custom function leave it to sleep as on previous versions.

Also new is a Link blinking led that will blink when you have the flash connected wirelessly to others in a group.

For the few images I took with it I felt it more consistent in exposure and also in WB in a mixed ambient. On top of the 5D MarkIII is a sweet I can tell you, never missed a frame while on burst mode and all seem pretty consistent with each other... needed more time to test this baby out... (Some sample images at the bottom of the page)

Basically that's it for the first impressions... not much but the time I had to test the Sample unit was not much and also with no instructions manual at hand it come difficult to know what this powerful flash can really do or what menus it hides inside.

But If you also want a great and excellent in depth First Impression take a look at Syl Arena page.

Another great feature expected, for quite sometime, was the confirmation Beep when the flashes would be ready to fire again well Canon finally gave us the confirmation Beep Beep ;)

More on this at the Syl Arena page, go check it out, meanwhile here is a quote from his page about the Beep.

-- Quoted from Syl Arena page --

4. Beep, beep, we want a beep. BETTER—Canonistas have long lusted after Nikon’s humble beep as an indicator that a Speedlite has recycled. Canon has designed far better functionality. Thanks to the 2-way radio in the new Canon gear, each slave actually reports to the master when it has recycled. Then, when all the slaves in a group have recycled, the master displays a ready-icon for that group. Then, when all the slaves have checked in as recycled, the master sound the long-awaited beep! So, even when there’s a wall or window between you and your slaved Speedlites, you’ll know when they are ready to go. And yes, the beep can be turned off for quiet places like churches.

-- End of quote --

These are the official specifications for the flash:

Speedlite 600EX-RT specifications


Product Specification
POWER
Guide No. (ISO100).meters 60 (200mm)
ZOOM
Zoom head Yes
Focal length coverage 20-200mm
Coverage with wide panel 14mm
Auto zoom for sensor size Yes
FLASH MODES
Auto exposure control E-TTLII/E-TTL/TTL
High speed sync (FP) Yes
Manual / output settings Yes - 1/1-1/128
Manual steps 1/3 step
Strobe / output settings Yes - 1/4-1/128
Frequency 1-500Hz (199Hz using optical slave function)
FLASH-RELATED FUNCTION
FE lock Yes
Flash exposure compensation Yes
Flash exposure bracketing Yes
Second-curtain flash sync Yes
Modelling flash Yes
Colour temperature info communication Yes
WIRELESS FLASH
Transmitter Yes
Transmission type Infra-red / Radio
Transmitter Max range approx. Indoors: 12-15m / 30m
Outdoors: 8-10m / 30m
Slave Yes
No. of groups 3 / 5¹
No. of channels 4 / 15
Remote Shutter Release Yes
FLASH HEAD MOVEMENT
Up 45, 60, 75 and 90 °
Down 7 °
Left 60, 75, 90, 120, 150 and 180 °
Right 60, 75, 90, 120, 150 and 180 °
AF ASSIST
AF-assist beam Yes
Number of AF points supported 1 - 61
AF-assist beam type Infra-red
POWER SOURCE
Battery 4 x AA batteries
Minimum recycling time* Approx. 3.3 sec
External power supply Yes - CP-E4
CONSTRUCTION
Dust and water resistance Yes
Mounting foot material Metal
MISC.
Custom function 18 (7 personal functions)
Flash settings from camera menus** Yes
External flash exposure sensor Yes
PC terminal Yes
Compatible accessories Off-camera shoe cord OC-E3
Compact battery Pack CP-E4
Speedlite Transmitter ST-E3-RT
EX Series Speedlite with Slave function
SR-N3 cable
Color filter holder SCH-E1
Color filter SCF-E1
Dedicated flash bracket SB-E2
DIMENSIONS & WEIGHT
Size (W x H x D), mm 79.7x 142.9x 125.4¹
Weight (Excluding batteries), grams 425g


This flash will also be available without the RT (Radio Transmitter) and it's simply called Canon 600EX and will be available on those countries that do not use the 2.4 GHz band unlicensed wireless devices. 

Here are some direct sample JPG images taken with the 5D MarkIII, the 24-70 f/2.8 USM L II and the 600EX-RT on a heavy mixed temperature atmosphere so you get a feeling out of it.


 Hope you have enjoyed the first part of the Hands On... stay tuned for the second part all about the new Canon 5D MarkIII with some sample images.

Hands On: 5D MarkIII, 24-70 2.8 USM L II and Flash 600 EX-RT (Part 2)

Adobe Lightroom 4 is out, with a new price tag


Today Adobe just officially released Lightroom 4 and some changes have been made since the public beta version.


The full version costs $149.00,

Upgrade $79,

Student and Teacher Edition $79.


Downloads available at adobe.com.


Changes since the public beta:
  • Reverse geocoding now available in the Map Module
  • Revamped and improved auto tone in Develop based on new controls
  • Increased range of local white balance controls (temperature and tint)
  • Updated Develop presets plus added new presets for video
  • Maximum Blurb book size is now 240 pages
  • Over 800 bugs found and fixed! (Thank you Lightroom 4 beta customers!)
Important Release Notes
  • We found a late bug in the Lightroom 4 book module that would cause text errors if Courier New or Times is the selected font.  Please preview your books as a PDF before submitting to blurb when using those fonts
  • Norton Antivirus 2012 incorrectly flags video related program files in Lightroom 4 as possible threats. Please instruct Norton Antivirus 2012 to exclude Lightroom 4 files from its scan.
  • McAfee Virus Scan prevents emails from being sent from Lightroom 4. Please instruct McAfee Virus Scan to exclude Lightroom 4 files from its scan.
  • AVCHD support is limited to MTS and M2TS video files. Dedicated video editors (such as Premiere Pro) may need the AVCHD file structure to process the files.
  • Lightroom can sometimes crash when printing to PDF in Windows 7. Lowering the resolution of the PDF in the print driver can help mitigate this.
New Camera Support in Lightroom 4.0
  • Canon EOS 1D X
  • Canon PowerShot G1 X
  • Canon PowerShot S100V
  • Fuji FinePix F505EXR
  • Fuji FinePix F605EXR
  • Fuji FinePix HS30EXR
  • Fuji FinePix HS33EXR
  • Fuji FinePix X-S1
  • Nikon D4
  • Nikon D800
  • Nikon D800E
New Lens Profiles Supported in Lightroom 4.0

Lens MountLens Name
CanonTokina AT-X 124 AF PRO DX 12-24mm f/4 (IF)
CanonTokina AT-X 124 AF PRO DX II 12-24mm f/4 (IF)
CanonTokina AT-X 165 PRO DX 16-50mm f/2.8 (IF) ASPHERICAL
CanonTokina AT-X 535 PRO DX  50-135mm f/2.8 (IF)
CanonTokina AT-X M35 PRO DX 35mm f/2.8 Macro
CanonTokina AT-X M100 AF PRO D 100mm f/2.8 Macro
CanonTokina AT-X 116 PRO DX 11-16mm f/2.8
NikonTokina AT-X 124 AF PRO DX 12-24mm f/4 (IF)
NikonTokina AT-X 124 AF PRO DX II 12-24mm f/4 (IF)
NikonTokina AT-X 165 PRO DX 16-50mm f/2.8 (IF) ASPHERICAL
NikonTokina AT-X 535 PRO DX  50-135mm f/2.8 (IF)
NikonTokina AT-X M35 PRO DX 35mm f/2.8 Macro
NikonTokina AT-X M100 AF PRO D 100mm f/2.8 Macro
NikonTokina AT-X 116 PRO DX 11-16mm f/2.8
NikonNikon AF-S NIKKOR 85mm f/1.8G
NikonSigma 18-200mm F3.5-6.3 II DC OS HSM
LeicaLEICA APO-SUMMICRON-M 75 mm f/2 ASPH.
LeicaLEICA APO-SUMMICRON-M 90 mm f/2 ASPH.
LeicaLEICA APO-TELYT-M 135 mm f/3.4 ASPH.
LeicaLEICA ELMAR-M 24 mm f/3.8 ASPH.
LeicaLEICA ELMARIT-M 28 mm f/2.8 ASPH.
LeicaLEICA ELMARIT-M 90 mm f/2.8
LeicaLEICA MACRO-ELMAR-M 90 mm f/4
LeicaLEICA NOCTILUX-M 50 mm f/0.95 ASPH.
LeicaLEICA SUMMARIT-M 35 mm f/2.5
LeicaLEICA SUMMARIT-M 50 mm f/2.5
LeicaLEICA SUMMARIT-M 75 mm f/2.5
LeicaLEICA SUMMARIT-M 90 mm f/2.5
LeicaLEICA SUMMICRON-M 28 mm f/2 ASPH.
LeicaLEICA SUMMICRON-M 35 mm f/2 ASPH.
LeicaLEICA SUMMICRON-M 50 mm f/2
LeicaLEICA SUMMILUX-M 21 mm f/1.4 ASPH.
LeicaLEICA SUMMILUX-M 24 mm f/1.4 ASPH.
LeicaLEICA SUMMILUX-M 35 mm f/1.4 ASPH.
LeicaLEICA SUMMILUX-M 50 mm f/1.4 ASPH.
LeicaLEICA SUPER-ELMAR-M 18 mm f/3.8 ASPH.
LeicaLEICA SUPER-ELMAR-M 21 mm f/3.4 ASPH.
PentaxSigma 17-50mm F2.8 EX DC HSM
PentaxSigma 50-200mm F4-5.6 DC HSM
SonyTokina AT-X 116 PRO DX 11-16mm f/2.8
SonyTamron 18-200mm F/3.5-6.3 Di III VC B011
SonySigma 17-50mm F2.8 EX DC HSM
SonySigma 50-200mm F4-5.6 DC HSM
SigmaSigma 18-200mm F3.5-6.3 II DC OS HSM

Press release:
Innovative Shadow and Highlight Recovery and Enhanced Digital Photography Workflows Mark A Milestone Release
SAN JOSE, Calif. — March 6, 2012 — Adobe Systems Incorporated (Nasdaq:ADBE) today announced the availability of Adobe® Photoshop® Lightroom® 4 software for Mac OS and Windows. Lightroom is the essential digital photography workflow solution helping amateur and professional photographers quickly import, manage, enhance and showcase their images.
First released as a public beta in January 2012, the final version of Lightroom 4 is now available for US$149 for the full version and US$79 for the upgrade, providing an incredible value for photographers. Lightroom 4 introduces refined technology for superior shadow and highlight processing, ability to create photo books, additional local adjustment controls, and enhanced video support.
“Feedback from our customers is invaluable in developing Lightroom and the real trick to a great release is to combine these insights with Adobe’s unrivalled image processing innovation,” said Winston Hendrickson, vice president products, Creative Media Solutions, Adobe. “Lightroom 4 is a stunning new release that will enhance photography workflows and help photographs stand out from the crowd.”
New Features in Lightroom 4
Lightroom 4 is a major release, adding significant new capabilities and innovations. New adjustment controls maximize dynamic range from cameras, recovering exceptional shadow details and highlights. The software features new and improved auto adjustments to dynamically set values for exposure and contrast, and additional local adjustment controls including Noise Reduction, Moire and White Balance.
Lightroom 4 provides photographers the tools to create beautiful photo books with text controls and a variety of easy-to-use templates, as well as a direct link for photo book creation from within the new Book module. A new intuitive Map module displays images already assigned a location, provides location tagging and reverse geo-tagging controls and saved locations for easy assignment of a photographer’s common locations.
Now, native video support gives photographers the capability to play, trim and extract frames from video clips shot on DSLRs, point-and-shoot cameras and smartphones. Video-specific presets and many standard Lightroom image adjustment controls can be applied to video clips, and adjusted videos can be exported as a H.264 file or published directly to Facebook or Flickr*.
In the Develop module, presets fully utilize new processing technology and the addition of soft proofing helps photographers tune images in a destination color space to ensure content looks its best. In addition, customers can now email images directly from Lightroom using an email account of their choice.