Tip: Canon 5D MarkII - Video Locks Up/Freezing (Solution)

Did it ever happened to you?

Lately I've been having some issues with the 5D MarkII video recording mode and would like to share with you what I have figure out to solve, at least for now, these kind of problems.

If you're having the same problems read my story and maybe it could bring you some sort of a relieve.

This has been an issue that I tried to replicate before bringing it to the blog but it seems that is very unpredictable when video recording will Freeze or Locks Up that I cannot tell exactly what is going on.

What I can say is that it happens and I have already lost 3 pieces of important film recording that are lost forever. I did some interviews during the weekend for our brandy new HardHeavy TV and while doing a small cut intro the video recording stopped at 40s and a blinking info "Busy" on the Top LCD.

I've waited more than 5 minutes for it to process since a buffer bar was showing at the back LCD but nothing happened. The shutter was still open but nothing happened. The only way to stop it was to remove both batteries from the grip and the shutter will close. Of course that the video was lost and so the recording :(

Well I formatted the card since this was the beginning of the session and I thought maybe there is something with the card, by the way I was using a 8Gb Sandisk UltraIII 30MB/s, I then started to record the interviews and everything seemed OK by that time.

The first interview went sweet with a 3m40s piece over 640x480 resolution. we did not need more resolution so all things were done on 640 format to keep the video files small.

I went around the place and did some photos of the ambiance, arena, group shots, headbangers shots and some small video pieces to fill in cuts and other stuff for post production.

I returned to the backstage for another interview and that when all the problems started. The card was maybe at half full when I started to record another interview. Everything was going smoothly then suddenly at the middle of the interview the same screen appeared and the video stopped recording... man, there was a chill on my bones and I went from red to white in a sec.

I run a simulation at home and obtained the same results. Although the Lock Up/Freeze did not occur as frequently but sometimes it happened and I think this could be disastrous if you are with a client and the camera acts weird and you loose all those important video recordings :(

Here are some of those Lock Up/Freeze photos.

Tip: Canon 5D MarkII - Video Locks Up/Freezing (Solution)

The picture of the Frozen/Lock on the back LCD screen. You can still see the buffer on the right but I've waited so long and it never went down :(

Tip: Canon 5D MarkII - Video Locks Up/Freezing (Solution)

And the top LCD screen.

Tip: Canon 5D MarkII - Video Locks Up/Freezing (Solution)

You can see that the camera is switched off ;) and the screen is still available but frozen :(

Tip: Canon 5D MarkII - Video Locks Up/Freezing (Solution)

It only unlocks if you remove the battery, in my case, both batteries from the grip.

Tip: Canon 5D MarkII - Video Locks Up/Freezing (Solution)

I run this test several times and in the end I came to the conclusion that the problem is with the Sandisk Extreme III 8GB/30s card.

I also did a quick Google search and found this thread talking about the same problem and with the same conclusions.

I run a couple of tests with some older cards like the Sandisk Ultra II 2.0GB, Sandisk Extreme III 2.0GB, Sandisk Extreme III 4.0GB and with Transcend 4GB 120x, so far, with no errors, Lock Ups or Freezes and I've continuously recorded 30 minutes with each one.

WARNING SOLUTION: If you are using your 5D MarkII for video pay attention to the Sandisk Extreme III 8GB/30s as they can bring you some ours with no sleep.

So until Canon releases another firmware to correct this for these cards I will keep my eyes on those older cards.

...and YES it has happened with older firmware and now with version 1.1.0.

If you are having these kind of problems report them on comments so people could also share your experiences.

5D MarkII Firmware update 1.1.0 with Video Manual Controls


Well It's here!!!!

And right on the date they have announced it June the 2nd 2009.

While I'm writing this I'm making the update and will post some more new tomorrow but for now here goes what consists this update and what problems it addresses.

First you can get the Firmware update here at Canon web page.

And direct link to the PDF Manual file for the Manual Exposure on the movie mode.


Firmware changes


Firmware Version 1.1.0 incorporates the following improvements and fixes.

1. Includes a function to enable the manual exposure setting when shooting movies.

*When shooting movies in manual (M) mode, the shutter speed *1, the lens aperture value *2, and the ISO speed *3 can be freely set to allow a greater flexibility.

Notes:
*1 Shutter speed range: 1/30 sec. to 1/4000 sec.
*2 Lens aperture range: Maximum to minimum aperture value of the lens used
*3 ISO speed range:
Auto: ISO 100 to 6400 set automatically
Manual: ISO 100 to 6400, H1

2. *For details on how to use this function, please download the PDF files from the bottom of this page. Disables the function of the depth-of-field preview button when images are played back or when the menu screen is displayed on the LCD panel.

*There are indications that images being reviewed or the menu screen may suddenly disappear from the LCD panel. As this phenomenon may be caused by accidentally pressing the depth-of-field preview button, this firmware update disables the function of the depth of field preview to address this issue.

3. Fixes a phenomenon where the peripheral illumination of images cannot be properly corrected, even if the images were captured with the lens peripheral illumination correction function set to Enable.

*Firmware Version 1.1.0 fixes a phenomenon where peripheral illumination may not be properly corrected due the type of lens used and shooting conditions.

4. Fixes the algorithms of the Auto Lighting Optimizer function when Custom Function C.Fn II-3 Highlight tone priority is enabled.

*Digital Photo Professional software version 3.6.1 or later (for Windows and Macintosh) can be used to automatically correct the peripheral illumination of RAW and JPEG images that were captured in the Peripheral illumination correction setting with cameras that have Firmware Version 1.0.7 or earlier.

5. Fixes incorrect indications on the Arabic, Romanian, Spanish, and Ukrainian menu screens.

6. Changes the battery information displayed on the camera when using the optional Battery Grip BG-E6.

*If only one LP-E6 battery pack is installed in the Battery Grip BG-E6, the battery information for the empty battery slot shows the error message, Cannot communicate with battery. However, with this firmware update, this error message no longer appears, even if only one LP-E6 battery pack is installed.

First impression after install is that when you change the aperture you will hear the shutter opening and closing and that interferes with sound recording. So if you are trying to record something with sound I suggest an external microphone. Also for the speed you can ear the cracking of the dial.

It looks, at first impression, that the sound on the shutter is the same you ear on the G10 movie mode but amplified a couple of times.

I think people would still prefer to buy Nikon lenses with manual aperture values and use it here instead of this NOISY crack sound but time will tell.

My first opinion is that this feature is great but it's not a killer if you are going to use the camera to record sound from the built in microphone unless of course you are on loudly external events ;)

I also noticed that when you take a photo while shooting a movie the exposure settings (ISO, Aperture, Shutter Speed) set for the movie will be applied to the still photo instead of the previous firmware where you would have to take a photo with the settings the camera was using for video and sometimes they were not the ones you would like.

Now with Manual control mode you loose the possibility of AE Lock and Exposure Compensation.

Take a look at this small example video of the Shutter, Speed and ISO dial buttons sound I did this movie right after the firmware update so no bother comment on quality or content issues. It's just first test.

I will upload the video tomorrow since Vimeo is too slow and YouTube is updating it's database :(

Here is the Video watch it in HQ for better quality. Had to put it on YouTube since Vimeo still did not have it available by this time.


--- Updated ---

Just want to mention that I got a good external microphone that I used on my old Sony MD player and that it fits perfectly to the camera and can help you dealing with all those noise button cracks and clicks. I'm using the Sony ECM717 with great results.

Share your experiences with external microphones on comments.

--- End of Update ---

Tip: FREE EBook


Today I bring you a lot of tips and good information on this great EBook written by David D. Bush.

With lots of pictures, How to Master and capture great pictures with your DLSR.

Just see for yourself...


5D MarkII Video: Manual Controls Coming Soon

FINALLY!!!!
It looks like Canon will get it BIG,this time, let's hope so.

As soon as I got more news will let you guys know but for now here is today's official announcement.

Canon has announced a firmware update for its EOS 5D Mark II digital SLR enabling manual exposure when shooting videos. With the updated version, users will be able to manually adjust the shutter speed, aperture and ISO settings in the video mode. The new firmware will be available for download on 2 June 2009 from Canon's website.

Press Release:
Canon Enable Manual Exposure in Video on EOS 5D Mark II

LONDON, UK, 27th May 2009: Canon announced today it will release a firmware update for the EOS 5D Mark II allowing users to manually control exposure when shooting video. The new firmware will be available for download from 2 June 2009 on Canon Europe’s support web site.
Following the launch of the EOS 5D Mark II in September 2008, Canon’s Research and Development team has listened closely to customer feedback to develop additions to the camera’s movie recording functionality.

Allowing EOS 5D Mark II owners to achieve even more stunning video results with the camera, the firmware update will include the following manual controls when shooting video:

* Full aperture selection
* ISO speed: Auto, 100 – 6400 and H1
* Shutter speed: 1/30th – 1/4000th second

The EOS 5D Mark II integrates full HD movie capability into a high-end 21.1 Megapixel camera; opening a multitude of new possibilities for photojournalists and news photographers.
Since its launch the camera has proved its appeal to professionals working in diverse fields, from studio and wedding to nature and travel.

Now, following customer feedback, Canon has improved functionality for professional video users, further unleashing the potential of the EOS 5D Mark II for cinematographers and photographers alike.


Camera Raw 5.4 RC Available on Adobe Labs


Adobe has recently released a Release Candidate for their new Camera Raw.

As always this brings a lot of new cameras to the set and if you are using the Hasselblad series or the new Nikon D5000 this is a major for you.

Although this is only a Release Candidate but is very functional and the Hasselblad possibilities just rocks.

Check the ful article for the full list of new supported cameras.

The Camera Raw 5.4 Release Candidate is now available on Adobe Labs. The release includes new camera support for the following models:

* Canon EOS 500D (EOS Rebel T1i)
* Epson R-D1x
* Hasselblad CF-22
* Hasselblad CF-22MS
* Hasselblad CF-39
* Hasselblad CF-39MS
* Hasselblad CFH-22
* Hasselblad CFH-39
* Hasselblad CFV503
* Hasselblad CWD
* Hasselblad H2D-22
* Hasselblad H2D-39
* Hasselblad H3D-22
* Hasselblad H3D-31
* Hasselblad H3D-39
* Hasselblad H3DII-22
* Hasselblad H3DII-31
* Hasselblad H3DII-39
* Hasselblad H3DII-39MS
* Hasselblad H3DII-50
* Kodak EasyShare Z980
* Nikon D5000
* Olympus E-450
* Olympus E-620
* Panasonic Lumix DMC-GH1
* Sigma DP2

This release also includes new DNG Compatibility conversion options. These choices are explained on the Adobe Labs web site and help address the additional options available with an upcoming revision of the DNG Specification.

If you have feedback on this release please post a descriptive topic on the Adobe User to User forums.

DIY: Ball Bungee


It's been a while since I did not posted any news here on the blog but the boat has started to put some water and the holes need to be closed. Since there are so many holes to close it's taking a little bit longer to maintain Lighting Mods at full speed but I hope that soon it will be at full speed again.

I would like to thank you all for the kind words that has been arriving through the sooo many emails and for the numerous requests for some more DIY projects.

While you wait for more new stuff take a moment to go through the right side menus and check the other stuff, you may find something useful in there for your small strobes and maybe it could even help you out at some point.

THANK YOU readers for hanging out.

A lot of people been asking me where to get the Ball Bungees because not every corner have them available.

I decided that it was time to put out this inexpensive Do It Yourself (DIY) Ball Bungee project. I name it Ball Bungee as title for today's article, just as a reference, but the real name I call them is NUT BUNGEE.

Sounds a little like what I feel sometimes... but it fits it's purposes and that's what matters.

Let's begin by explaining what are these Ball Bungees and what they are useful for.

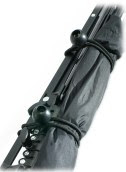
They are loops of a thin elastic rope whose nodes ends on a plastic ball. With this Ball Bugees you can, not only stretch tight schedule, but they are simply a versatile tool to fix things together. I use it for a lot of different purposes and one of them is secure the umbrella to the light stand for a much easier way to carry them both.


Unfortunately, buying these loops are not offered in Portugal like in so many other countries. So I decided to create a simple, but with lot's of images, DIY project so you can create yours in a blink of an eye.


First you need to move your body to a hardware store near you and search for these next items:

DIY: Nut Bungees 001

Elastic rope with 4mm or 6mm. I do prefer the 4mm and let you know why later on, but you can always make these with any thickness and color you like.

Next we go NUTS!!!!!

DIY: Nut Bungees 002

Thickness M8 or a M10 size nut depending on the thickness of the elastic rope you have chosen for your project.

DIY: Nut Bungees 003

I also bought some M12 just in case the 6mm elastic rope would not fit inside the M10.

DIY: Nut Bungees 004

So let's take a closer look at what you really need:


- Elastic rope about 1 meter or more, depending how many you would like to make.
- Nuts M8 or larger, depending on the thickness of the rubber rope.
- Scissors.
- Lighter.
- Ruler or Metric Tape.

DIY: Nut Bungees 005
DIY: Nut Bungees 006

These are 2 different Original Ball Bungees with different sizes to tight different things.


Now that we have what we need let's begin...

DIY: Nut Bungees 007

I'm cutting the 6mm Elastic Rope with a 40cm long to produce a 20cm Nut Bungee, so if you need to make a longer one just cut it more, simple as that.

DIY: Nut Bungees 008

Now you understand why the lighter ;) So in order for the tips would not come apart is better to burn them a little so that the elastic would not unweave itself.

DIY: Nut Bungees 009

Here it is burned but not toasted.

DIY: Nut Bungees 010

Now let's grab the 6mm Elastic Rope and put the both ends through the tiny Nut hole with the help of the scissors (this sounds like weird but it's not... hole, nuts, nut, hole... well simple), let's move on.

DIY: Nut Bungees 011

UFFFF!!!! DONE!!! The 6mm is very thick and difficult to tight the not so that's why I prefer the 4mm Elastic Rope. They also make the job done and for the small strobes are perfect unless you are trying to tighten together heavy stuff.

DIY: Nut Bungees 012

This is what it should look like in the end.

DIY: Nut Bungees 014

This is something I was searching through the shells and found interesting so I bought it to test if was really cool. And in the end it does :)

What is it, you may ask?

It's a cover for the 10M Nuts with this you can cover your Nuts (uppsss!!) your Screws, well not that a... hum!! well this writing is a different lead. STOP STOP STOP REWIND!!!!!

So, as I was saying this is a cover to conceal the Nuts and this way they would not be banging on your stuff while in the bag. Unfortunately I only saw for the M10 Nuts, maybe they will have it somewhere else. Anyway I will give you an idea of what I'm talking about.

DIY: Nut Bungees 015

This is the box where they came in.

DIY: Nut Bungees 016

See what I mean? To cover the Nuts, just that :)

DIY: Nut Bungees 017

Since they do not have a hole in the back end one need to be made.

DIY: Nut Bungees 018

So grab the scissors and make a nice hole that corresponds the size of the Elastic Rope thickness you have.

DIY: Nut Bungees 019

This is what it should look like in the end.

DIY: Nut Bungees 020

Put it through the Elastic Rope right before you put the Nut.

DIY: Nut Bungees 021

Then make a loop knot at the end and you have your Nut Bungee ready to use.

DIY: Nut Bungees 022

That's it. I also made a bigger ones with the small Elastic Rope just in case I need them bigger than my originals.

DIY: Nut Bungees 023

An example of what you can use them for.

DIY: Nut Bungees 024

Another example of what you can use them for.

DIY: Nut Bungees 025

You can even use them to hold your strobes either together or against something. Just use your imagination.

If you prefer you can always get original ones at FlashGels in the U.K. Just tell them you are coming from Lighting Mods for a discount ;)

Hope you enjoy this DIY and see you again soon.

Lighting Mods - WSPT09 ABERTAS INSCRIÇÕES

Lighting Mods PT WS 09
JÁ ESTÃO ABERTAS AS INCRIÇÕES.

WORKSHOPS PARA MAIO 2009 (Zona de Lisboa).

Nivel 1 - Iniciado – 21 de Maio de 2009 (Quinta Feira) 19h30-22h30
Nivel 2 - Intermédio – 24 de Maio de 2009 (Domingo) 10h00-13h00 / 14h00-18h00

Os conteudos e valores encontram-se disponiveis em Português para Portugueses nos seguintes links;)

Nivel 1 - Iniciado (Download pdf)

(3 Horas – Max. 10 pessoas)

Esta formação está direccionada para quem deseja adquirir conhecimentos básicos de fotografia com Flashes Portateis mesmo sem noções de iluminação com os mesmos.

- Noções de Flashes Portateis e suas utilidades quer seja na camera ou fora dela.

- Equipamentos e acessórios para Flashes Portateis:
a) Que Flashes Portateis podemos usar e como.
b) Conceitos de ligações do flash com a camera.
c) Como montar o seu equipamento de flash portatil.
d) Modificadores da luz para o flash.
e) Outros Acessorios; Como fazer “DIY” os seus ou Onde comprar.

- Noções de iluminação com Flashes Portateis:
a) Diferentes tipos de luz e iluminacões possiveis.
b) Noções das diversas aplicações práticas.

- Exemplos, com visionamento e explicação de imagens, de diferentes iluminações com Flashes Portateis:
a) Diferenças entre a luz produzida pelo flash na camera e fora dela.
b) Luz Cruzada (1 Flash Portatil cruzado com outra fonte de luz).
c) Sombrinha com um Flash Portatil.
d) Utilização de alguns acessórios complementares, Snoot e Grid, para modificação e controlo da luz.
- Perguntas, Respostas e Esclarecimento de Dúvidas.

Valor do Workshop Iniciado: 60,00€

Nivel 2 - Intermédio (Download pdf)
(6 Horas – Máx. 9 Pessoas)

Esta formação está direccionada para quem deseja aprofundar os seus conhecimentos de fotografia com Flashes Portateis e que já possua algumas noções de iluminação com os mesmos.

- Identificação de Flashes Portateis e acessórios:
a) Equipamento.
b) Ligações do Flash com a camera.
c) Acessorios.

- Como controlar e dominar o Flash Portatil:
a) Relação entre Potencias/Flash/Abertura/Velocidades.
b) Uso Manual do Zoom do Flash Portatil.
c) Sincronismo do Flash Portatil com a camera, diferentes maneiras e técnicas de o superar.
d) Abordagem aos Modos do flash portátil.
e) Posicionamento do flash em relação ao assunto e sua influência directa.

- Uso prático do flash na Iluminação com Flashes Portateis:
a) Conceitos de diferentes tipos de luz e iluminações possiveis.
b) Como controlar o Flash Portátil com a luz ambiente.
c) Distancias Vs Tipo Vs Tamanho da Luz.
d) Tipos de luz (Luz Dura, Luz Suave e Luz Reflectida).
e) Tipos de Restrições de Luz.

- Diversos Exemplos de como identificar e superar as dificuldades mais comuns no uso dos flashes portateis.

- Prática de iluminação com exemplos de alguns setups:
a) Como utilizar correctamente a Luz Cruzada (1 flash portatil cruzado com uma ou várias fontes de luz).
b) Utilização correcta da Sombrinhas com o flash portatil.
c) Utilização de acessorios complementares para modificação e controlo da luz do flash portatil.
d) Balancear luz com paredes e tecto.
e) Manuseamento e Utilização da Luz Dura.
f) Utilização de Gel de correção de temperatura no flash para corrigir a luz ambiente e/ou balanço de brancos e criar ambientes.

- Perguntas, Respostas e esclarecimento de Dúvidas

Valor do Workshop Intermédio: 125,00€

Nivel 3 - Avançado I (Download pdf)
(8 Horas – Min. 6 - Máx. 9 Pessoas)

Breve apresentação do equipamento de Flash Portatil e algumas duvidas existentes quanto ao mesmo.

As aulas praticas terão a presença de modelos, maquilhagem e styling para que haja uma dinâmica em cada uma das fotos produzidas.
Depois dos setups mencionados será criado um conceito “Projecto” que os alunos terão que resolver em 20 minutos de forma sincronizada e em equipa.

Manha – 09h00 – 13h00
- Setup com uma fonte de luz (Luz Suave sombrinha).
- Setup com duas fontes de luz (Luz Cruzada).

Tarde – 13h30 – 17h30
- Setup Luz dura ou directa no assunto.
- Setup com luz controlada (Snoots, Gobos e Grids).
17h30 – 18h30
- Projecto.
- Análise do trabalho produzido.
- Perguntas e Respostas

As incrições para os módulos avançados só podem ser efectuadas após frequência do módulo Intermédio.

Valor do Workshop Avançado I: 150,00€

Nivel 4 - Avançado II (Download pdf)
(8 Horas – Min. 6 - Máx. 9 Pessoas)

Breve apresentação do equipamento de Flash Portatil e algumas duvidas existentes quanto ao mesmo.

As aulas praticas terão a presença de modelos, maquilhagem e styling para que haja uma dinâmica em cada uma das fotos produzidas.
Depois dos setups mencionados será criado um conceito que os alunos terão que resolver em 20 minutos de forma sincronizada e em equipa.

Manha – 09h00 – 13h00
- Setup com Posicao/ Angulo / Distancia / Tamanho.
- Setup com uso de Gelatinas.

Tarde – 13h30 – 17h30
- Setup com várias fontes de luz e modeladores.
- Setup fotografia de grupo.

17h30 – 18h30
- Projecto.
- Análise do trabalho produzido.
- Perguntas e Respostas

As incrições para os módulos avançados só podem ser efectuadas após frequência do módulo Intermédio.

Valor do Workshop Avançado II: 150,00€

FICHA DE INSCRIÇÃO

Os workshops são ministrados e acompanhados pelos fotografos profissionais Rui M Leal e Carlos Rodrigues.

Mais informações através do email wsflashportatil@gmail.com

Videos Brussels & Paris
Brussels part 1
Brussels part 2
--//--
Paris part 1
Paris part 2

Grupos de Conversação disponiveis no Flickr:

Lighting Mods WS PT

Strobist Portugal

Adiciona-te.

Tip: Don't Loose Your Focus!!

Using the gear at Moda Lisboa

How many times lack of focus and not knowing what to do next will block your mind from doing what you really like?

Today I just wanted to share with you this wonderful video as part of your growing photographer experience. Not that the video has anything to do with photography, on the contrary it has a lot of human reactions to what may not seem too obvious.

Many times, on my assignments, I lack inspiration to create better images than my previous ones. Maybe because I'm always pushing my cyclops eye into the unknown or even worst letting others judge the work I do causing some lost of focus and objectivity.

Sometimes we are so influenced by what others judge on our work that we do not give it credit, maybe we could not accomplish some objectives just by thinking we are older, shorter, thinner or maybe even fatter.

Come on people... put your head up and keep your track and everything will come it's way.

Just as an example of what I'm trying to put through this Tip is on the video bellow where Susan Boyle gives a demonstration of how appearances may not lead into a dreadful end.


Although this video does not have any technical or photographic content I was so impressed with it that I decided to share it with you. Think of it as a positive thinking for your photography breakdowns.

Believe in Yourself!!!!!

Lighting Mods - Workshops PT 2009 SOON-BREVEMENTE

Lighting Mods PT WS 09
Lighting Mods - Workshops 2009

Will be Available, SOON, the calendar and contents in Portuguese by and for Portuguese ;)

Level 1 - Basic
Level 2 - Intermediate
Level 3 - Advanced Lighting 101
Level 4 - Advanced Lighting 102

For the moment for more information's please contact me directly.

Thank you

Rui M Leal

--//--

Estarão, BREVEMENTE, publicados aqui o calendário dos Workshops para 2009 e os respectivos conteudos disponiveis em Português para Portugueses ;)

Nivel 1 - Iniciado
Nivel 2 - Intermédio
Nivel 3 - Avançado Lighting 101
Nivel 4 - Avançado Lighting 102

De momento para mais informações e inscrições contactem-me directamente.

Rui M Leal

Videos Brussels & Paris

Brussels part 1
Brussels part 2

Paris part 1
Paris part 2

Grupos de Conversação disponiveis no Flickr:

Lighting Mods WS PT

Strobist Portugal

Adiciona-te

Tip: Why Shoot Raw?

Many of you been asking on what format I'm taking my pictures and the answer is very simple.

I use only RAW format, well maybe sometimes Raw+Jpg when I need fast delivery on the images, otherwise I use only RAW format.

It gives me the possibility of having more control over your images without having degradation while save it over and over and over.

I found this video by hadto titled "Generation Loss" that shows exactly what I'm talking about.

Keep reading for video...


You take a normal JPG image from your files and open the last saved jpeg image, then you Save it as a new JPG/Jpeg image with slightly more compression and repeat the process 600 times and this is what you will get.

Watch the video

Generation Loss from hadto on Vimeo.

And you what are you shooting Raw or Jpg?... why so?

FREE?, Something to Think About

This video of Harlan Ellison "Pay the Writer" it applies also to photographers.

How do you feel about this? Did it ever happen to you and what did you do?

What do you feel about the Coldplay contracts signed prior the bad's show?

Take a look at the article about this here.

Share your comments...

Adobe Photoshop Lightroom 2.3 and Camera Raw 5.3 Final


Lightroom 2.3 and Camera Raw 5.3 have graduated from Adobe Labs and are now available as final releases on Adobe.com.(UPDATE: Use this link to download the new language versions of Lightroom ) These updates include camera support for the following models:(Previously provided in the release candidates of these updates)

* Nikon D3X
* Olympus E-30

This update also includes preliminary support for the recently announced Epson R-D1x (and R-D1xG).

The Lightroom 2.3 update includes several bug fixes.

FIXES originally provided in the Lightroom 2.3 Release Candidate

* In the Windows 64-bit version of Lightroom an sFTP upload process could cause Lightroom to crash.
* Slideshows could return to the first image randomly during playback.
* A memory leak could cause Lightroom to crash while attempting to process files with local adjustments.
* Canon EOS 5D Mk II sRAW files could process with artifacts in Lightroom 2.2.
* Lightroom 2.2 could cause disc burning to fail for Windows customers.

FIXES new to the final version of Lightroom 2.3

* Attempting to undo(CTRL-Z) a single step in Lightroom 2.2 on Windows could cause a series of previous actions to be undone.

Lightroom 2.3 now provides language support for the following additional languages:
(UPDATE: It indicates a trial version but it's identical to what we're now shipping from the Adobe.com Store for this new version. Since technically these versions didn't exist before there was no place to put them on the Update page.)

* Chinese (Simplified)
* Chinese (Traditional)
* Dutch
* Italian
* Korean
* Portuguese (Brazilian)
* Spanish
* Swedish

Adobe Photoshop Lightroom 2.3 Direct Download Links (Mac - PC)

Adobe Camera Raw 5.3 Direct Download Links (Mac - PC)

Tip: DVD's You Must Have (Part 2)

DVD's You Must Have
After waiting for a few weeks on some mail sent to Mr. Zack Arias concerning the use of some more info and photos from the DVD I got no answer so I decided to publish what I have on both DVD's and try not infringe too much copyrighted information.

This is part 2 of the DVD's You Must Have and if you have missed the first one here is the link to where you can find Part 1. DVD's You Must Have (Part 1)

Just follow me...

I believe that some of the good tools to get your photography skills improved are taking pictures, read lot's of photography books and related, sharing skills with other photographers and DVD's.

Today I bring you another one of my favorite from the collection I already own.

It's called "OneLight Workshop" by photographer Zack Arias.

This DVD caught my attention because of the OneLight concept I was trying to accomplish and quite few people have talked about it in such a deep and detailed way.

But why? - you may ask.

Well simply because I always carry my small portable strobe with me while I'm on assignments and because I wanted to try different photo approaches but lacked the ideas.

I've been following Zack Arias blog for quite some time now and did not hesitate on getting his DVD when it was released.

The Zack blog thing started with his wonderful "White Seamless Tutorial" have you read it? It may change the way you look and create a white seamless picture. Take a peak ;)

For those who do not know MR. Zack Arias here is a small introduction taken from his own blog:

"My name is Zack Arias and I am a full time editorial photographer.

My specialty is niched in press and publicity photography for the music industry. As my music work continues to expand nationally, my studio in Atlanta works within a wider spectrum of the entertainment industry producing headshots and fashion portfolios.

My first run at being a freelance photographer left me heavily in debt and placed my family on the edge of destruction. I came to a place in my career that required me to put the cameras down and take a “job.” After two years of leaving the cameras and selling them off to pay rent and fix beater cars, I was given a chance to come back as a second shooter for a friend of mine who shoots weddings. I took a D100 that he bought me, a 285 flash, an ample amount of faith, and quit my job at Kinkos in October of 2003. I was determined to do things differently this time around..."

You can find his works here:
Music Photography by Zack Arias
Headshots by Used Film Studios
The OneLight Workshop

This 2 DVD pack has a lot of goods inside the card box pack that came on the post.

Here is what I found inside when I open it...

OneLight Workshop DVD_Package

This is the full package :)

Inside the card box package you will find:

- 6 Stickers
- 2 DVD with lots of information
- 1 Black T-Shirt with OneLight Workshop white logo
- 1 music CD from the band Meghan Coffee "Songs to Sail By". For more information about this band you can always check their page in here.
- 1 Instructions Booklet with 18 pages.

OneLight Workshop DVD_Inside

Inside the DVD box package you can find:
A detail of the Booklet with some basic information and more tips.

OneLight Workshop DVD_Booklet

Inside the DVD box package you will find:

- 2 DVD with lots of video information.
- 1 Instruction Booklet to guide you with some basic information and more tips.

On the first DVD Zack shows you how exposure variables work.

How Shutter Speed controls the ambient exposure with pictures to illustrate what he's talking about. Range goes to 250th to 4th with simple and illustrative examples.

Zack talks clearly and it's not those kind of videos where at middle of the lesson you're opening your mouth and tired of what the tutor tries to explain you... remember those boring school days with that lousy teacher?... well this has nothing to do with it, it's the complete opposite.

He also talks about Flash Power and explain how you can get consistent flashes and amount of light with the explanation of 1/1 scale to the 1/128 on your flash and this is full of diagrams and examples so you can see what he's talking about in a simple manner.

Then you will have a talk about aperture controls and ISO and how they will affect your photo shootings.

Next come the gear.

Zack talks about what gear he carries around, flashes and accessories.

Flashes are explained from the simple hot-shoe flash to a more powerful studio flashes. You will get to know how you can assemble the gear and also the ways to trigger your flashes wireless, light modifiers, umbrellas and softboxes.

Back in the studio you start to see how you can apply all the things you have learned so far and this is done with a model.

Zack explains all details on how to start with the client, shoot with small on camera strobe, off-camera and compare them.

You will see the pictures taken during this shooting has he explains what is going on with ISO, Aperture and why he chooses that light or position. You imagine yourself having a personal workshop with Zack.

As the 1st DVD is coming to an end is time to move outside and use the model with softbox and umbrella and compare the differences. Zack, at some point, will be shooting against the sun and some more great techniques that will help you outside.

On disc 2 you will go travel with Zack Arias through his client shootings around several setups and this is more of a follow up DVD with lot's on hands on the job.

You can watch Zack talking while choosing this or that setup or light and follow him on this journey through all his assignments.

He does a great job explaining why he has chosen this or that location, spot, light and sends some great tips.

I think this is a must have DVD. If you do not have what are you waiting for???

You can take a look at this small presentation video from DVD package:


And if you are lucky enough to catch one of his workshops... Man you ARE LUCKY!!!

What are people saying about his workshops:


The DVD Box can be ordered at:
OneLight Workshop web page and check out Zac Arias blog for more tips.

Before you go just take a moment to see this brilliant video made by Zack Arias himself:


For more information here are the direct links to his pages:

Web Page: http://www.zackarias.com/
DVD: http://www.onelightworkshop.com/
Blog: http://www.zarias.com/

THANK YOU MR.ZACK ARIAS for sharing this information with all of us.

Tip: DVD's You Must Have (Part 1)
Tip: DVD's You Must Have (Part 2)

Canon Powershot G10 Firmware Updated


Canon has updated the Powershot G10 firmware to a newer version 1.0.2.0.

This addresses the Phenomenon:

If RAW images are captured by continuous shooting under the ISO 1600 setting, abnormal data is recorded and a magenta cast appears in the second and subsequent RAW images. This phenomenon also occurs in the second and subsequent recorded RAW images captured by single shooting, but only if the LCD monitor display mode is set to the OFF position.

This phenomenon cannot be confirmed when images are played back on the camera's LCD monitor. It can only be confirmed if image processing software (such as the Digital Photo Professional software bundled with the product) is used to develop RAW images on a PC.

Read the full article for more about this, what cameras are affected and where to download it from.

The following content is to help you update the firmware by yourself. If errors occur when performing the firmware update, there are instances where the camera cannot be started; therefore, please read the precautionary notes carefully before starting the firmware update.

In addition, this firmware update can also be performed at our service centers. If you wish to have us perform the firmware updates, please contact our service centers.

Firmware Update (Version 1.0.2.0)

This firmware update corrects the following phenomenon.

Phenomenon:

If RAW images are captured by continuous shooting under the ISO 1600 setting, abnormal data is recorded and a magenta cast appears in the second and subsequent RAW images. This phenomenon also occurs in the second and subsequent recorded RAW images captured by single shooting, but only if the LCD monitor display mode is set to the OFF position.

This phenomenon cannot be confirmed when images are played back on the camera's LCD monitor. It can only be confirmed if image processing software (such as the Digital Photo Professional software bundled with the product) is used to develop RAW images on a PC.

Note

* Images that have the magenta cast phenomenon cannot be fixed.
* The phenomenon only appears in RAW images, and does not appear in JPEG images or images appearing on the LCD monitor display.
* The phenomenon only occurs if the ISO Speed Dial is set to ISO 1600 manually, and does not occur if the ISO speed is set to other values (such as ISO AUTO or ISO HI).

Identifying Affected Cameras for the Update

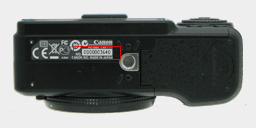
Please check the serial number on the bottom of the camera.

Serial numbers

Products whose fifth digit from the left is 0 or 1 are affected.

****0*****
****1*****


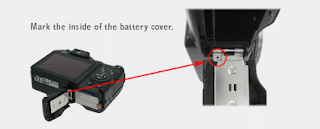
Among products with the serial numbers described above, if there is a marking inside the battery cover like the one in the image below, the issue has already been corrected by correction firmware, and you may continue to use your camera as is with no further action required.

Marking Position

In addition, products whose fifth digit from the left is 2 or above are already equipped with correction firmware; therefore, this phenomenon does not apply.


Items Required for Firmware Update

The following items are required for this firmware update.


1 - PowerShot G10 Camera
2 - Computer* (USB interface required)
3 - Battery (Bundled with the camera)
4 - USB Interface Cable (Bundled with the camera)
5 - Memory Card (Commercially available SD memory card with a capacity of at least 8 MB)
6 - Firmware Update Data (Can be downloaded if the camera is determined as affected after the serial number is entered).
7 - Firmware Update Procedure (PDF) (Can be Downloaded)

* OS installed on the computer: Windows® XP/ Windows VistaTM, Mac OS X (v10.4-10.5)

Customers who do not have any of the items 2 to 5 are asked to contact Canon service centers.

Outline of the Firmware Update Procedures

To update the firmware, the following procedures are required.

1. Downloading and extracting the firmware update data
2. Preparing the memory card for the firmware update
3. Updating the firmware
4. Confirming the completion of firmware update

In addition, details of the procedures above are covered by the Firmware Update Procedure (PDF). Read the Firmware Update Procedure (PDF) carefully before updating the firmware.

GO TO DOWNLOAD PAGE
(You will need to enter your serial)


Final notes:

You have to pay attention to the way the firmware is uploaded to the camera. Canon with the Powershot G10 model decided to change the way firmware were updated.
So now instead of copying the file directly to the card you will have to connect the computer (PC or MAC) and the camera with the supplied USB cable and use the software to copy the firmware update file to the card on the camera (make sure you formatted the card first).

Then you will have to start the camera on preview mode and choose the firmware update menu item (you cannot have the lens extended or this menu item will not show up).

Just made mine today with no problems and my camera was one of the affected but I've never saw or identified this Phenomenon. But if Canon says it's to update then it's time.

I was hopping to see some improvements on video (GIVES US BACK the 1024 of the G9!!!) or maybe the reappearance of time lapse feature but nothing... this simply corrects what it's mentioned here.

Maybe we will all have better luck next time who knows...

Tip: Interview with Copyright Attorney Ed Greenberg

This great video came into my attention and I think it's worth while and spare some of your time to watch it full.

Just click on the image below to take you to the PhotoshopUserTv video and watch this great Interview with Ed Greenberg conducted by Scott Kelby.

It's a must in copyright advices.